background image

84

S VIDEO

VIDEO

AUDIO

IN

AUDIO/
VIDEO

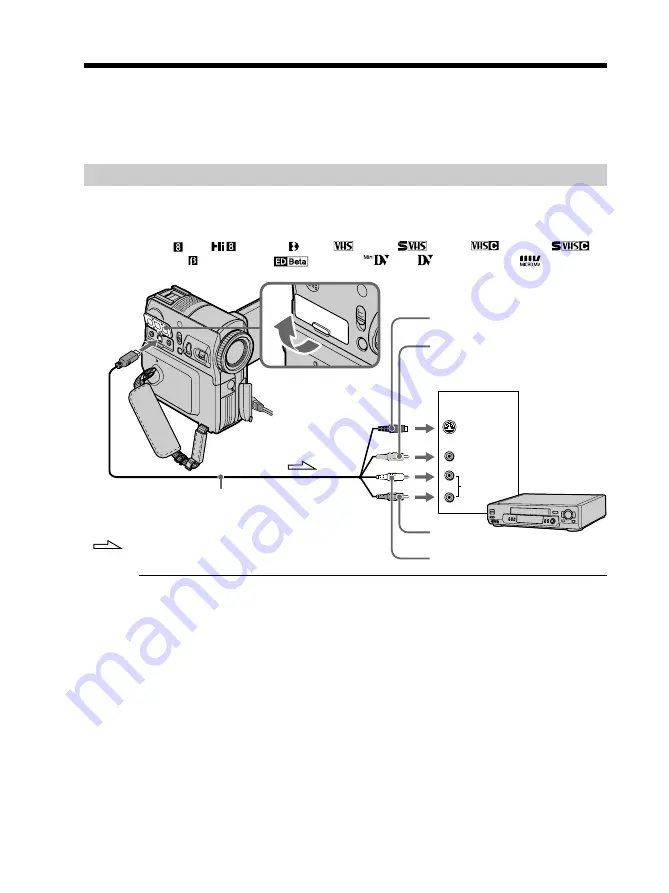
You can dub or edit on the VCR connected to your camcorder using your camcorder as
a player.
You can connect either the A/V connecting cable (supplied) or i.LINK cable (optional).
If you connect with the i.LINK cable (optional), video and audio signals are transmitted
in digital form for high-quality editing.

Connecting

With the A/V connecting cable

You can edit on VCRs that support the following systems

8 mm  , Hi8 

, Digital8  , VHS 

, S-VHS 

, VHSC 

, S-VHSC 

,

Betamax  , ED Betamax 

, mini DV 

, DV 

 or MICRO MV 

— Editing —

Dubbing a tape

A/V connecting cable (supplied)

Yellow

White

Red

: Signal flow

VCR

Black

When using the A/V connecting cable

The supplied A/V connecting cable is equipped with an S video plug and a video plug.
Use either the S video plug or the video plug depending on the VCR. See page 48 for
details of the S video jack.

If your VCR is a monaural type

Connect the yellow plug of the A/V connecting cable to the video input jack and the
white or the red plug to the audio input jack on the VCR. When the white plug is
connected, the left channel audio is output, and when the red plug is connected, the
right channel audio is output.

Summary of Contents for DCR PC105 - Handycam Camcorder - 1.0 MP

Page 1: ...tain it for future reference Owner s Record The model and serial numbers are located on the bottom Record the serial number in the space provided below Refer to these numbers whenever you call upon your Sony dealer regarding this product DCR PC105 Digital Video Camera Recorder Model No DCR PC105 Model No AC Serial No Serial No ...

Page 2: ...tended to alert the user to the presence of important operating and maintenance servicing instructions in the literature accompanying the appliance For customers in the U S A and CANADA CAUTION TO PREVENT ELECTRIC SHOCK MATCH WIDE BLADE OF PLUG TO WIDE SLOT FULLY INSERT RECYCLING LITHIUM ION BATTERIES Lithium Ion batteries are recyclable You can help preserve our environment by returning your used...

Page 3: ...n outlet on a circuit different from that to which the receiver is connected Consult the dealer or an experienced radio TV technician for help The supplied interface cable must be used with the equipment in order to comply with the limits for a digital device pursuant to Subpart B of Part 15 of FCC Rules For customers in the U S A If you have any questions about this product you may call Sony Cust...

Page 4: ...ed on a Memory Stick p 144 Viewing moving pictures recorded on a Memory Stick p 147 Capturing images on the computer Viewing moving pictures recorded on a tape using the USB cable p 173 Viewing images recorded on a Memory Stick using the USB cable p 181 186 Capturing images on a computer from your camcorder using the USB cable p 175 176 Converting an analog signal into digital to capture images on...

Page 5: ...etting is OFF To zoom greater than 10 select the digital zoom power in D ZOOM in the menu settings Fader p 57 Picture effect p 60 76 Digital effect p 61 77 Title p 106 MEMORY MIX p 128 Functions for giving a natural appearance to your recordings PROGRAM AE p 64 SPORTS LANDSCAPE Manual focus p 68 Spot Focus p 70 Functions for using after recording End search Edit search Rec Review p 40 Data code p ...

Page 6: ...elf timer recording 51 Adjusting the white balance manually 53 Using the wide mode 55 Using the fader function 57 Using special effects Picture effect 60 Using special effects Digital effect 61 Using PROGRAM AE 64 Adjusting the exposure manually 66 Using spot light metering function Flexible Spot Meter 67 Focusing manually 68 Using spot focus function Spot Focus 70 Interval Recording 71 Frame by f...

Page 7: ... DELETE 155 Writing a print mark Print mark 158 Changing the image size Resize 159 Viewing Images with your Computer Viewing images with a computer Introduction 160 Connecting your camcorder to a computer using the USB cable For Windows users 163 Viewing pictures recorded on a tape on a computer USB Streaming For Windows users 173 Viewing images recorded on a Memory Stick on a computer For Windows...

Page 8: ...f the cassette back to insert the cassette Insert the cassette straight as far as possible into the cassette compartment with the window facing up 3Close the cassette compartment by pressing on the cassette compartment After the cassette compartment goes down completely close the lid until it clicks How to hold your camcorder Connect the plug with its v mark facing the grip belt Open the jack cove...

Page 9: ... the LCD panel is closed pull out the viewfinder placing your eye against the eyecup Adjust the viewfinder lens to your eyesight p 34 1Set the POWER switch to VCR while pressing the small green button 3Press of the touch panel to start playback Note When using the touch panel press operation buttons lightly with your finger supporting the LCD panel from the back side of it Do not press the LCD scr...

Page 10: ...ide Recording on a Memory Stick Connecting the power cord Use the battery pack when using your camcorder outdoors p 15 Open the jack cover Connect the plug with its v mark facing the grip belt Access lamp 1 2 3 How to hold your camcorder Hold the camcorder putting your wrist through the belt and your fingers lightly on the finger rest p 21 Insert a Memory Stick in the Memory Stick slot as far as i...

Page 11: ...anel The picture appears on the screen 2Set the POWER switch to MEMORY while pressing the small green button Make sure that the LOCK switch is set to the right unlock position Do not pick up your camcorder by the parts illustrated LOCK MEMORY CAMERA VCR CHG OFF POWER When you purchase your camcorder the clock is not set up yet If you want to record the date and time for a picture set the clock bef...

Page 12: ...a cassette with Cassette Memory Cassettes with Cassette Memory have the Cassette Memory mark Note on TV color systems TV color systems differ depending on the country or region To view your recordings on a TV you need an NTSC system based TV Copyright precautions Television programs films video tapes and other materials may be copyrighted Unauthorized recording of such materials may be contrary to...

Page 13: ... affect the recording in any way Do not let your camcorder get wet Keep your camcorder away from rain and sea water Letting your camcorder get wet may cause your camcorder to malfunction Sometimes this malfunction cannot be repaired a Never leave your camcorder exposed to temperatures above 60 C 140 F such as in a car parked in the sun or under direct sunlight b Be careful when placing the camera ...

Page 14: ... Remote Commander p 234 A button type lithium battery is built in 5 Memory Stick p 112 Contents of the recording cannot be compensated if recording or playback is not made due to a malfunction of the camcorder storage media etc 9 1 5 6 2 7 3 8 4 6 USB cable p 160 7 CD ROM SPVD 010 USB Driver p 164 8 Cleaning cloth p 222 9 Battery terminal cover p 15 The rechargeable battery pack NP FM30 supplied w...

Page 15: ...ding the BATT battery release lever in the direction of the arrow 1 slide the battery terminal cover in the direction of the arrow 2 2 Slide the battery pack down until it clicks To remove the battery pack Remove the battery pack while sliding the BATT battery release lever 1 Step 1 Preparing the power source BATT release lever 2 1 2 ...

Page 16: ...ur camcorder to the DC IN jack with the v mark on the DC plug facing the grip belt 3 Connect the power cord to the AC Adaptor 4 Connect the power cord to a wall outlet 5 Set the POWER switch to OFF CHG The CHARGE lamp lights up when charging begins After charging is completed the CHARGE lamp goes out full charge After charging the battery pack Disconnect the AC Adaptor from the DC IN jack on your ...

Page 17: ...ut off the power While charging the battery pack the battery CHARGE lamp flashes in the following cases The battery pack is not installed correctly Something is wrong with the battery pack PRECAUTION The set is not disconnected from the AC power source house current as long as it is connected to the wall outlet even if the set itself has been turned off Charging time Approximate minutes at 25 C 77...

Page 18: ...he LCD panel closed Recording time Recording with the viewfinder Playing time on the LCD screen Approximate minutes when you use a fully charged battery pack Approximate recording time when you repeat recording start stop zooming and turning the power on off The actual battery life may be shorter Playing time Approximate minutes when you use a fully charged battery pack Note Approximate recording ...

Page 19: ...is the available recording time when the LCD BACKLIGHT switch is set to ON Note The BATTERY INFO indicator may not appear in the following cases The battery pack is not installed Something is wrong with the battery pack The battery pack is fully discharged Battery Info The number displayed as Battery Info is the approximate recording time While the remaining battery time is being calculated CALCUL...

Page 20: ...tery pack p 16 Connecting to a wall outlet The AC Adaptor can supply power from a wall outlet even if the battery pack is attached to your camcorder The DC IN jack has source priority This means that the battery pack will not supply any power if the power cord is connected to the DC IN jack even when the power cord is not plugged into a wall outlet ...

Page 21: ...he grip belt as a wrist strap 1 Open the hand pad Unfasten the belt from the clasp and pull out the belt from the hand pad 2 Pull out the belt from the strap ring and feed the belt through the clasp again 3 Feed the belt through the belt adjuster and close the hand pad Notes Hold the camcorder putting your wrist through the belt and your fingers lightly on the finger rest The hand pad can be remov...

Page 22: ...22 Step 2 Adjusting the grip belt 1 2 3 Belt adjuster Strap ring Hand pad ...

Page 23: ...A or MEMORY unless you set the date and time If you do not set the date and time and are recorded on a tape or a Memory Stick as the data code If you do not use your camcorder for about 3 months the date and time settings may be unset bars may appear because the built in rechargeable battery installed in your camcorder will have been discharged p 223 In this case charge the built in rechargeable b...

Page 24: ...tep 3 Setting the date and time To return to FN Function Press EXIT Note on the time indicator The internal clock of your camcorder uses a 12 hour cycle 12 00 AM stands for midnight 12 00 PM stands for noon ...

Page 25: ...en touch the LCD screen lightly to make it appear You can control the display with DISPLAY BATT INFO on your camcorder 4 Press PAGE2 PAGE3 to display PAGE2 PAGE3 Operation buttons on PAGE2 PAGE3 are displayed on the LCD screen 5 Press the desired operation item See relevant pages of this manual for each function To return to FN Press EXIT To execute settings Press OK The display returns to PAGE1 P...

Page 26: ...GE3 To make screen indicators disappear Press DISPLAY BATT INFO Operation buttons on each display When the POWER switch is set to CAMERA When the POWER switch is set to VCR When the POWER switch is set to MEMORY During memory camera During memory playback PAGE1 SPOT FOCUS SPOT METER MENU FADER END SCH EXPOSURE PAGE2 SELFTIMER DIG EFFT LCD BRT VOL MEM MIX PAGE3 SUPER NS COLOR SLW S PAGE1 MENU LCD B...

Page 27: ...ss the LCD screen with sharp objects such as a pen Do not press the LCD screen too hard Do not touch the LCD screen with wet hands When executing each item A green bar appears above the item If any items are not available The color of the items changes to gray When using the viewfinder You can also operate with the touch panel p 74 Step 4 Using the touch panel ...

Page 28: ...rder to standby 4 Press OPEN to open the LCD panel The picture appears on the screen 5 Press START STOP Your camcorder starts recording The REC indicator appears The camera recording lamp located on the front of your camcorder lights up To stop recording press START STOP again Recording Basics Recording a picture 5 2 4 3 50min REC 0 00 01 LOCK LOCK MEMORY CAMERA VCR CHG OFF POWER 1 MEMORY CAMERA V...

Page 29: ...eave your camcorder in standby for 5 minutes while the cassette is inserted Your camcorder automatically turns off This is to save battery power and to prevent battery pack and tape wear To return to standby set the POWER switch to OFF CHG and then back to CAMERA However your camcorder does not turn off automatically while the cassette is not inserted When you record in the SP and LP modes on the ...

Page 30: ... Memory 3 Recording mode 4 STBY REC 5 Time code 6 Remaining tape This appears after you insert the cassette p 198 7 Date The date appears about 5 seconds after the power is turned on 8 Time The time appears about 5 seconds after the power is turned on 9 FN button Press this button to display operation buttons on the LCD screen 0 00 01 60min 50min REC JUL 4 2003 12 05 56PM FN 1 7 2 8 34 5 6 9 ...

Page 31: ...nutes seconds during recording and 0 00 00 00 hours minutes seconds frames during playback You cannot rewrite only the time code later Recording data The recording data date time or various settings when recorded are not displayed during recording However they are recorded automatically on the tape To display the recording data press DATA CODE during playback p 44 After recording 1 Set the POWER s...

Page 32: ...s feature allows the camera subject to view him or herself on the LCD screen The subject can use this feature to check his or her own image on the LCD screen while you look at the subject in the viewfinder Pull out the viewfinder and rotate the LCD panel 180 degrees Picture in the mirror mode The picture on the LCD screen is a mirror image However the picture will be normal when recorded 180 ...

Page 33: ...h is set to VCR press FN to display PAGE1 When the POWER switch is set to MEMORY press FN and select PAGE3 2 Press LCD BRT The screen to adjust the brightness of the LCD screen appears 3 Adjust the brightness of the LCD screen using to dim to brighten 4 Press OK to return to PAGE1 PAGE2 PAGE3 in step 1 To return to FN Press EXIT 2 3 LCD BRT LCD BRT OK The bar indicator ...

Page 34: ...cklight when using the battery pack Select LCD B L in in the menu settings p 194 Even if you adjust the LCD screen using LCD BRT LCD B L or the LCD BACKLIGHT switch The recorded picture will not be affected Adjusting the viewfinder If you record pictures with the LCD panel closed check the picture with the viewfinder Adjust the viewfinder lens to your eyesight so that the images in the viewfinder ...

Page 35: ...a faster zoom Using the zoom sparingly results in better looking recordings W Wide angle subject appears farther away T Telephoto subject appears closer To use zoom greater than 10 Zoom greater than 10 is performed digitally Digital zoom can be set to 20 or 120 To activate digital zoom select the digital zoom power in D ZOOM in in the menu settings p 193 Digital zoom is set to OFF as a default set...

Page 36: ... When the POWER switch is set to MEMORY You cannot use the digital zoom Shooting backlit subjects Back light function When you shoot a subject with the light source behind the subject or a subject with a light background use the back light function 1 Set the POWER switch to CAMERA or MEMORY 2 Press BACK LIGHT The indicator appears on the screen To cancel the back light function Press BACK LIGHT ag...

Page 37: ... to CAMERA or MEMORY 2 Slide NIGHTSHOT to ON The and NIGHTSHOT indicators flash on the screen To cancel NightShot Slide NIGHTSHOT to OFF Using Super NightShot Super NightShot makes subjects up to 16 times brighter than those recorded in NightShot 1 Set the POWER switch to CAMERA 2 Slide NIGHTSHOT to ON The and NIGHTSHOT indicators flash on the screen 3 Press FN and select PAGE3 4 Press SUPER NS Th...

Page 38: ...dim place 1 Set the POWER switch to CAMERA 2 Slide NIGHTSHOT to OFF 3 Press FN and select PAGE3 4 Press COLOR SLW S The indicator lights up on the screen 5 Press EXIT to return to FN To cancel Color Slow Shutter Press COLOR SLW S to make the indicator disappear Notes Do not use NightShot in bright places e g the outdoors in the daytime Doing so may cause a malfunction If focusing is difficult duri...

Page 39: ...functions White balance Fader Digital effect PROGRAM AE Manual exposure Flexible Spot Meter Recording with the flash When the POWER switch is set to MEMORY You cannot use the following functions Super NightShot Color Slow Shutter NightShot Light NightShot Light rays are infrared and so are invisible The maximum shooting distance using the NightShot Light is about 3 m 10 feet While using Color Slow...

Page 40: ...s FN to display PAGE1 3 Press END SCH The last 5 seconds of the recorded section are played back and your camcorder returns to standby To return to FN Press EXIT To cancel end search Press END SCH again End search When you use a cassette without Cassette Memory end search does not work once you eject the cassette after you have recorded on the tape If you use a cassette with Cassette Memory end se...

Page 41: ... p 193 5 Select ON then press EXIT 6 Hold down 7 or The recorded portion is played back Release 7 or to stop playback If you press START STOP recording begins from the point you released 7 or 7 To go backward To go forward Rec Review You can check the last recorded section 1 Set the POWER switch to CAMERA 2 Press FN to display PAGE1 3 Press MENU 4 Select EDITSEARCH in then press EXEC p 193 5 Selec...

Page 42: ... to VCRwhile pressing the small green button 2 Press OPEN to open the LCD panel 3 Press to rewind the tape 4 Press to start playback 5 Adjust the volume following the steps below 1 Press FN to display PAGE1 2 Press VOL The screen to adjust volume appears 3 Press to turn down the volume to turn up the volume 4 Press OK to return to PAGE1 Playback Basics Playing back a tape 4 3 1 5 2 VOL OK LOCK MEM...

Page 43: ... the playback pause lasts more than 5 minutes the camcorder automatically stops If you leave the power on for a long time Your camcorder gets warm This is not a malfunction To display the screen indicators Display function Press DISPLAY BATT INFO on your camcorder or DISPLAY on the Remote Commander supplied with your camcorder The indicators disappear from the screen To make the indicators reappea...

Page 44: ...arious data Select OFF in step 4 Various settings Various settings show your camcorder s recording information at the time of recording During tape recording the various settings will not be displayed When you use data code bars appear if A blank portion of the tape is being played back The tape is unreadable due to tape damage or noise The tape was recorded by a camcorder without the date and tim...

Page 45: ... or while rewinding the tape To resume fastforwarding or rewinding release the button To view the picture at slow speed slow playback Press during playback For slow playback in the reverse direction press then press 1 To view the picture at double speed Press during playback For double speed playback in the reverse direction press then press 1 To view the picture frame by frame Press during playba...

Page 46: ...e speed On the Remote Commander N To play back the tape X To pause the tape x To stop the tape m To rewind the tape M To fastforward the tape y To play back the tape slowly In the various playback modes Sound is muted The previous picture may remain as a mosaic image during playback When you play back the tape in reverse Horizontal noise may appear in the center or the top and bottom of the screen...

Page 47: ... Open the jack cover Connect your camcorder to the TV with the A V connecting cable Then set the TV VCR selector on the TV to VCR to be able to view images from your camcorder The supplied A V connecting cable is equipped with an S video plug and a video plug Use either the S video plug or the video plug depending on the TV If your TV is already connected to the VCR Connect your camcorder to the L...

Page 48: ...connected has an S video jack Pictures can be reproduced more faithfully by using an S video jack With this connection you do not need to connect the yellow video plug of the A V connecting cable However you need to connect the red and white audio plugs Connect the S video plug to the S video jack on the TV or the VCR This connection produces higher quality DV format pictures To display the screen...

Page 49: ...se PHOTO select a still image again and then press and hold PHOTO lightly 2 Press PHOTO deeper Recording is complete when the bar scroll indicator disappears The image displayed on the screen when you pressed PHOTO deeper will be recorded in the folder on the Memory Stick p 142 1 2 FN 101 FINE 640 50min FN 101 12 CAPTURE FINE 640 50min a Advanced Recording Operations Recording still images on a Me...

Page 50: ...ll be recorded with image quality as set when the POWER switch is set to MEMORY The default setting is FINE To record images with higher image quality use of memory photo recording is recommended p 120 Recording with the flash During recording standby you can record still images on the Memory Stick with the flash See page 124 for details When you press PHOTO on the Remote Commander Your camcorder ...

Page 51: ... Recording moving pictures on a tape The POWER switch should be set to Operate by touching the panel 1 During standby press FN and select PAGE2 2 Press SELFTIMER The self timer indicator appears on the screen 3 Press EXIT to return to FN 4 Press START STOP The self timer starts counting down from about 10 seconds with a beep In the last 2 seconds the beep gets faster and then the recording starts ...

Page 52: ...y To stop the countdown for recording on a tape Press START STOP To restart the countdown press START STOP again To cancel the self timer During standby press SELFTIMER on the LCD screen to make the self timer indicator disappear from the screen You cannot cancel the self timer using the Remote Commander Notes When self timer recording is finished the self timer is automatically canceled You can r...

Page 53: ...ing a single colored subject or background OUTDOOR When recording a sunset sunrise just after sunset just before sunrise neon signs or fireworks Under daylight fluorescent lamps INDOOR n When lighting conditions change quickly In too bright places such as photography studios Under sodium lamps or mercury lamps To return to FN Press EXIT To return to the automatic white balance Set WHT BAL to AUTO ...

Page 54: ... You remove the battery pack for replacement You bring your camcorder from indoors to outdoors holding the exposure or vice versa Point your camcorder at the white subject for about 10 seconds after setting the POWER switch to CAMERA to get better adjustment If you did the following in the HOLD mode You change the mode of PROGRAM AE You bring your camcorder from indoors to outdoors or vice versa S...

Page 55: ...e W wide side the recording angle will become wider than that of the usual tape recording The picture played back in the wide mode on a normal TV appears the same as the picture played back in the wide mode on your camcorder a The POWER switch should be set to Operate by touching the panel 1 During recording standby press FN to display PAGE1 2 Press MENU 3 Select 16 9WIDE in then press EXEC p 193 ...

Page 56: ...is compatible with the video ID ID 1 ID 2 system You connect your camcorder to the S video jack on the TV ID 1 system The ID 1 system sends aspect ratio information 16 9 4 3 or letter box with video signals If you connect a TV compatible with the ID 1 system the screen size is automatically selected ID 2 system The ID 2 system sends a copyright protection signal with ID 1 signals inserted between ...

Page 57: ...icture gradually changes from black and white to color When fading out the picture gradually changes from color to black and white 1 You can use BOUNCE when D ZOOM in is set to OFF in the menu settings 2 You can fade in only Using the fader function a REC STBY REC STBY b NORM FADER normal MOSC FADER mosaic BOUNCE 1 2 OVERLAP 2 WIPE 2 DOT 2 ...

Page 58: ... 3 Press the desired mode 4 Press OK to return to PAGE1 5 Press EXIT to return to FN The fader indicator you selected flashes 6 Press START STOP After the fade in out is carried out your camcorder automatically returns to the normal mode To cancel the fader function Before pressing START STOP press OFF on the FADER screen to return to PAGE1 Using the fader function 2 FADER FADER MOSC FADER NORM FA...

Page 59: ...OVERLAP WIPE or DOT during recording Your camcorder stores the image recorded when your camcorder was set to standby and sets itself ready for fade in During BOUNCE is on you cannot use the following functions Zoom Picture effect Manual exposure Flexible Spot Meter Manual focus PROGRAM AE Recording on a Memory Stick Note on the BOUNCE mode You cannot select BOUNCE in the following D ZOOM is activa...

Page 60: ...ld be set to Operate by touching the panel 1 Press FN to display PAGE1 2 Press MENU 3 Select P EFFECT in then press EXEC p 192 4 Select the desired mode then press EXEC To return to FN Press EXIT To cancel picture effect Set P EFFECT to OFF in the menu settings Note While using picture effect you cannot use following functions BOUNCE OLD MOVIE Using special effects Picture effect a b c d MANUAL SE...

Page 61: ...changes the screen format to wide and the color to sepia and sets the appropriate shutter speed STILL You can record a still image so that it is superimposed on a moving picture FLASH flash motion You can record still images successively at regular intervals LUMI luminance key You can swap the brighter area in a still image with a moving picture TRAIL You can record a picture so that an incidental...

Page 62: ...tter speed number the slower the shutter speed OLD MOVIE No items need to be adjusted STILL The degree of the still image you want to superimpose on the moving picture FLASH The interval of flash motion LUMI The brightness of the area in the still image which is to be swapped with a moving picture TRAIL The vanishing time of the incidental image 5 Press OK to return to PAGE2 Using special effects ...

Page 63: ...1 8 SLOW SHTR 4 1 4 Notes While using digital effect you cannot use the following functions Super NightShot Color Slow Shutter Fader Recording with the flash PROGRAM AE does not work in the SLOW SHTR mode The following functions do not work in the OLD MOVIE mode Wide mode Picture effect PROGRAM AE When recording in the SLOW SHTR mode Autofocus may not be effective Focus manually using a tripod Usi...

Page 64: ...This mode prevents people s faces from appearing dark in strong light or reflected light such as at a beach in midsummer or on a ski slope SUNSETMOON sunset moon 2 This mode allows you to maintain atmosphere when you record sunsets general night views fireworks displays and neon signs LANDSCAPE 2 This mode is for when you record distant subjects such as mountains Also it prevents your camcorder fr...

Page 65: ...gs Notes The following functions do not work in PROGRAM AE Color Slow Shutter BOUNCE SLOW SHTR OLD MOVIE Spot Focus PROGRAM AE does not work in the following cases The indicator flashes NIGHTSHOT is set to ON To record images on a Memory Stick using the MEMORY MIX When you set the POWER switch to MEMORY the SPORTS mode does not work The indicator flashes Using PROGRAM AE MANUAL SET PROGRAM AE P EF...

Page 66: ...ess FN to display PAGE1 2 Press EXPOSURE The screen to adjust the exposure appears 3 Press MANUAL 4 Adjust the exposure using to dim to brighten 5 Press OK to return to PAGE1 To return to FN Press EXIT To return to the automatic exposure Press AUTO on the EXPOSURE screen to return to PAGE1 Note When you adjust the exposure manually the following functions do not work Back light function Color Slow...

Page 67: ...E1 2 Press SPOT METER The SPOT METER screen appears 3 Press the desired area in the frame The SPOT METER indicator flashes on the screen The exposure is adjusted to the brightness of the point you selected 4 Press OK to return to PAGE1 The EXPOSURE setting changes to the manual mode p 66 To return to FN Press EXIT To return to the automatic exposure Press AUTO on the SPOT METER screen to return to...

Page 68: ...es Subjects with little contrast with backgrounds such as walls or the sky Shooting a stationary subject when using a tripod When you want to change the focus from a subject in the foreground to a subject in the background The POWER switch should be set to or 1 Press FOCUS The 9 indicator appears 2 Turn the focus ring to sharpen focus To return to the autofocus mode Press FOCUS to turn off 9 or in...

Page 69: ...ect when the subject is too close to focus on Focal distance information is displayed for about 3 seconds on the screen in the following cases When switching the focus adjustment mode from autofocus to manual When turning the focus ring Focal distance information This information aids focusing if it is not easy to focus on the subject for example when recording in the dark Use this information as ...

Page 70: ...en The focus of the point you selected is adjusted 4 Press OK to return to PAGE1 The FOCUS setting changes to the manual mode p 68 To return to FN Press EXIT To return to the autofocus On the SPOT FOCUS screen press AUTO to return to PAGE1 Notes Spot Focus does not work while PROGRAM AE is on The back light function does not work during Spot Focus Focal distance information It is not displayed on ...

Page 71: ... can achieve excellent recordings of flowering insects emerging etc with this function There may be a discrepancy in recording time of up to 6 frames from the selected time The POWER switch should be set to Operate by touching the panel 1 Press FN to display PAGE1 2 Press MENU 3 Select INT REC in then press EXEC 4 Select SET then press EXEC 5 Select INTERVAL then press EXEC 6 Select the desired in...

Page 72: ...et INT REC to ON then press EXEC 11 Press EXIT to return to FN The INTERVAL TAPE indicator flashes on the screen 12 Press START STOP to start Interval Recording The INTERVAL TAPE indicator lights up during Interval Recording To cancel Interval Recording Set INT REC to OFF in the menu settings Interval Recording ...

Page 73: ... in then press EXEC p 198 4 Select ON then press EXEC 5 Press EXIT to return to FN The FRAME REC indicator lights up 6 Press START STOP to start frame recording Your camcorder makes a recording for about 6 frames and returns to recording standby 7 Move the subject and repeat step 6 To cancel frame recording Set FRAME REC to OFF in the menu settings Note The proper remaining tape time is not indica...

Page 74: ...acing out then pull out the viewfinder 2 Press OFF The PANEL OFF indicator appears on the screen 3 Press OK The LCD screen is turned off 4 Looking in the viewfinder press the LCD screen EXPOSURE OK ON and FADER only when the POWER switch is set to CAMERA appear 5 Press the LCD screen and select the desired item then press OK EXPOSURE Adjust the exposure by pressing FADER Press FADER until the desi...

Page 75: ...appear Press OK Note When the POWER switch is set to VCR or during memory playback you cannot operate with the touch panel using the viewfinder To operate items that do not appear Set the LCD panel and the viewfinder back to the previous position Operate the items using the LCD screen Available recording time Available recording time with the installed battery pack in this case is the same as with...

Page 76: ...cture effect Set P EFFECT to OFF in the menu settings Notes You cannot process externally input scenes using picture effect You cannot record images on the tape on your camcorder while you are processing the image using picture effect Record images on a Memory Stick p 126 137 or on a VCR using your camcorder as a player Pictures processed by picture effect These pictures are not output through the...

Page 77: ...details of the each effect 4 Press to adjust the effect 5 Press OK to return to PAGE2 To return to FN Press EXIT To cancel digital effect Press OFF to return to PAGE2 Notes You cannot process externally input scenes using digital effect You cannot record images on the tape on your camcorder while you are processing the image using digital effect Record images on a Memory Stick p 126 137 or on a VC...

Page 78: ... want to enlarge in the frame The area you pressed moves to the center of the screen and the playback image is enlarged to about twice the size If you press another area the area moves to the center of the screen 4 Adjust the zoom ratio by the power zoom lever You can select the zoom ratio from approximately 1 1 times up to 5 times its size W To decrease the zoom ratio T To increase the zoom ratio...

Page 79: ...cord moving pictures on the Memory Stick on your camcorder when you have processed the picture using tape PB ZOOM Images enlarged by tape PB ZOOM These images are not output through the DV Interface During tape PB ZOOM If you press DISPLAY BATT INFO the frame on the PB ZOOM screen disappears If the frame is not displayed you cannot move the part you pressed to the center of the screen Edge of the ...

Page 80: ...e tape counter s zero point The tape stops automatically when the tape counter reaches about zero 4 Press N Playback starts from the counter s zero point The indication changes from the tape counter to the time code and the zero set memory function is canceled Notes When you press ZERO SET MEMORY before rewinding the tape the zero set memory function will be canceled There may be a discrepancy of ...

Page 81: ...ch screen appears The indicator changes as follows TITLE SEARCH t DATE SEARCH no indicator 2 Press or on the Remote Commander to select the title for playback Your camcorder automatically starts playback of the scene having the title that you selected a Actual point you are trying to search for b Present point on the tape To cancel searching Press x on the Remote Commander If the tape has a blank ...

Page 82: ...WER switch should be set to 1 Press SEARCH M on the Remote Commander repeatedly until the DATE SEARCH indicator appears The date search screen appears The indicator changes as follows TITLE SEARCH t DATE SEARCH no indicator 2 Press or on the Remote Commander to select the date for playback Your camcorder automatically starts playback of the scene having the date you selected a Actual point you are...

Page 83: ...the point where the date changes Each time you press or your camcorder searches for the previous or next date To cancel searching Press x on the Remote Commander or on your camcorder Note If one day s recording is less than 2 minutes your camcorder may not accurately find the point where the recording date changes If the tape has a blank portion between recorded portions Date search may not work c...

Page 84: ...SC Betamax ED Betamax mini DV DV or MICRO MV Editing Dubbing a tape A V connecting cable supplied Yellow White Red Signal flow VCR Black When using the A V connecting cable The supplied A V connecting cable is equipped with an S video plug and a video plug Use either the S video plug or the video plug depending on the VCR See page 48 for details of the S video jack If your VCR is a monaural type C...

Page 85: ...e i LINK cable optional Signal flow VCR About i LINK See page 218 for details Pictures processed by picture effect digital effect or PB ZOOM These are not output through the DV Interface When using the i LINK cable Recording of only the picture or sound cannot be done ...

Page 86: ...reen lettering cannot be recorded The POWER switch should be set to 1 Insert a blank tape or the tape you want to record over into the VCR and insert the recorded tape into your camcorder 2 Prepare the VCR for recording If the VCR has an input selector set it to input mode Refer to the operating instructions of the VCR 3 Play back the recorded tape on your camcorder 4 Start recording on the VCR Re...

Page 87: ...3 Adjusting the synchronization of the VCR p 92 When you dub using the same VCR again you can skip steps 2 and 3 Using Digital program editing on the tape recorded on other equipment Operation 1 Making a program p 94 Operation 2 Performing Digital program editing Dubbing the tape p 96 Note When editing digital video the operation signals to the VCR cannot be sent with LANC jack Step 1 Connecting t...

Page 88: ...ay PAGE1 3 Press MENU 4 Select VIDEO EDIT in then press EXEC 5 Select TAPE then press EXEC 6 Press EDIT SET 7 Select CONTROL then press EXEC 8 When connecting with the A V connecting cable select IR then press EXEC When connecting with the i LINK cable select i LINK press EXEC then go to Step 3 Adjusting the synchronization of the VCR on page 92 9 Select IR SETUP then press EXEC 10 Select the IR S...

Page 89: ... UNDO OTHERS BEEP COMMANDER DISPL AY VIDEO EDIT EXIT RET EXEC RETURN TAPE MEMORY END 11 V I DEO ED I T ED I T SET CONTROL ADJ TEST CUT IN CUT OUT IR SETUP PAUSEMODE IR TEST RET EXEC PAUSE REC PB END 12V I DEO ED I T ED I T SET CONTROL ADJ TEST CUT IN CUT OUT IR SETUP PAUSEMODE IR TEST RET EXEC PAUSE END Dubbing only desired scenes Digital program editing on tape 13 Locate the infrared rays emitter...

Page 90: ...TE Note When you connect with the i LINK cable you may not be able to operate the dubbing function correctly depending on the VCR Set CONTROL to IR in the menu settings of your camcorder 15 16 V I DEO ED I T ED I T SET CONTROL ADJ TEST CUT IN CUT OUT IR SETUP PAUSEMODE IR TEST RET EXEC ENGAGE REC PAUSE RETURN EXECUTE V I DEO ED I T ED I T SET CONTROL ADJ TEST CUT IN CUT OUT IR SETUP PAUSEMODE IR T...

Page 91: ...in the memory of your camcorder Be sure to set the correct code depending on your VCR Default setting is code number 3 TV VCR component Note on the IR SETUP code Digital program editing is not possible if the VCR does not support IR SETUP codes Dubbing only desired scenes Digital program editing on tape ...

Page 92: ... Select EXECUTE then press EXEC IN and OUT are recorded on an image for 5 times each to calculate the numerical values for adjusting the synchronization The EXECUTING indicator flashes on the screen When finished the indicator changes to COMPLETE 4 Rewind the tape in the VCR then start slow playback 5 IN numbers and corresponding OUT numbers are displayed Take a note of the opening numerical value...

Page 93: ... cable leave the connection as it is and make the A V connecting cable settings p 88 Video and audio are sent by digital signals Dubbing only desired scenes Digital program editing on tape 2 3 6 8 V I DEO ED I T ED I T SET CONTROL ADJ TEST CUT IN CUT OUT IR SETUP PAUSEMODE IR TEST RET EXEC RETURN EXECUTE ENGAGE REC PAUSE END V I DEO ED I T ED I T SET CONTROL ADJ TEST CUT IN CUT OUT IR SETUP PAUSEM...

Page 94: ...corder then insert the tape for recording into the VCR 2 Press FN to display PAGE1 3 Press MENU 4 Select VIDEO EDIT in then press EXEC 5 Select TAPE then press EXEC 6 Search for the beginning of the first scene you want to insert using the video control buttons on the screen then pause playback You can fine adjust one frame at a time with 7 Press MARK IN on the screen The IN point of the first pro...

Page 95: ...m you have set Erase OUT mark first then IN mark of the last set program 1 Press UNDO 2 Press ERASE 1 MARK The last set program mark flashes and the DELETE indicator appears 3 Press EXEC The last set program is deleted To cancel erasing Press CANCEL in step 3 To erase all programs 1 Follow steps 2 to 5 on page 94 2 Press UNDO 3 Press ERASE ALL All the set program marks flash then the DELETE indica...

Page 96: ...flashes The SEARCH indicator appears during searching and the EDITING indicator appears during editing on the screen When the dubbing ends your camcorder and the VCR automatically stop To cancel dubbing during editing Press CANCEL To end Digital program editing Your camcorder stops when the dubbing is complete Then the display returns to VIDEO EDIT in the menu settings Press END to end the video e...

Page 97: ...ideo audio outputs Use your camcorder as a recorder You can connect either the A V connecting cable supplied or i LINK cable optional If you connect with the i LINK cable optional video and audio signals are transmitted in digital form for high quality editing Connecting a VCR or TV With the A V connecting cable Signal flow Black i LINK DV Interface Signal flow i LINK cable optional VCR With the i...

Page 98: ... appears on the screen The DV IN indicator may appear on both equipment Recording of only the picture or sound cannot be done Selecting a video jack The supplied A V connecting cable is equipped with an S video plug and a video plug Change the setting for the jack depending on the VCR or the TV The default setting is VIDEO See page 48 for details of the S video jack The POWER switch should be set ...

Page 99: ... If you are recording a tape from the VCR insert the recorded tape into the VCR 2 Press FN and select PAGE3 3 Press REC CTRL 4 Press REC PAUSE 5 Press N on the VCR to start playback if you record a tape from a VCR Select a TV program if you record from a TV The picture from playback side appears on the LCD screen or in the viewfinder 6 Press REC START at the scene where you want to start recording...

Page 100: ... scene to insert into the VCR A The tape that contains the scene to be superimposed B The tape before editing C The tape after editing The POWER switch should be set to Operate by touching the panel 1 On the VCR locate just before the insert start point a then set the VCR to playback pause 2 On your camcorder locate the insert end point c then set it to playback pause 3 Press ZERO SET MEMORY on th...

Page 101: ...nction is canceled To change the insert end point Press ZERO SET MEMORY on the Remote Commander again after step 3 to erase the ZERO SET MEMORY indicator and begin from step 2 Note Pictures and sound recorded on the portion between the insert start and end points will be erased when you insert the new scene To insert a scene without setting the insert end point Skip steps 2 and 3 Press x on the Re...

Page 102: ...in microphone Connecting the microphone optional to the MIC jack Connecting the microphone optional to the intelligent accessory shoe Connecting the A V connecting cable to the AUDIO VIDEO jack The audio input to be recorded will take precedence over others in the following order MIC jack Intelligent accessory shoe AUDIO VIDEO jack Built in microphone Dubbing with the built in microphone No connec...

Page 103: ...ck or the built in microphone pictures are not output through the AUDIO VIDEO jack Check the recorded picture on the screen or the viewfinder You can check the recorded sound by using headphones Intelligent accessory shoe Audio dubbing LINE OUT L R AUDIO VIDEO AUDIO R Do not connect the S video plug black and video yellow plug Signal flow White Red A V connecting cable supplied AUDIO L Audio equip...

Page 104: ... recorded in stereo 2 ST2 during playback While recording the new sound the red indicator appears on the screen 7 Press on your camcorder at the point where you want to stop recording To add new sound to previously recorded sections more precisely During playback press ZERO SET MEMORY on the Remote Commander at the point where you want to stop recording new sound Follow steps 2 to 7 Recording auto...

Page 105: ...IO MIX in then press EXEC 5 Press r R to adjust the balance between the original sound ST1 and the new sound ST2 then press EXEC About 5 minutes after you disconnect the power source or remove the battery pack the setting of AUDIO MIX returns to the original sound ST1 only The default setting is original sound only VCR SET H i F i SOUND AUDIO MIX A VcDV OUT VIDEOINPUT ST1 ST2 EXIT RET EXEC R r Aud...

Page 106: ...tch should be set to or Operate by touching the panel 1 Insert a cassette with Cassette Memory 2 During standby recording playback or playback pause press FN to display PAGE1 3 Press MENU 4 Select TITLE in then press EXEC 5 Select then press EXEC 6 Select the desired title then press EXEC The title appears on the screen 7 If necessary change the color size or position by pressing COLOR SIZE POS r ...

Page 107: ...other video equipment To not display title Set TITLE DSPL to OFF in the menu settings Title setting The title color changes as follows The title size changes as follows SMALL y LARGE You cannot input 13 characters or more in LARGE size The title position If you select the title size SMALL you have 9 choices for the title position If you select the title size LARGE you have 8 choices for the title ...

Page 108: ...t the title you want to erase then press EXEC The ERASE OK indicator appears 5 Make sure the title is the one you want to erase then press OK The ERASING indicator flashes on the screen When the title has erased the COMPLETE indicator appears To return to FN Press EXIT To cancel erasing Press CANCEL in step 5 3 4 T I TLE ERASE 1 HELLO 2 CONGRATULATIONS 3 HAPPY NEW YEAR 4 PRESENT 5 GOOD MORNING 6 W...

Page 109: ...____ EXIT TITLE SET TITLE SET CUSTOM1 SET CUSTOM2 SET EXIT RET EXEC R r ABC DEF T t 678 90 123 45 MNO JKL GHI SET WXY Z TUV PQR S ____________________ EXIT TITLE SET To return to FN Press EXIT To change the title you have stored In step 5 select CUSTOM1 SET or CUSTOM2 SET depending on which title you want to change then press EXEC and enter the new title If it takes 5 minutes or longer to enter ch...

Page 110: ...er Repeat the same procedure as steps 5 and 6 to complete the label 7 Press SET The label is stored in memory To return to FN Press EXIT To erase the label you have made Erase the label by selecting C in step 5 then press SET To change the label you have made Insert the cassette to change the label and operate in the same way to make a new label If you have superimposed titles in the cassette When...

Page 111: ...ress EXEC The OK indicator changes to EXECUTE 5 Select EXECUTE then press EXEC The ERASING indicator flashes on the screen Once erasing is complete the COMPLETE indicator appears To return to FN Press EXIT To cancel erasing Select RETURN in step 5 then press EXEC Erasing all the data in Cassette Memory 3 4 CM SET TITLE TITLEERASE TITLE DSPL CM SEARCH TAPE TITLE ERASE ALL EXIT RET EXEC RETURN EXECU...

Page 112: ...o or MagicGate Memory Stick Duo a dedicated adaptor may be needed depending on the type of the device 3 The camcorder cannot record or play back the data that need the MagicGate function Trouble free operation for all Memory Stick media is not guaranteed File format for still images Exif 4 Ver 2 2 4 Exif is a file format for still images established by the Japan Electronics and Information Technol...

Page 113: ...g read or recorded from to the Memory Stick the access lamp is lit or flashing You use a Memory Stick in a location subject to the effects of static electricity or electrical noise We recommend backing up important data on the hard disk of a computer On handling When you carry or store a Memory Stick put it in its case Avoid touching the metal terminals with fingers or metal objects Do not bend dr...

Page 114: ...Systems universal standard established by the JEITA Japan Electronics and Information Technology Industries Association On your camcorder you cannot play back still images recorded on other equipment DCR TRV890E TRV900 TRV900E or DSC D700 D770 that does not conform to this universal standard These models are not sold in some areas If you cannot use a Memory Stick that otherwise can be used with ot...

Page 115: ...Stick into the Memory Stick slot Doing so may cause a malfunction While the access lamp is lit or flashing Do not shake or strike your camcorder because your camcorder is reading the data from the Memory Stick or recording the data on the Memory Stick Do not turn the power off remove the Memory Stick or remove the battery pack Otherwise image data breakdown may occur If MEMORY STICK ERROR appears ...

Page 116: ...uality then press EXEC Image quality settings Setting Meaning FINE FINE STANDARD STD To return to FN Press EXIT Selecting image quality and size Use this mode when you want to record high quality images Fine images are compressed to about 1 4 This is the standard image quality Standard images are compressed to about 1 10 3 4 MEM SET 1 STILL SET BURST QUALITY IMAGESIZE OFF EXIT RET EXEC MEM SET 1 S...

Page 117: ...sired image size then press EXEC The indicator changes as follows 1152 640 Memory capacity of still images Recorded images are compressed in JPEG format before being stored in memory The memory capacity of still images varies depending on the selected image quality mode and image size Details are shown in the table below 1152 864 image size Image quality Memory capacity FINE About 500 kB STANDARD ...

Page 118: ...rate by touching the panel 1 Press FN to display PAGE1 2 Press MENU 3 Select MOVIE SET in then press EXEC 4 Select IMAGESIZE then press EXEC 5 Select the desired image size then press EXEC The indicator changes as follows 320 160 3 4 EXIT RET EXEC R r MEM SET 1 MOVIE SET IMAGESIZE REMAIN 320 240 REMAIN 30sec 320 EXIT RET EXEC R r MEM SET 1 MOVIE SET IMAGESIZE REMAIN 320 240 160 112 REMAIN 30sec ...

Page 119: ...ype of Memory Stick FINE STANDARD 1152 864 640 480 1152 864 640 480 1152 640 1152 640 8 MB supplied 15 50 37 120 16 MB 30 96 74 240 32 MB 61 190 150 485 64 MB 120 390 300 980 128 MB 245 780 600 1970 256 MB MSX 256 445 1400 1000 3550 512 MB MSX 512 900 2850 2050 7200 1 GB MSX 1G 1800 5900 4200 14500 unit image Image size 320 240 160 112 320 160 8 MB supplied 1 min 20 s 5 min 20 s 16 MB 2 min 40 s 1...

Page 120: ...sappears The image displayed on the screen when you pressed PHOTO deeper will be recorded on the Memory Stick a Approximate number of images recordable on a Memory Stick b Current recording folder Depending on the image quality setting and the complexity of the subject the indication of the remaining number of recordable still images may not change even after you record an image If the remaining n...

Page 121: ...rn off the power or press PHOTO When you press PHOTO on the Remote Commander Your camcorder immediately records the image that is on the screen when you press the button When you press PHOTO lightly in step 1 The image momentarily flickers This is not a malfunction Recording data The recording data date time or various settings when recorded does not appear during recording However they are record...

Page 122: ...tomatically shoots 3 images at about 0 5 sec intervals at different exposures The POWER switch should be set to Operate by touching the panel 1 Press FN to display PAGE1 2 Press MENU 3 Select STILL SET in then press EXEC 4 Select BURST then press EXEC 5 Select the desired mode then press EXEC 6 Press EXIT to make the menu display disappear 7 Press PHOTO deeply a b Recording a still image on a Memo...

Page 123: ...ur camcorder automatically records up to the maximum number of still images If remaining capacity on the Memory Stick is less than for 3 images EXP BRKTG does not work FULL appears when you press PHOTO The effect of EXP BRKTG The effect of EXP BRKTG may not appear clearly on the LCD screen We recommend viewing images on TV or the computer to realize the effect When selecting NORMAL Recording conti...

Page 124: ... settings the indicator changes as follows Forced flash The flash fires regardless of the surrounding brightness Auto red eye reduction The flash fires before recording to reduce red eye Forced red eye reduction The flash fires before recording to reduce red eye regardless of the surrounding brightness No flash The flash does not fire The amount of flash is automatically adjusted to the appropriat...

Page 125: ...the subject the subject not looking at the pre recording flash or other conditions The flash effect cannot be obtained easily when you use forced flash in a bright location When recording with the flash it takes longer to prepare for image capture This is because your camcorder starts to charge the flash after it pops up The flash charge lamp flashes while the flash is being charged After charging...

Page 126: ...lease PHOTO select a still image again and then press and hold PHOTO lightly 3 Press PHOTO deeper Recording is complete when the bar scroll indicator disappears The image displayed on the screen when you pressed PHOTO deeper will be recorded on the Memory Stick Recording an image from a tape as a still image 2 3 101 FINE 640 50min 101 12 CAPTURE FINE 640 50min 1 Sound recorded on the tape You cann...

Page 127: ...ting is LCD Also select the video jack for connection p 98 The POWER switch should be set to 1 Play back the recorded tape on the VCR or turn the TV on to see a desired program The image of the other equipment is displayed on the LCD screen or in the viewfinder 2 At the point where you want to record follow steps 2 and 3 on page 126 Note If the tape is in poor condition due to being used repeatedl...

Page 128: ...the brighter area of a still image such as a handwritten illustration or a title with a moving picture To use this function we recommend recording a title on a Memory Stick before a trip or event C CHROM Camera Chroma key You can superimpose a moving picture on top of a still image such as an image which can be used as background Shoot the subject against a blue background Only the blue area of th...

Page 129: ...with other equipment You may not be able to play modified images back with your camcorder Recording a superimposed image to the tape Before operation Insert the Memory Stick containing the still images into your camcorder Insert the tape for recording into your camcorder The POWER switch should be set to Operate by touching the panel 1 Press FN and select PAGE2 2 Press MEM MIX The image recorded o...

Page 130: ...he moving picture which is to be swapped with a still image M OVERLAP No adjustment necessary You can select M OVERLAP only when the POWER switch is set to CAMERA 6 Press EXIT to return to FN 7 Press START STOP to start recording To change the still image to be superimposed Press in the lower right corner before step 5 To cancel MEMORY MIX Press OFF to return to PAGE2 When you select M OVERLAP You...

Page 131: ...nto your camcorder Image size of still images is automatically set to 640 480 The POWER switch should be set to Operate by touching the panel 1 Follow steps 1 to 6 on page 129 and 130 2 Press PHOTO deeply to start recording Recording is complete when the bar scroll indicator disappears The image displayed on the screen when you pressed PHOTO deeply will be recorded on the Memory Stick To cancel ME...

Page 132: ...EC 7 Press RET 8 Set INT R STL to ON then press EXEC 9 Press EXEC to return to FN The INTERVAL MEM STILL indicator flashes on the screen 10 Press PHOTO deeply Interval Photo Recording starts The INTERVAL MEM STILL indicator lights up on the screen during Interval Photo Recording Interval Photo Recording b b a a a To cancel Interval Photo Recording Set INT R STL to OFF in the menu settings 4 5 MEM ...

Page 133: ... details of recording time a Available recording time on the Memory Stick b This indicator appears for about 5 seconds after you press START STOP This indicator is not recorded c Current recording folder Note Sound is recorded in monaural When the POWER switch is set to MEMORY The following functions do not work Digital zoom Super NightShot Color Slow Shutter Wide mode Fader Picture effect Digital...

Page 134: ...te time The date time do not appear during recording However they are automatically recorded onto the Memory Stick To display the recording date time press DATA CODE during playback Various settings cannot be recorded p 44 Self timer recording You can record moving pictures on the Memory Stick with the self timer See page 135 for details Recording a moving picture on a Memory Stick MPEG MOVIE reco...

Page 135: ...OWER switch should be set to Operate by touching the panel 1 Press FN and select PAGE2 2 Press SELFTIMER The self timer indicator appears on the screen 3 Press EXIT to return to FN 4 Press PHOTO deeply The self timer starts counting down from about 10 seconds with a beep In the last 2 seconds of the countdown the beep gets faster and then your camcorder records still images automatically START STO...

Page 136: ...own the beep gets faster and then recording starts automatically To stop the countdown for recording moving picture Press START STOP To restart the countdown press START STOP again To cancel the self timer During standby press SELFTIMER on the LCD screen to make the self timer indicator disappear from the screen You cannot cancel the self timer using the Remote Commander When self timer recording ...

Page 137: ...s and sound are recorded on the Memory Stick To stop recording press START STOP again See page 119 for details on recording time a Available recording time on the Memory Stick b This indicator appears for about 5 seconds after you press START STOP This indicator is not recorded c Current recording folder Notes Sound recorded in 48 kHz is converted to one in 32 kHz when recording images from the ta...

Page 138: ...e from other equipment You can use either A V connecting cable or i LINK cable See page 97 for the connection When connecting with the A V connecting cable set DISPLAY in to LCD in the menu settings The default setting is LCD Also select the video jack for connection p 98 The POWER switch should be set to 1 Play back the recorded tape on the VCR or turn the TV on to see the desired program The ima...

Page 139: ...peat pressing IMAGESIZE to select the desired size The image size changes when you press IMAGESIZE 7 Follow steps 6 to 10 on page 94 To erase the program you have set 1 Perform the above steps 2 to 5 2 Perform steps 1 to 3 on page 95 To erase all programs 1 Perform the above steps 2 to 5 2 Perform steps 2 to 4 on page 95 Recording edited pictures from a tape as a moving picture Digital program edi...

Page 140: ... POWER switch should be set to Operate by touching the panel 1 Press FN to display PAGE1 2 Press MENU 3 Select VIDEO EDIT in then press EXEC 4 Select MEMORY then press EXEC 5 Press START 6 Press EXEC Your camcorder searches for the beginning of the first program then starts dubbing The program mark flashes The SEARCH indicator appears during searching the EDITING indicator appears during writing o...

Page 141: ...he program to operate Digital program editing has not been made A Memory Stick is not inserted The write protect tab on the Memory Stick is set to LOCK When the available recording time of the Memory Stick is not enough The LOW MEMORY indicator appears on the screen However you can record pictures up to the time indicated When the program has not been set You cannot press START Recording edited pi...

Page 142: ...by touching the panel 1 Press FN to display PAGE1 2 Press MENU 3 Select NEW FOLDER in then press EXEC The new folder number is displayed 4 Select ADD then press EXEC A new folder is created The numeric part of the folder name is one larger than that of the last created folder The created folder is automatically set to the recording folder To return to FN Press EXIT To cancel creating a new folder ...

Page 143: ...s in then press EXEC To return to FN Press EXIT Notes Up to 9 999 image files can be recorded in each folder When a folder is full a new folder is automatically created Once a folder is created it cannot be deleted with your camcorder As the number of folders increases the number of recordable images in the Memory Stick decreases Changing the recording folder REC FOLDER 101MSDCF 102MSDCF 103MSDCF ...

Page 144: ...n also use the Remote Commander for this operation The POWER switch should be set to Operate by touching the panel 1 Press PLAY The last recorded image is displayed 2 Press to see the previous image to see the next image on your camcorder to select the desired still image To stop memory photo playback Press CAM When no file is in the folder The NO FILE AVAILABLE indicator appears Viewing a still i...

Page 145: ... playback p 44 Notes on the file name The folder number may not appear and only the file number may appear if the structure of the folder does not conform to the DCF standard The file name flashes on the screen if the file is corrupted or the file is unreadable When the Memory Stick contains multiple folders The following icons appear on the screen on the first or last images in a folder You can m...

Page 146: ...A red B mark appears above the image that was being displayed before the change to the index screen mode T To display the previous 6 images t To display the next 6 images 1 B mark 2 Image serial number in the current playback folder on the Memory Stick To return to FN Press EXIT To return to the normal playback screen single screen Press the image you want to display 101 1 8 1 2 3 4 5 6 EXIT DEL M...

Page 147: ...elect the desired moving pictures 3 Press MPEG N X to start playback 4 Adjust the volume following the steps below 1 Press FN and select PAGE3 2 Press VOL The screen to adjust the volume appears 3 Press to turn down the volume to turn up the volume to adjust the volume 4 Press OK to return to PAGE3 To stop MPEG MOVIE playback Press MPEG N X When no file is in the folder The NO FILE AVAILABLE indic...

Page 148: ... time If a recording is too short it cannot be divided The POWER switch should be set to Operate by touching the panel 1 Follow steps 1 and 2 on the previous page 2 Press to see previous part to see next part to select the point where you want to play back 3 Follow steps 3 and 4 on the previous page To stop MPEG MOVIE playback Press MPEG N X 101 1 8 FN MPEG N X INDEX CAM 320 0 00 00 MOV00001 Viewi...

Page 149: ... Total number of recorded pictures in the current playback folder 4 Playback folder 5 Memory playback time 6 Protect mark 7 Recording date time Various settings appear as Recording date time To display the recording date time press DATA CODE during playback p 44 8 8 FN MPEG N X INDEX CAM 320 MOV00008 0 00 12 101 12 05 56 AM JUL 4 2003 5 6 7 1 2 3 4 Viewing a moving picture MPEG MOVIE playback ...

Page 150: ...hen press END to return to PAGE1 To select the previous folder To select the next folder 4 Press EXIT to play back the image Note Your camcorder does not recognize folders created or renamed using the computer Current playback folder The current playback folder is valid until the next recording is made Once you record an image the current recording folder becomes the current playback folder Choosi...

Page 151: ...moves to the center of the screen and the playback image is enlarged to about twice the size If you press another area the area moves to the center of the screen 5 Adjust the zoom ratio by the power zoom lever You can select the image from approximately 1 1 times up to 5 times its size W To decrease the zoom ratio T To increase the zoom ratio To cancel memory PB ZOOM Press END Enlarging a still im...

Page 152: ...rt you pressed to the center of the screen Edge of the image The edge of the image can be enlarged but cannot be displayed at the center of the screen Moving pictures recorded on the Memory Stick Memory PB ZOOM does not work To record the images processed by Memory PB ZOOM on the Memory Stick Press PHOTO when the image is being displayed The image size automatically becomes 640 480 Enlarging a sti...

Page 153: ...folder selected in the PB FOLDR setting The folder name appears in sss 5 Press START Your camcorder plays back the images recorded on the Memory Stick in sequence When all images are played back slide show automatically stops and returns to the first image To cancel slide show Press END To pause slide show Press PAUSE To return to FN Press END to return to PAGE1 then press EXIT To start slide show...

Page 154: ...turn to FN Press EXIT To cancel image protection Press the image you want to cancel image protection for in step 3 again The indicator disappears from the image Note Formatting erases all information on a Memory Stick including protected image data Check the contents of the Memory Stick before formatting If the write protect tab on the Memory Stick is set to LOCK You cannot protect an image or vic...

Page 155: ...pears on the screen 4 Press OK The selected image is deleted To return to FN Press EXIT To cancel deleting an image Press CANCEL in step 4 Notes To delete a protected image first cancel image protection Once you delete an image you cannot restore it Check the images to delete carefully before deleting them If the write protect tab on the Memory Stick is set to LOCK You cannot delete images Deletin...

Page 156: ...the selected image is highlighted 3 Press EXEC The DELETE indicator appears on the screen 4 Press OK The selected images are deleted To return to FN Press EXIT To cancel deleting an image Press CANCEL in step 4 The maximum number of images you can select in one session You can select up to 100 images to be deleted 1 INDEX 2 DEL 1 3 2 4 5 6 EXIT DEL EXEC T t RET 101 4 8 Deleting images DELETE ...

Page 157: ...all of the images in the Memory Stick FOLDER sss To delete the images in the folder selected in the PB FOLDR setting The folder name appears in sss 5 Select OK then press EXEC OK changes to EXECUTE 6 Select EXECUTE then press EXEC The DELETING indicator appears then flashes on the screen When all the unprotected images have been deleted the COMPLETE indicator appears To return to FN Press EXIT To ...

Page 158: ... Press MARK The screen to write a print mark appears 3 Press the image you want to write a print mark The appears on the selected image To return to FN Press EXIT To erase the print marks Press the image you want to erase the print mark in step 3 again The disappears from the image If the write protect tab on the Memory Stick is set to LOCK You cannot write or erase on still images Moving pictures...

Page 159: ...RESIZE screen appears 3 Press 640 480 or 320 240 The resized image is recorded as the newest file in the selected folder to record To change still images Press before step 3 To return to FN Press END to return to PAGE2 then press EXIT Notes You cannot resize the picture recorded with MPEG MOVIE recording You may not be able to resize the picture recorded on other camcorder You cannot select image ...

Page 160: ... supplied i LINK cable optional USB cable supplied Computer Environment requirements USB port editing software DV port editing software USB port editing software For Windows Users 163 172 173 180 161 187 188 189 190 163 172 181 183 For Macintosh Users 184 185 186 Reference pages When connecting to a computer with the USB port complete installation of the USB driver before connecting your camcorder...

Page 161: ...g images with ImageMixer Ver 1 5 for Sony 1 Perform steps 8 and 9 on page 173 2 Click in step 10 on page 174 Refer to the on line help of ImageMixer Ver 1 5 for Sony for details Notes Editing software supplied with your computer can be used For operation details refer to the operation manual or the on line help of the software ImageMixer Ver 1 5 for Sony operations are almost the same for both the...

Page 162: ...ed on your computer is used on your camcorder or if a Memory Stick in your camcorder was formatted from your computer when the USB cable was connected Do not compress the data on the Memory Stick Compressed files cannot be played back on your camcorder Software Depending on your application software the file size may increase when you open a still image file When you load an image modified using r...

Page 163: ...r OS Microsoft Windows 98SE Windows Me Windows 2000 Professional Windows XP Home Edition or Windows XP Professional Standard installation is required However operation is not assured if the above environment is an upgraded OS You cannot hear sound if your computer is running Windows 98 but you can read still images CPU Minimum 500 MHz Intel Pentium III or faster 800 MHz or faster recommended Appli...

Page 164: ... for all the recommended computer environments mentioned above Windows and Windows Media are registered trademarks of Microsoft Corporation in the United States and or other countries Pentium is a trademark or registered trademark of Intel Corporation All other product names mentioned herein may be the trademarks or registered trademarks of their respective companies Furthermore and are not mentio...

Page 165: ...the on screen messages Notes If you connect the USB cable before USB driver installation is complete the USB driver will not be properly registered Carry out installation again following the on screen messages The title screen is not displayed if the screen size of the computer is set to less than 800 600 dots and 256 colors or less See pages 163 and 164 about the recommended computer environment ...

Page 166: ...h permission of computer administrators 1 Turn on your computer and allow Windows to load Or if Windows OS is already running close all active applications 2 Insert the supplied CD ROM in the CD ROM drive of the computer The application software starts up 3 Select Handycam on the screen The title screen appears 4 Move the cursor to Image Transfer and click The Install Wizard program starts up and ...

Page 167: ...pplications 2 Insert the supplied CD ROM into the CD ROM drive of the computer The application software starts up 3 Select Handycam on the screen The title screen appears 4 Move the cursor to ImageMixer and click The Install Wizard program starts up and the Choose Setup Language screen appears 5 Select the language for installation 6 Follow the on screen messages The installation screen disappears...

Page 168: ...e that the ImageMixer CD writing function may not work properly Making the computer recognize your camcorder If you are using Windows 2000 log in with permission of administrators If you are using Windows XP log in with permission of computer administrators Viewing pictures recorded on the tape 1 Connect the AC Adaptor to your camcorder 2 Set the POWER switch to 3 Press FN to display PAGE1 4 Press...

Page 169: ...he Memory Stick into your camcorder 2 Connect the AC Adaptor then set the POWER switch to 3 Connect the USB jack on your camcorder to the USB port on the computer using the supplied USB cable The USB MODE indicator appears on the LCD screen of your camcorder The computer recognizes your camcorder and the Add Hardware Wizard starts 4 Follow the on screen messages so that the Add Hardware Wizard rec...

Page 170: ...ter and allow Windows to load 2 Connect the AC Adaptor and set the POWER switch to 3 Connect the USB port on the computer to the USB jack on your camcorder using the USB cable supplied 4 Open the computer s Device Manager Windows XP Select Start t Control Panel t System t Hardware and click the Device Manager button If there is no System inside Pick a category after clicking Control Panel click Sw...

Page 171: ...iewing Images with your Computer Connecting your camcorder to a computer using the USB cable For Windows users Windows 2000 Windows XP Windows 98SE Windows Me 5 Select and delete the underlined devices below ...

Page 172: ...k on your camcorder using the USB cable supplied 5 Open the computer s Device Manager Windows XP Select Start t Control Panel t System t Hardware tab and click the Device Manager button If there is no System inside Pick a category after clicking Control Panel click Switch to classic view instead Windows 2000 Select My Computer t Control Panel t System t Hardware and click the Device Manager button...

Page 173: ... using Windows XP log in with permission of computer administrators Viewing pictures recorded on the tape 1 Turn on the computer and allow Windows to load 2 Connect the AC Adaptor then insert the cassette into your camcorder 3 Set the POWER switch to 4 Press FN to display PAGE1 5 Press MENU to display the menu 6 Select USB STREAM in then press EXEC p 199 7 Select ON then press EXEC 8 Select Start ...

Page 174: ...d on a tape on a computer USB Streaming For Windows users 10 Click 11 Connect the USB jack on your camcorder to the USB port on the computer using the supplied USB cable Monitor window USB port USB cable supplied USB jack Computer ...

Page 175: ...to 3 Follow steps 4 to 11 on pages 173 and 174 The picture from your camcorder appears on the monitor window on the computer Capturing still images 1 Click 2 Looking at the monitor window move the cursor to and click it at the point you want to capture The still image on the screen is captured Captured images appear in the thumbnail list window Monitor window Video control buttons Monitor window T...

Page 176: ...want to capture changes to 5 Looking at the monitor window click at the last scene you want to capture The moving picture is captured The captured images appear in the thumbnail list window To close ImageMixer Click in the upper right corner of the screen Monitor window Thumbnail list window Video control buttons Viewing pictures recorded on a tape on a computer USB Streaming For Windows users ...

Page 177: ...creen of your camcorder do not appear on images that are captured into the computer If you capture a fast moving picture the preview window may not move smoothly You can make the picture move more smoothly by shifting the upper right slider on the bottom of the monitor window to the left although this deteriorates the picture quality You cannot carry out any Memory Stick operations during USB Stre...

Page 178: ...h you want to capture images onto the CD R 3 Click 4 Connect the USB jack on your camcorder to the USB port on the computer using the supplied USB cable 5 Insert a new CD R in the CD R drive of the computer 6 Click Start The tape is automatically played back Easy Video CD automatically begins to capture images onto the CD R to create a Video CD 7 After the Video CD successfully created message app...

Page 179: ...creen as a location for the Location of work folder CD RWs cannot be used Playing back Video CDs You can use a DVD player or a computer with a DVD drive to play back the Video CDs you create To play back Video CDs on a computer you need to have Video CD software installed You can play back Video CDs with Windows Media Player However you cannot use menu functions such as capturing function You also...

Page 180: ...lp operating instructions of ImageMixer An ImageMixer Ver 1 5 for Sony on line help site is available where you can find the detailed information about ImageMixer Ver 1 5 for Sony 1 Click the located in the upper right corner of the screen The ImageMixer s Manual screen appears 2 You can find the information you need from the list of contents To close on line help Click in the upper right corner o...

Page 181: ...ert the Memory Stick into your camcorder then connect the AC Adaptor to your camcorder 3 Set the POWER switch to 4 Connect the USB jack on your camcorder to the USB port on the computer using the supplied USB cable 5 Image Transfer automatically starts up and the transfer of image data begins 6 ImageMixer automatically starts up enabling you to view the copied image 7 Select an album and the image...

Page 182: ...he USB port on the computer using the supplied USB cable The USB MODE indicator appears on the screen of your camcorder 5 Open My Computer on Windows and double click the newly recognized drive e g Removable Disk F The folders inside the Memory Stick appear 6 Double click a desired image file from the folder in this order DCIM folder t sssMSDCF folder 1 t Image file 2 See Image file storage destin...

Page 183: ...ck only 2 Folder containing image files recorded with your camcorder When no new folders have been created this is only 101MSDCF 3 Folder containing moving picture data recorded using other camcorders without the folder creation function for playback only 1 2 3 Disconnect the USB cable and remove the Memory Stick or set the POWER switch to OFF CHG For Windows 2000 Windows Me or Windows XP users 1 ...

Page 184: ...pment to a single computer at the same time or when using a hub Some equipment may not operate depending on the type of USB equipment that is used simultaneously Operations are not guaranteed for all the recommended computer environments mentioned above Macintosh iMac iBook Power Mac Mac OS and QuickTime are trademarks of Apple Computer Inc All other product names mentioned herein may be the trade...

Page 185: ...Camcorder USB Shim 6 When the message appears click OK The USB driver is installed on the computer 7 Remove the CD ROM from the computer 8 Restart the computer For Mac OS 9 1 9 2 Mac OS X v10 0 v10 1 v10 2 The USB driver need not be installed Your camcorder is automatically recognized as a drive just by connecting your Mac using the USB cable Connecting your camcorder to a computer using the USB c...

Page 186: ...t Image file 2 1 sss stands for any number within the range from 101 to 999 2 Copying a file to the hard disk of the computer before viewing it is recommended If you play back the file directly from the Memory Stick the image and sound may break off Disconnect the USB cable and remove the Memory Stick or set the POWER switch to OFF CHG 1 Close all running applications Make sure that the Memory Sti...

Page 187: ...ENU 3 Select VIDEOINPUT in then press EXEC 4 To use the video jack select VIDEO or to use the S video jack select S VIDEO then press EXEC The default setting is VIDEO 5 Select A V t DV OUT in then press EXEC 6 Select ON then press EXEC 7 Start playback on the analog video unit 8 Start capturing procedures on the computer The operation procedures depend on the computer and the software which you us...

Page 188: ...le to output images correctly when you convert video signals into digital video signals via your camcorder Depending on the analog video unit the image may contain noise or incorrect colors You cannot record or capture video output via your camcorder when the video tapes include copyright protection signals If the computer has a USB port You can connect using a USB cable but images may not be tran...

Page 189: ...y VAIO series personal computers Furthermore this function cannot be used with some Sony VAIO models in some countries or regions For details of compatible models of computer or system requirements refer to the following websites the U S A http www vaio net Canada http www sonystyle ca Latin America http vaio online sony com Asia http vaio online sony com i LINK Signal flow DV Interface i LINK cab...

Page 190: ...opens automatically In the following cases the computer will cancel capturing of images and the DVD will be created with images that have been currently captured Refer to the on line help of Click to DVD Automatic Mode A blank portion of over 10 seconds on the tape is detected A recording date older than the previous image is detected A change of image ratio from normal to wide or vice versa is de...

Page 191: ...r items Press RET to return to step 3 For details see Selecting the mode setting of each item p 192 Customizing your Camcorder Changing the menu settings 2 3 4 5 MENU MANUAL SET PROGRAM AE P EFFECT RED EYE R FLASH LVL WHT BAL AUTO SHTR EXIT RET EXEC MANUAL SET P EFFECT EXIT RET EXEC MANUAL SET PROGRAM AE RED EYE R FLASH LVL WHT BAL EXIT RET EXEC OTHERS WORLD TIME BEEP COMMANDER DISPLAY REC LAMP EX...

Page 192: ...e flash level higher than normal To use the normal setting To make the flash level lower than normal To adjust the white balance p 53 To automatically activate the electronic shutter when shooting in bright conditions Not to activate the electronic shutter even when shooting in bright conditions POWER switch Note on RED EYE R and FLASH LVL You cannot adjust RED EYE R and FLASH LVL if the external ...

Page 193: ...e picture To record a 16 9 wide picture p 55 To compensate for camera shake To cancel SteadyShot Natural pictures are produced when shooting a stationary subject with a tripod Not to display 7 on the LCD screen To display 7 on the LCD screen p 41 To use the NightShot Light p 38 To cancel the NightShot Light POWER switch Notes on SteadyShot SteadyShot may not correct excessive camera shake Attachme...

Page 194: ... camcorder To output analog images and sound in digital format using your camcorder p 187 To use the video plug of the A V connecting cable when recording from a player To use the S video plug of the A V connecting cable when recording from a player To set the brightness on the LCD screen normal To brighten the LCD screen To adjust the color on the LCD screen with r R To set the brightness on the ...

Page 195: ... capacity of the Memory Stick in the following cases For 5 seconds after setting the POWER switch to MEMORY or VCR and inserting the Memory Stick When the remaining capacity of the Memory Stick is less than 2 minutes after setting the POWER switch to MEMORY For 5 seconds from the start of moving picture recording For 5 seconds after completing moving picture recording To always display the remaini...

Page 196: ...tick Check the contents of the Memory Stick before formatting 1 Select FORMAT then press EXEC 2 Select OK then press EXEC 3 After the EXECUTE indicator appears press EXEC The FORMATTING indicator flashes during formatting The COMPLETE indicator appears when formatting is complete POWER switch The folder name is displayed in the sss Notes on formatting Do not do any of the following while the FORMA...

Page 197: ...title or make your own title p 106 109 To erase the title you have superimposed p 108 To display the title you have superimposed To not display the title p 107 To search using Cassette Memory p 81 82 To search without using Cassette Memory p 83 To label the cassette p 110 To cancel erasing all the data To erase all the data in Cassette Memory p 111 POWER switch continued on the following page ...

Page 198: ...tivate Interval Recording To set INTERVAL and REC TIME for Interval Recording POWER switch Notes on the LP mode When you record the tape in the LP mode on your camcorder we recommend playing back the tape on your camcorder When you play back the tape on another camcorder or VCRs noise may occur in pictures or sound When you record in the LP mode we recommend using a Sony Excellence Master mini DV ...

Page 199: ...EMO MODE You cannot select DEMO MODE when the cassette or the Memory Stick is inserted in your camcorder When NIGHTSHOT is slid to ON the NIGHTSHOT indicator appears on the screen and you cannot select DEMO MODE in the menu settings If you press the touch panel during the demonstration the demonstration stops for a while then it starts again after about 10 minutes DEMO MODE is set to STBY Standby ...

Page 200: ...ront of your camcorder To turn the camera recording lamp off so that the person is not aware of the recording To cancel Digital program editing To make programs and perform Digital program editing on the tape p 87 To make programs and perform Digital program editing on the Memory Stick p 139 POWER switch Mode z MELODY NORMAL OFF z ON OFF z LCD V OUT LCD z ON OFF z RETURN TAPE MEMORY Note If you pr...

Page 201: ...pe is stuck to the drum moisture condensation c Remove the cassette and leave your camcorder for at least 1 hour to acclimatize p 221 Your camcorder automatically turns off to prevent the battery pack from running out and to protect the tape when your camcorder has been in recording standby for more than 5 minutes c Set the POWER switch to OFF CHG and then to CAMERA The battery pack is dead or nea...

Page 202: ... in in the menu settings p 193 The power of the external flash optional is off or the power source is not installed c Turn on the external flash optional or install the power source Two or more external flashes optional are attached c Only one external flash optional can be attached PORTRAIT or SPORTS of PROGRAM AE is on when recording in light from a discharge tube such as a fluorescent lamp sodi...

Page 203: ...assette Memory c Use a cassette with Cassette Memory p 81 CM SEARCH is set to OFF in in the menu settings c Set it to ON p 197 There is no title in the tape c Superimpose the titles p 106 The tape has a blank portion in the recorded portion p 81 AUDIO MIX is set to the ST1 side in in the menu settings c Adjust AUDIO MIX p 194 TITLE DSPL is set to OFF in in the menu settings c Set it to ON p 197 Th...

Page 204: ...so that the indication on the remaining battery time indicator is correct p 16 A deviation has occurred in the remaining battery time indicator c Charge the battery pack fully again so that the indication on the remaining battery time indicator is correct p 16 c Use a charged battery pack p 15 16 The power source is disconnected c Connect it firmly p 15 16 The battery pack is dead c Use a charged ...

Page 205: ... any images in it The image is protected c Cancel image protection p 154 The write protect tab on the Memory Stick is set to LOCK c Release the lock p 113 You tried to delete more than 100 images in one session c You can select up to 100 images on the INDEX screen in one session p 156 The write protect tab on the Memory Stick is set to LOCK c Release the lock p 113 The write protect tab on the Mem...

Page 206: ...t mark is written on 999 files c A print mark can only be written on up to 999 files Images recorded using other cameras may not be resized p 159 You may not be able to play back images recorded by other equipment in actual size This is not a malfunction Folders files renamed or images processed with the computer may not be played back If you record images with any other equipment the images may n...

Page 207: ...in on a recorded portion p 94 The synchronization of your camcorder and the VCR is not adjusted c Adjust the synchronization of the VCR p 92 The IR SETUP code is not correct c Set the correct code p 91 Setting a program on a blank portion of the tape is attempted c Set the program again on a recorded portion p 139 COMMANDER is set to OFF in in the menu settings c Set it to ON p 200 Something is bl...

Page 208: ...ediately and contact your Sony dealer or local authorized Sony service facility DISPLAY BATT INFO is pressed c Press the LCD screen lightly c Press DISPLAY BATT INFO on your camcorder or DISPLAY on the Remote Commander p 25 43 c Adjust the screen CALIBRATION p 224 The USB cable was connected before installation of the USB driver was complete c Uninstall the incorrect USB driver and reinstall the U...

Page 209: ...te A malfunction that you cannot service has occurred c Contact your Sony dealer or local authorized Sony service facility and inform them of the 5 digit code e g E 61 10 If you are unable to rectify the problem even if you try corrective actions a few times contact your Sony dealer or local authorized Sony service facility Your camcorder has a self diagnosis display function This function display...

Page 210: ...rrupted p 115 The Memory Stick is not formatted correctly p 196 Warning indicator for incompatible Memory Stick Slow flashing An incompatible Memory Stick is inserted If indicators appear on the screen check the following See the page in parentheses for details Q Warning indicator for a tape Slow flashing The tape is near the end No cassette is inserted The write protect tab of the cassette is set...

Page 211: ...There is no recorded portion on the tape 1 You cannot dub new sound i LINK CABLE i LINK cable is connected 1 You cannot dub new sound p 102 FULL The Memory Stick is full p 123 1 The write protect tab on the Memory Stick is set to LOCK p 113 1 NO FILE No image is recorded or recognized on the Memory Stick 1 NO MEMORY STICK No Memory Stick is inserted 1 AUDIO ERROR You are trying to record an image ...

Page 212: ... deleting data in the Memory Stick FORMATTING You pressed PHOTO on your camcorder while formatting the Memory Stick NOW CHARGING Charging the built in flash or an external flash optional does not work correctly FOLDER NO FULL You have reached the maximum number of folders that can be created on a Memory Stick USB STREAMING ON GOING USB Streaming is being performed You hear the melody or beep sound...

Page 213: ...d portions titles may not be displayed properly or the search functions may not work properly Perform the following to prevent a blank portion from being created on the tape Press END SCH to go to the end of the recorded portion before you begin the next recording if you operate the following You have ejected the cassette during recording You have played back the tape You have used edit search If ...

Page 214: ... The balance between stereo 1 and stereo 2 can be adjusted by selecting AUDIO MIX in the menu settings during playback Both sounds can be played back 16 bit mode A new sound cannot be recorded but the original sound can be recorded in high quality Moreover it can also play back sound recorded in 32 kHz 44 1 kHz or 48 kHz When playing back a tape recorded in the 16 bit mode the 16BIT indicator appe...

Page 215: ...sette Rewind the tape to the beginning put the cassette in its case and store it in an upright position When the Cassette Memory function does not work Reinsert the cassette The gold plated connector of a mini DV cassette may be dirty or dusty Cleaning the gold plated connector If the gold plated connector on a cassette is dirty or dusty the remaining tape indicator sometimes does not appear corre...

Page 216: ...e to efficiently charge the battery pack After charging is complete either disconnect the cable from the DC IN jack on your camcorder or remove the battery pack Effective use of the battery pack Battery pack performance decreases in 10 C 50 F or below surroundings So the time that the battery pack can be used becomes shorter We recommend the following to use the battery pack longer Put the battery...

Page 217: ... is not used for a long time do the following once a year to maintain proper function 1 Fully charge the battery pack 2 Discharge on your electronic equipment 3 Remove the battery pack from the equipment and store it in a dry cool place To use the battery pack up on your camcorder leave your camcorder in tape recording standby until the power goes off without a cassette inserted Battery life The b...

Page 218: ... can be connected to this unit by the i LINK cable When connecting this unit to i LINK compatible equipment having two or more DV Interfaces refer to the operating instructions of the equipment to be connected About the name i LINK i LINK is a more familiar term for IEEE 1394 data transport bus proposed by Sony and is a trademark approved by many corporations IEEE 1394 is an international standard...

Page 219: ... your computer make sure that application software supported by this unit is already installed on your computer Some video equipment such as digital TV DVD MICRO MV may not be compatible with the DV Interface even if they have an i LINK jack Make sure that the equipment is compatible with the DV Interface before connecting For details on precautions when connecting this unit also refer to the oper...

Page 220: ...entral America Chile Colombia Ecuador Jamaica Japan Korea Mexico Peru Surinam Taiwan the Philippines the U S A Venezuela etc PAL system Australia Austria Belgium China Czech Republic Denmark Finland Germany Holland Hong Kong Hungary Italy Kuwait Malaysia New Zealand Norway Poland Portugal Singapore Slovak Republic Spain Sweden Switzerland Thailand United Kingdom etc PAL M system Brazil PAL N syste...

Page 221: ...hen the power is turned on again If moisture starts to condense your camcorder sometimes cannot detect condensation If this happens the cassette is sometimes not ejected for about 10 seconds after the cassette lid is opened This is not a malfunction Do not close the cassette lid until the cassette is ejected Note on moisture condensation Moisture may condense when you bring your camcorder from a c...

Page 222: ...ing cassette optional Check the picture and if the above problem persists repeat cleaning If the video heads become very dirty the entire screen becomes blue c Note on the video head The video head suffers from wear after long use If you cannot obtain a clear image even after using a cleaning cassette it might be because the video head is worn Please contact your Sony dealer or local authorized So...

Page 223: ...n when the POWER switch is set to OFF CHG The built in rechargeable battery is always charged as long as you are using your camcorder The battery however will get discharged gradually if you do not use your camcorder It will be completely discharged in about 3 months if you do not use your camcorder at all Even if the built in rechargeable battery is not charged it will not affect your camcorder o...

Page 224: ...casing unplug your camcorder and have it checked by a Sony dealer before operating it any further Avoid rough handling or mechanical shock Be particularly careful of the lens Keep the POWER switch setting to OFF CHG when you are not using your camcorder Do not wrap your camcorder with a towel for example and operate it Doing so might cause heat to build up inside Keep your camcorder away from stro...

Page 225: ...ged Do not bend the power cord forcibly or place a heavy object on it This may damage the cord and cause fire or electrical shock Prevent metallic objects from coming into contact with the metal parts of the connecting section If this happens a short may occur and the unit may be damaged Always keep metal contacts clean Do not disassemble the unit Do not apply mechanical shock or drop the unit Whi...

Page 226: ...nstall the rechargeable battery pack in the video equipment securely Charging while some capacity remains does not affect the original battery capacity Notes on the button type lithium battery Keep the Remote Commander and button type lithium battery out of the reach of children to prevent them swallowing the battery If swallowed consult a doctor immediately Do not disassemble heat or short circui...

Page 227: ...NDOOR 3 200 K OUTDOOR 5 800 K Minimum illumination 7 lx lux F 1 8 0 lx lux in the NightShot mode Objects unable to be seen due to the dark can be shot with infrared lighting Input Output connectors Audio Video jack 10 pin connector Input output auto switch Video signal 1 Vp p 75 Ω unbalanced Luminance signal 1 Vp p 75 Ω unbalanced Chrominance signal 0 286 Vp p 75 Ω unbalanced Audio signal 327 mV a...

Page 228: ...argeable battery pack NP FM30 Maximum output voltage DC 8 4 V Output voltage DC 7 2 V Capacity 5 0 Wh 700 mAh Dimensions approx 38 2 20 5 55 6 mm 1 9 16 13 16 2 1 4 in w h d Mass approx 65 g 2 3 oz Operating temperature 0 C to 40 C 32 F to 104 F Type Lithium ion Memory Stick Memory Flash memory 8MB MSA 8A Operating voltage DC 2 7 3 6 V Power consumption Approx 45 mA during operation mode Approx 13...

Page 229: ...p 9 4 Battery pack Battery terminal cover p 15 5 BATT release lever p 15 Camcorder 1 6 7 8 2 9 3 q 4 qa 5 qs 6 Eyecup p 223 7 Viewfinder p 34 8 LOCK switch p 29 9 i headphones jack green When you use headphones the speaker on your camcorder is muted 0 POWER switch p 28 qa START STOP button p 28 qs Flash lamp flash button p 124 ...

Page 230: ...ault qf Speaker qg Viewfinder lens adjustment lever p 34 qh LCD BACKLIGHT switch p 34 qj Memory Stick slot p 10 115 qk Cassette lid p 8 ql Access lamp p 115 w OPEN ZEJECT lever p 8 wa Tripod receptacle Make sure that the length of the tripod screw is less than 5 5 mm 7 32 inch Otherwise you cannot attach the tripod securely and the screw may damage your camcorder ...

Page 231: ... images The lens for your camcorder was developed jointly by Carl Zeiss in Germany and Sony Corporation It adopts the MTF measurement system for video camera and offers a quality as the Carl Zeiss lens MTF stands for Modulation Transfer Function The value number indicates the amount of light of a subject coming into the lens ws wd wf wg wh wj wk wl e wj DV Interface p 85 97 187 189 The DV Interfac...

Page 232: ...llowing you to turn the power supplied by the shoe on and off Refer to the operating instructions of the accessory for details The intelligent accessory shoe has a safety device for fixing the installed accessory securely To connect an accessory press down and push it to the end and then tighten the screw To remove an accessory loosen the screw and then press down the accessory and pull it off ed ...

Page 233: ...recedence ek AUDIO VIDEO jack p 47 84 97 187 el LANC jack blue LANC stands for Local Application Control Bus System The control jack is used for controlling the tape transport of video equipment and other peripherals connected to the video equipment This jack has the same function as the jack indicated as CONTROL L or REMOTE r Grip belt p 8 21 ej eh el ek r ra rs rd ra Power zoom lever p 35 78 rs ...

Page 234: ...ted Before operation remove the insulation 1 PHOTO button p 51 120 135 2 Memory Control buttons p 144 3 SEARCH M button p 81 82 4 buttons p 81 82 5 Video control buttons p 46 6 ZERO SET MEMORY button p 80 1 7 8 9 q 2 3 4 5 6 Insulation 7 Transmitter Point toward the remote sensor to control your camcorder after turning it on 8 START STOP button p 28 9 Power zoom button p 35 q DISPLAY button p 43 ...

Page 235: ...mmander may not function properly In this case replace the battery with a Sony CR2025 lithium battery Use of another battery may present a risk of fire or explosion A button type lithium battery CR2025 is already installed in the Remote Commander Do not use any batteries other than CR2025 Point the remote sensor away from strong light sources such as direct sunlight or overhead lighting Otherwise ...

Page 236: ...HOT p 37 COLOR SLOW SHUTTER p 38 AUTO 60 AWB F1 8 9dB 0 12 34 48min ZERO SET MEMORY END SEARCH DV IN 16BIT 12 05 56 PM 50min STBY STILL 16 9WIDE NEG ART 6 5 4 3 2 1 9 q qa w ql qk qj qh qg qf qd ws ws wd wa wg wf wh 7 8 qs qj Warning p 210 qk Time code p 30 Tape counter p 80 Self diagnosis p 209 Memory photo recording p 120 Image number p 145 Playback folder p 145 ql Remaining tape p 30 Memory pho...

Page 237: ...32 Interval Recording 71 Interval Photo Recording 132 JPEG 112 Labeling a cassette 110 LANC jack 233 Luminance key 61 M N M CHROM 128 M LUMI 128 M OVERLAP 128 Main sound 214 Manual focus 68 MEMORY MIX 128 Memory PB ZOOM 151 Memory photo recording 120 Memory Stick 112 Memory Stick capacity 119 Menu settings 191 Mirror mode 32 Moisture condensation 221 MONOTONE 57 MOSC FADER 57 MPEG 112 NIGHTSHOT 37...

Page 238: ......

Page 239: ......

Page 240: ...Printed in Japan Printed on 100 recycled paper using VOC Volatile Organic Compound free vegetable oil based ink ...

Reviews: