background image

54

GB

By adjusting the remote signal, you can control 
your TV with the supplied remote.

Notes

• If you enter a new code number, the code number 

previously entered will be erased.

• When you replace the batteries of the remote, the 

code number may reset itself to the default (SONY) 
setting. Reset the appropriate code number.

Controlling TVs with the 
remote

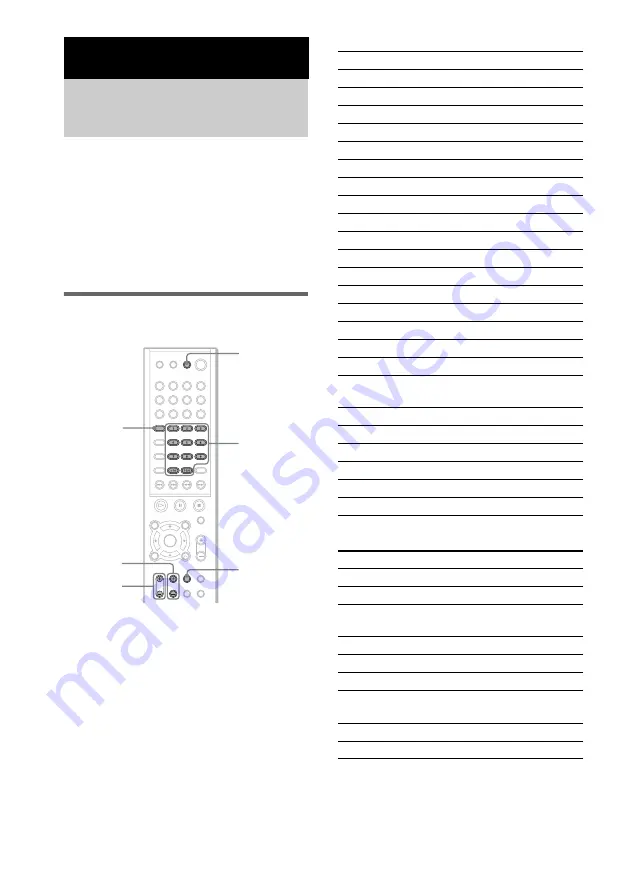
Press and hold TV 

[

/

1

 while entering your 

TV’s manufacturer’s code (see the table) 
using the number buttons. Then release TV 

[

/

1

.

If you set successfully the manufacturer’s code, 
the TV button flashes twice slowly. If the setting 
is unsuccessful, the TV button flashes five times 
quickly.

Code numbers of controllable TVs

If more than one code number is listed, try 
entering them one at a time until you find the one 
that works with your TV.

TV

CATV

Other Operations

Controlling TV with the 
Supplied Remote

TV CH +/–

TV/VIDEO

Number 
buttons

TV VOL +/–

TV 

?

/

1

TV button

Manufacturer

Code number

SONY

001

AIWA

001, 047

DAEWOO

002, 004, 005, 006, 007, 015

FISHER

008

GOLDSTAR

002, 003, 011, 012, 015, 034

GRUNDIG

017, 034, 055

HITACHI

002, 013, 014, 015

ITT/NOKIA

021, 022

JVC

016

LOEWE

048, 049, 050

MAGNAVOX

002, 003, 018

MITSUBISHI/MGA 002, 003, 019

NEC

002, 003, 020

PANASONIC

009, 024

PHILIPS

015, 018

PIONEER

009, 025, 026, 040

RCA/PROSCAN

002, 010, 027, 028, 029

SAMSUNG

002, 003, 015, 031, 032, 033, 
034, 051, 052, 053, 054

SANYO

008, 044, 045, 046

SHARP

035

TELEFUNKEN

023, 036, 037, 038

THOMSON

030, 037, 039

TOSHIBA

035, 040, 041

ZENITH

042, 043

Manufacturer

Code number

SONY

101

HAMLIN/REGAL

123, 124, 125, 126, 127

JERROLD/GI

102, 103, 104, 105, 106, 107, 
108, 109, 119, 131

OAK

128, 129, 130

PANASONIC

120, 121, 122

PIONEER

115, 116

SCIENTIFIC 
ATLANTA

110, 111, 112

TOCOM

117, 118, 131

ZENITH

113, 114

Summary of Contents for DAV-SC5

Page 1: ... 2003 Sony Corporation 4 248 408 12 2 Compact AV System Operating Instructions DAV SC5 ...

Page 2: ... intend to use it for an extended period of time To disconnect the cord pull it out by the plug never by the cord Installing Allow adequate air circulation to prevent internal heat buildup Do not place the unit on surfaces rugs blankets etc or near materials curtains draperies that may block the ventilation slots Do not install the unit near heat sources such as radiators or air ducts or in a plac...

Page 3: ...LED remains lit for a while the system is completely off On adjusting volume Do not turn up the volume while listening to a section with very low level inputs or no audio signals If you do the speakers may be damaged when a peak level section is suddenly played On cleaning Clean the cabinet panel and controls with a soft cloth slightly moistened with a mild detergent solution Do not use any type o...

Page 4: ...fle Play Playing Repeatedly 32 Repeat Play Searching for a Particular Point on a Disc 33 Scan Slow motion Play Searching for a Title Chapter Track Index Album File 34 Viewing Disc Information 36 Sound Adjustments Changing the Sound 41 Enjoying Surround Sound 43 Using the Sound Effect 46 Using Various Additional Functions Changing the Angles 47 Displaying Subtitles 48 Locking Discs 49 CUSTOM PARENT...

Page 5: ... Additional Information Troubleshooting 70 Specifications 73 Glossary 74 Index to Parts and Controls 77 Language code list 82 DVD Setup Menu List 83 Index 84 Quick reference for Remote Commander Back cover ...

Page 6: ...usic piece on a VIDEO CD Super Audio CD CD or MP3 Index Super Audio CD CD Video Index VIDEO CD A number that divides a track into sections to easily locate the point you want on a VIDEO CD Super Audio CD or CD Depending on the disc no indexes may be recorded Scene On a VIDEO CD with PBC functions page 25 the menu screens moving pictures and still pictures are divided into sections called scenes Fi...

Page 7: ...iscs that the system cannot play The system cannot play the following discs CD ROMs except for extension MP3 JPG or JPEG CD Rs CD RWs other than those recorded in the following formats music CD format video CD format MP3 JPEG format that conforms to ISO9660 Level 1 Level 2 or its extended format Joliet Data part of CD Extras DVD ROMs DVD Audio discs DVD RAMs DVD RWs in VR Video Recording mode Prog...

Page 8: ...U S patents and other intellectual property rights Use of this copyright protection technology must be authorized by Macrovision and is intended for home and other limited viewing uses only unless otherwise authorized by Macrovision Reverse engineering or disassembly is prohibited This system incorporates with Dolby Digital and Dolby Pro Logic II adaptive matrix surround decoder and the DTS Digita...

Page 9: ...ays the index and selects the index Super Audio CD to be played TIME page 36 Checks the elapsed time and the remaining playback time Inputs the time code for picture and music searching AUDIO DVD VIDEO CD Super Audio CD CD MP3 only page 41 Changes the audio setting SUBTITLE DVD only page 48 Displays the subtitles Changes the subtitle language ALBUM JPEG only page 28 Selects the album JPEG to be pl...

Page 10: ...s are recorded on the disc FILE JPEG only page 28 Selects the file JPEG to be played DATE JPEG only page 40 Displays the date information ANGLE DVD only page 47 Changes the angle PLAYMODE VIDEO CD Super Audio CD CD MP3 JPEG only page 32 Selects the play mode REPEAT page 32 Plays the entire disc all titles all tracks one title chapter track album or contents of program repeatedly CUSTOM PARENTAL CO...

Page 11: ... the markings inside the compartment When using the remote point it at the remote sensor on the system Notes Do not leave the remote in an extremely hot or humid place Do not use a new battery with an old one Do not drop any foreign object into the remote casing particularly when replacing the batteries Do not expose the remote sensor to direct light from the sun or lighting apparatus Doing so may...

Page 12: ...t any speakers other than those supplied with this system To obtain the best possible surround sound specify the speaker parameters distance level etc on page 21 Required cords Speaker cords The connector and the colour tube of the speaker cords are the same colour as the label of the jacks to be connected Step 1 Speaker System Hookup colour tube ...

Page 13: ... and R red jacks Surround speakers SPEAKER SURR L blue and R grey jacks Centre speaker SPEAKER CENTER green jack Subwoofer SPEAKER WOOFER purple jack COAXIAL FM 75 OPTICAL DIGITAL IN AM CENTER FRONT L FRONT R WOOFER SURR L SURR R SPEAKER VIDEO OUT AUDIO OUT VIDEO IN AUDIO IN R L R L VIDEO 1 VIDEO 2 VIDEO IN AUDIO IN R L MONITOR OUT COMPONENT VIDEO OUT Y PB CB PR CR VIDEO 2 SCAN SELECT SELECTABLE I...

Page 14: ...e speaker cord After connecting all the components speakers and mains lead output a test tone to check that all the speakers are connected correctly For details on outputting a test tone see page 67 If no sound is heard from a speaker while outputting a test tone or a test tone is output from a speaker other than the one currently displayed in the front panel display the speaker may be short circu...

Page 15: ...hing While pressing the plug down against a flat surface insert the new speaker cords Note that the cord marked with a line should be attached to the minus side of the plug Note Be careful not to damage the surface you use desk etc when attaching detaching the speaker cords Tips You can use any commercially sold speaker cable of gauge cord AWG 18 AWG 24 Before attaching a new cable strip off 10 mm...

Page 16: ...t the supplied AM loop aerial the cord A and the cord B can be connected in either terminal Step 2 Aerial Hookups Connect the To the AM loop aerial AM terminals FM wire aerial FM 75ΩCOAXIAL jack COAXIAL FM 75 OPTICAL DIGITAL IN AM CENTER FRONT L FRONT R WOOFER SURR L SURR R SPEAKER VIDEO OUT AUDIO OUT VIDEO IN AUDIO IN R L R L VIDEO 1 VIDEO 2 VIDEO IN AUDIO IN R L MONITOR OUT COMPONENT VIDEO OUT Y...

Page 17: ...Getting Started 17GB Tip If you have poor FM reception use a 75 ohms coaxial cable not supplied to connect the system to an outdoor FM aerial as shown below COAXIAL FM 75 AM Outdoor FM aerial System ...

Page 18: ...ode of the system is set to DVD and PROGRESSIVE is selected in SCREEN SETUP the signal is output only from the COMPONENT OUT jacks Tips When using the S video jack instead of the video jacks your TV monitor must also be connected via an S video jack S video signals are on a separate bus from the video signals and will not be output through the video jacks When using the COMPONENT VIDEO OUT jacks Y...

Page 19: ...sten to the TV or game machine ex PlayStation 2 sound by using the system Connect the audio output jacks of the TV or game machine to the VIDEO 2 AUDIO IN jacks of the system with the audio cords optional S VIDEO IN INPUT VIDEO IN INPUT Y PB CB PR CR COMPONENT VIDEO IN VIDEO IN R VIDEO OUT AUDIO IN AUDIO OUT L VIDEO OUT R AUDIO OUT L OPTICAL DIGITAL OUT COAXIAL FM 75 OPTICAL DIGITAL IN AM CENTER F...

Page 20: ...20GB Before connecting the mains lead of this system to a wall outlet connect the speakers to the system see page 13 Step 4 Connecting the Mains Lead ...

Page 21: ...ased TV or projector install the subwoofer at least 0 3 metre from the TV set If it is installed too close colour irregularity may occur on the screen If colour irregularity occurs turn off the TV set once then turn it on after 15 to 30 minutes If colour irregularity occurs again place the subwoofer farther away from the TV set If colour irregularity still occurs after performing the above make su...

Page 22: ...appears in the front panel display 5 Press H The system starts playback continuous play Adjust the volume on the system After following Step 5 Depending on the disc a menu may appear on the TV screen You can play the disc interactively by following the instructions on the menu DVD page 24 VIDEO CD page 25 To remove the disc Press A on the system or Z on the remote Remove the disc after it is eject...

Page 23: ...art playback by pressing the H Saving the power in standby mode Press 1 on the system or 1 on the remote once Tip While the system is in standby mode the STANDBY indicator on the system lights up To cancel standby mode Press 1 on the remote once Additional operations You cannot pause during JPEG playback Notes If there is no disc in the system READY appears on the front panel display If DVD playba...

Page 24: ... play from the beginning of the disc press x twice then press H A DVD is divided into a lot of sections which make up a picture or music feature These sections are called titles When you play a DVD which contains several titles you can select the title you want using DVD TOP MENU ALBUM When you play DVDs that allow you to select items such as the language for the subtitles and the language for the...

Page 25: ...the disc as the operating procedure may differ depending on the VIDEO CD To go back to the menu Press O RETURN Notes Depending on the VIDEO CD the menu does not appear in Step 1 Depending on the VIDEO CD Press ENTER in Step 3 may appear as Press SELECT in the instructions supplied with the disc In this case press H Tip To play without using PBC press or the number buttons while the system is stopp...

Page 26: ... albums on a disc 99 The maximum number of MP3 audio tracks that can be contained on an album is 250 An album that does not include an MP3 audio track is skipped If you put the extension MP3 to data not in MP3 format the system cannot recognize the data properly and will generate a loud noise which could damage your speaker system If the system cannot play MP3 remove the disc and select CUSTOM SET...

Page 27: ...mage files on CD ROMs CD Rs or CD RWs However the discs must be recorded according to ISO9660 level 1 level 2 or Joliet format for the system to recognize the files You can also play discs recorded in Multi Session See the instructions of the CD R RW device or recording software not supplied for details on the recording format 1 Load a data disc recorded in JPEG into the system 2 Press H The syste...

Page 28: ...to the file or the album list 5 Select a file using X x and press ENTER The selected file starts playing To return to the previous display Press O RETURN or C To turn off the display Press DVD DISPLAY Notes Only the letters in the alphabet and numbers can be used for album or file names Anything else is displayed as Maximum number of albums on a disc 99 The maximum number of JPEG image files that ...

Page 29: ...ing Slide show the interval time changes With each press the indication changes as follows The FF3M interval time is faster than FF2M Note Slide show can play in only one direction To rotate the current image Rotate the current image using C c Each time you press c the image turns clockwise by 90º Each time you press C the image turns counterclockwise by 90º Note You cannot rotate the image during...

Page 30: ...x Press C or O RETURN to return to the track list 3 Select the track you want to program For example select track 7 4 Press X x or the number buttons to select 7 then press ENTER 5 To program other tracks repeat Steps 2 to 4 The programmed tracks are displayed in the selected order Creating Your Own Program Program Play Number buttons CLEAR PLAY MODE H REPEAT ORETURN C X x c ENTER Program Total Ti...

Page 31: ...racks and play them in random order Subsequent shuffling will produce a different playing order 1 In stop mode press PLAY MODE repeatedly until SHUF appears in the front panel display When you play an MP3 disc you can play all tracks in albums in random order For details on album shuffle see page 32 2 Press H To return to normal play In stop mode press PLAY MODE repeatedly until SHUF disappears fr...

Page 32: ...INUE SHUFFLE ALBUM t CONTINUE ALBUM You can play all the titles tracks files or a single title chapter track on a disc In Shuffle or Program Play mode the system repeats tracks in shuffled or programmed order You cannot perform Repeat Play during PBC playback of VIDEO CDs page 25 1 Press DVD DISPLAY The Control Menu appears 2 Press X x to select REPEAT then press ENTER or c If you do not select OF...

Page 33: ...cel Repeat Play Press CLEAR Notes Depending on the DVD disc Repeat Play does not work Repeat Play is cancelled when you eject the disc If ALL is selected repeat play is limited to 5 times Tips You can set Repeat Play during stop mode After selecting the REPEAT item press H The system starts Repeat Play You can quickly display the REPEAT status Press REPEAT on the remote You can perform Repeat Play...

Page 34: ...search a title DVD chapter DVD track CD VIDEO CD Super Audio CD MP3 index VIDEO CD Super Audio CD album MP3 JPEG and file JPEG As titles tracks albums and files are assigned unique names on the disc you can select the desired one from the Control Menu Also chapters and indexes are assigned unique numbers on the disc so you select the desired one by entering its number Or you can search a particula...

Page 35: ...VD DISPLAY The Control Menu appears 2 Press X x to select the search method x When playing a DVD CHAPTER x When playing a VIDEO CD INDEX x When playing a Super Audio CD INDEX Example when you select CHAPTER is selected refers to a number The number in parentheses indicates the total number of chapters or indexes 3 Press ENTER or c changes to 4 Press X x or the number buttons to select the chapter ...

Page 36: ...ck number displayed is the same number recorded on the disc You cannot search a scene of a VIDEO CD If you play a DVD input the playing time of the current title using the time code If you play a CD Super Audio CD VIDEO CD or MP3 input the playing time of the current track using the time code Tip You can change the display to show playing time or remaining time For details see Checking the Playing...

Page 37: ... the current title Remaining time and number of the current title Playing time and number of the current chapter Remaining time and number of the current chapter Title name Current sound field INDEX M S TRK M S M S INDEX M S TRK Playing time and current track number Remaining time and current track number Playing time of the disc Remaining time of the disc Track name Current sound field continued ...

Page 38: ...ime and current track remaining time may not be displayed accurately when an MP3 file of VBR variable bit rate is played Tips When playing VIDEO CDs with PBC functions only the playing time of the scene is displayed The playing time and remaining time of the current chapter title track scene or disc will also appear on your TV screen See the following section Checking the Playing Time and Remainin...

Page 39: ...f the current chapter Playing time of the menu or current title without a chapter x When playing a VIDEO CD with PBC functions Playing time of the current scene x When playing a VIDEO CD without PBC functions Super Audio CD or CD T Playing time of the current track T Remaining time of the current track D Playing time of the current disc D Remaining time of the current disc x When playing an MP3 T ...

Page 40: ...hangeable Image File Format is a digital camera image format defined by the Japan Electronics Information technology Industries Association Note If there is no date information or data is damaged on the disc the system cannot display the date information Tip You can change the date information order in JPEG DATE of CUSTOM SETUP page 65 DVD DISPLAY MOUNTAIN FAMILY 1 2 0 BIRTHDAY 01 01 2003 JPEG Dat...

Page 41: ...gnal x When playing a DVD Depending on the DVD the choice of language varies When 4 digits are displayed they represent the language code Refer to the language code list on page 82 to see which language the code represents When the same language is displayed two or more times the DVD is recorded in multiple audio formats x When playing a VIDEO CD CD or MP3 The default setting is underlined STEREO ...

Page 42: ...corded channels may differ PCM MPEG DTS or DOLBY DIGITAL is displayed For DOLBY DIGITAL the channels in the playing track are displayed numerically as follows For Dolby Digital 5 1 ch The display examples are as follows PCM stereo Dolby Surround Dolby Digital 5 1ch DTS Tips When the signal contains surround signal components such as LS RS or S the surround effect is enhanced If you play MPEG AUDIO...

Page 43: ...decoding of the audio input signal AUTO FORMAT DIRECT AUTO The auto decoding function automatically detects the type of audio signal being input Dolby Digital DTS or standard 2 channel stereo and performs the proper decoding if necessary This mode presents the sound as it was recorded encoded without adding any effects e g reverberation However if there are no low frequency signals Dolby Digital L...

Page 44: ...the sound characteristics of the Sony Pictures Entertainment Kim Novak Theater cinema production studio This mode is ideal for watching science fiction or action movies with lots of sound effects x C ST EX C Cinema Studio EX C Reproduces the sound characteristics of the Sony Pictures Entertainment scoring stage This mode is ideal for watching musicals or classic films where music is featured in th...

Page 45: ...the sound from the headphone L R Standard 2 channel stereo sources completely bypass the sound field processing Multi channel surround formats are downmixed to two channels x HEADPHONE THEATER This mode outputs the sound as surround from headphone L R To turn the surround effect off Press SOUND FIELD on the remote repeatedly until A F D AUTO appears in the front panel display When connecting the h...

Page 46: ...ss BASS LEVEL the bass level changes in the following sequence BASS OFF t BASS 1 t BASS 2 t BASS OFF To turn off the sound effect Press NIGHT MODE on the remote again or BASS LEVEL on the remote repeatedly until BASS OFF appears in the front panel display Notes The NIGHT MODE function is activated only when the input stream is Dolby Digital format When you connect the headphones to the system the ...

Page 47: ...dicator lights up in green when angles are recorded on the disc 3 Press ENTER or c The angle number changes to 4 Select the angle number using the number buttons or X x then press ENTER The angle is changed to the selected angle To turn off the Control Menu Press DVD DISPLAY repeatedly until the Control Menu is turned off Note Depending on the DVD you may not be able to change the angles even if m...

Page 48: ...nguage Depending on the DVD the choice of language varies When 4 digits are displayed they indicate the language code Refer to the language code list on page 82 to see which language the code represents 4 Press ENTER To cancel the SUBTITLE setting Select OFF in Step 3 To turn off the Control Menu Press DVD DISPLAY repeatedly until the Control Menu is turned off Note Depending on the DVD you may no...

Page 49: ...f the disc is playing press x to stop playback 2 In stop mode press DVD DISPLAY The Control Menu appears 3 Press X x to select CUSTOM PARENTAL CONTROL then press ENTER or c CUSTOM PARENTAL CONTROL is selected 4 Press X x to select ON t then press ENTER x If you have not entered a password yet The display for registering a new password appears Enter a 4 digit password by using the number buttons th...

Page 50: ...sword using the number buttons then press ENTER 4 To confirm your password re enter it using the number buttons then press ENTER Playing the disc for which Custom Parental Control is set 1 Insert the disc for which Custom Parental Control is set The CUSTOM PARENTAL CONTROL display appears 2 Enter your 4 digit password using the number buttons then press ENTER The system is ready for playback Notes...

Page 51: ...isplay for registering a new password appears Enter a 4 digit password using the number buttons then press ENTER The display for confirming the password appears x When you have already registered a password The display for entering the password appears 4 Enter your password using the number buttons then press ENTER The display for setting the playback limitation level and changing the password app...

Page 52: ...e more strict the limitation If you make a mistake Press O RETURN to go back to the previous screen To turn off the Setup Display Press DVD SETUP repeatedly until the Setup Display is turned off To turn off the Parental Control function and play the DVD after entering your password Set LEVEL to OFF in Step 8 To change the password 1 In Step 5 select CHANGE PASSWORD t using x then press ENTER The d...

Page 53: ...d repeat Step 1 to 3 of Limiting playback for children When you are asked to enter your password enter 199703 using the number buttons then press ENTER The display will ask you to enter a new 4 digit password After you enter a new 4 digit password in Step 3 replace the disc in the system and press H When the PARENTAL CONTROL display appears enter your new password Area Code Standard Code number Ar...

Page 54: ...ntil you find the one that works with your TV TV CATV Other Operations Controlling TV with the Supplied Remote TV CH TV VIDEO Number buttons TV VOL TV 1 TV button Manufacturer Code number SONY 001 AIWA 001 047 DAEWOO 002 004 005 006 007 015 FISHER 008 GOLDSTAR 002 003 011 012 015 034 GRUNDIG 017 034 055 HITACHI 002 013 014 015 ITT NOKIA 021 022 JVC 016 LOEWE 048 049 050 MAGNAVOX 002 003 018 MITSUB...

Page 55: ...t operate the remote for 10 seconds Tip Depending on the TV manufacture the following method also works Press 10 then the number For example for channel 25 press 10 then 2 and 5 You can use VCRs or other units connected to the VIDEO 1 or VIDEO 2 jacks Refer to the operation manual supplied with the unit for further information on the operation Press FUNCTION repeatedly until VIDEO 1 or VIDEO 2 tha...

Page 56: ...G or until scanning starts then release Scanning stops when the system tunes in a station TUNED and ST for stereo program appear in the front panel display 3 Press MEMORY A preset number appears in the front panel display 4 Press PRESET or to select the preset number you want 5 Press ENTER The station is stored 6 Repeat 1 to 5 to store other stations To change the preset number Restart from step 1...

Page 57: ...radio stations Use manual or automatic tuning in Step 2 For manual tuning press TUNING or on the remote repeatedly For automatic tuning press and hold TUNING or on the remote Press TUNING or when you stop the automatic tuning Tips If an FM program is noisy press STEREO MONO on the remote so that MONO appears in the front panel display There will be no stereo effect but the reception will improve P...

Page 58: ...ress FUNCTION the mode of the system changes in the following sequence DVD t VIDEO 1 t VIDEO 2 t TUNER FM or AM t DVD 2 Press PRESET or repeatedly to select the preset station you want to create an index name for 3 Press NAME 4 Create an index name by using the cursor buttons Press X x to select a character then press c to move the cursor to the next position If you make a mistake Press C or c rep...

Page 59: ...ning time Press SLEEP once To change the remaining time Press SLEEP repeatedly to select the desired time To cancel the Sleep Timer function Press SLEEP repeatedly until SLEEP OFF appears in the front panel display You can change the brightness of the front panel display by two steps 1 Press AMP MENU repeatedly until CUSTOMIZE appears in the front panel display 2 Press x X until DIMMER appears in ...

Page 60: ... Press C c until MEMO CLR Y appears in the front panel display and press ENTER When you select MEMO CLR N and press ENTER this operation will be cancelled 4 Press C c until Really Y appears in the front panel display and press ENTER ALL CLEAR appears in the front panel display and the settings return to the default settings When you select Really N and press ENTER this operation will be cancelled ...

Page 61: ...ted Setup item appears Example SCREEN SETUP 3 Select an item using X x then press ENTER or c The options for the selected item appear Example TV TYPE Press C or O RETURN to return to setup items 4 Select a setting using X x then press ENTER The setting is selected and setup is complete Example 4 3 PAN SCAN Settings and Adjustments Using the Setup Display DVD SETUP C X x c ENTER O RETURN LANGUAGE S...

Page 62: ...ects the display language on the screen Selects the language from the displayed list x DVD MENU DVD only Selects the desired language for the DVD menu x AUDIO DVD only Selects the language of the sound track Selects the language from the displayed list x SUBTITLE DVD only Selects the language of the subtitle Selects the language from the displayed list Note If you select a language that is not rec...

Page 63: ...ROUND Selects the background colour or picture on the TV screen in stop mode or while playing a CD Settings for the Display SCREEN SETUP 16 9 Select this if you connect a wide screen TV or a TV with a wide mode function 4 3 LETTER BOX Select this if you connect a 4 3 screen TV Displays a wide picture with bands on the upper and lower portions of the screen 4 3 PAN SCAN Select this if you connect a...

Page 64: ...ng the display see Using the Setup Display page 61 The default settings are underlined x VCD COLOR SYSTEM Asian models only Select the colour system when you play a VIDEO CD Notes You cannot change the colour system of the disc itself On Asian models you can change the colour system of this unit according to the connected TV page 19 x PARENTAL CONTROL t DVD only Sets a password and playback limita...

Page 65: ...AMIC range compression only applies to Dolby Digital sources x DATA CD PRIORITY MP3 JPEG only Set priority data you want to play when you play a DATA CD CD ROM CD R CD RW containing MP3 audio tracks and JPEG image files Notes When you play multi session CDs the system decides a target to play for the last session or session linked with the last session If you change this setting reinsert the disc ...

Page 66: ...d height Since the front speaker and subwoofer settings are fixed you cannot change them Notes When you select an item the sound cuts off for a moment Depending on the settings of other speakers subwoofer may be excessive Settings for the Speakers SPEAKER SETUP SPEAKER SETUP DISTANCE TEST TONE SIZE BALANCE LEVEL 90 20 45 A A B B Position diagram FRONT YES CENTER YES Normally select this NONE Selec...

Page 67: ...LUME x TEST TONE The speakers will emit a test tone to adjust LEVEL and BALANCE FRONT 3 0 m Front speaker distance from the listening position can be set in 0 2 metre increments from 1 0 to 7 0 metres CENTER 3 0 m Centre speaker distance can be moved up to 1 6 metres closer to the listening position from the front speaker distance in 0 2 metre increments SURROUND 3 0 m Surround speaker distance ca...

Page 68: ... Press X or x repeatedly to select OFF then press ENTER Note When you adjust the speaker settings the sound cuts off for a moment Tip To adjust the balance or the level without listening to the test tone select BALANCE or LEVEL in step 3 and press ENTER Then adjust the balance or level using X x and press ENTER Setting the speakers by using the front panel display on the system You can set the spe...

Page 69: ...4 6 metres closer to the listening position than the front speakers Cannot be set to less than 1 metre S P surround speakers position BEHIND behind SIDE side S H surround speakers height LOW low HIGH high T TONE test tone ON on OFF off F ______I_______ front speakers balance C LEV centre speaker level 6 dB to 6 dB S L LEV surround left speaker level 6 dB to 6 dB S R LEV surround right speaker leve...

Page 70: ...atible with progressive format 480p signals the image may be affected when you set COMPONENT OUT to PROGRESSIVE In this case set COMPONENT OUT to INTERLACE When PROGRESSIVE is selected in SCREEN SETUP no signal is output from the MONITOR OUT or S VIDEO OUT jacks Picture noise appears The disc is dirty or flawed If the picture output from your system goes through your VCR to get to your TV the copy...

Page 71: ... function is on page 43 Select a sound field containing the word C ST EX page 44 Depending on the source the effect of the surround speakers may be less noticeable Operation Radio stations cannot be tuned in Check that the aerials are connected securely Adjust the aerials or connect an external aerial if necessary The signal strength of the stations is too weak when tuning in with automatic tuning...

Page 72: ...tops automatically Some discs may contain an auto pause signal While playing such a disc the system stops playback at the auto pause signal The system turns off during DVD playback If approximately one hour passes with DVD playback paused or with the DVD top menu or a DVD menu displayed during DVD playback the system automatically turns off You cannot perform some functions such as Stop Search Slo...

Page 73: ...section System PLL quartz locked digital synthesizer system FM tuner section Tuning range 87 5 108 0 MHz 50 kHz step Aerial FM wire aerial Aerial terminals 75 ohms unbalanced Intermediate frequency 10 7 MHz AM tuner section Tuning range Middle Easten models 531 1 602 kHz with the interval set at 9 kHz Other models 531 1 602 kHz with the interval set at 9 kHz 530 1 710 kHz with the interval set at ...

Page 74: ... frequency range and a subwoofer channel for deep bass is independently provided This format is also called 5 1 with the subwoofer channel designated as the 0 1 channel since it functions only when a deep bass effect is needed All six channels in this format are recorded separately for superior channel separation Furthermore since all the signals are processed digitally less signal degradation occ...

Page 75: ...ted data according to the status of the picture The audio data is recorded in Dolby Digital as well as in PCM allowing you to enjoy more realistic audio presence Furthermore various advanced functions such as the multi angle multilingual and Parental Control functions are provided with the DVD File Section of a picture on a data CD containing JPEG image files Film based software Video based softwa...

Page 76: ...nt of information which provides higher quality sound There are three types of discs single layer double layer and hybrid discs The hybrid disc contains both standard audio CD and Super Audio CD information Title The longest section of a picture or music feature on a DVD movie etc in video software or the entire album in audio software Track Section of a picture or a music piece on a Super Audio C...

Page 77: ... 22 C H play 22 D X pause 23 E x stop 23 F PREV NEXT PRESET 23 25 56 57 G VOLUME 22 67 H BASS LEVEL 46 I PHONES on the side of the system jack 22 J SOUND FIELD 43 44 45 K DISPLAY 36 39 57 L BAND 56 57 M FUNCTION 22 55 57 N Front panel display 78 O remote sensor 11 P 1 power switch STANDBY indicator 22 Index to Parts and Controls ...

Page 78: ...nd Current mode TITLE H M S CHAP DOLBY PL DIGITAL NIGHT REP 1 PROG BASS SHUF M S TRK SACD PCM MP3 NIGHT REP 1 PBC PROG BASS SHUF MULTI Current sound Lights up during PBC playback VIDEO CD only Playing time Current mode Playing status Current track number Current sound effect Lights up during MULTI channel playback area Super Audio CD only TUNED MONO FM AM ST NIGHT MHz kHz BASS Preset number Curren...

Page 79: ...Additional Information 79GB When playing back a JPEG file Current file number Playing status ...

Page 80: ...XIAL jack 16 H SCAN SELECT switch 64 I COMPONENT VIDEO OUT jacks 18 J VIDEO 1 ANALOG IN jack 18 COAXIAL FM 75 OPTICAL DIGITAL IN AM CENTER FRONT L FRONT R WOOFER SURR L SURR R SPEAKER VIDEO OUT AUDIO OUT VIDEO IN AUDIO IN R L R L VIDEO 1 VIDEO 2 VIDEO IN AUDIO IN R L MONITOR OUT COMPONENT VIDEO OUT Y PB CB PR CR VIDEO 2 SCAN SELECT SELECTABLE INTERLACE COMPONENT VIDEO OUT VIDEO S VIDEO DVD ONLY ...

Page 81: ...ay 22 25 30 31 32 O X pause 23 P DVD TOP MENU ALBUM 24 26 28 Q C X x c ENTER 24 25 26 28 29 30 32 34 41 47 48 49 51 58 59 61 R DVD DISPLAY 26 28 32 34 39 40 41 47 48 49 S TV CH 54 T TV VOL 54 U TV 1 on standby 54 V 1 standby 22 56 W REPEAT 30 32 X NAME 58 Y SOUND FIELD 43 44 45 Z MEMORY 56 wj NIGHT MODE 46 wk Number buttons 24 25 30 34 47 49 51 54 wl ENTER 56 e m M SLOW TUNING 29 33 56 ez x stop 2...

Page 82: ...9 Bulgarian 1060 Bihari 1061 Bislama 1066 Bengali Bangla 1067 Tibetan 1070 Breton 1079 Catalan 1093 Corsican 1097 Czech 1103 Welsh 1105 Danish 1109 German 1130 Bhutani 1142 Greek 1144 English 1145 Esperanto 1149 Spanish 1150 Estonian 1151 Basque 1157 Persian 1165 Finnish 1166 Fiji 1171 Faroese 1174 French 1181 Frisian 1183 Irish 1186 Scots Gaelic 1194 Galician 1196 Guarani 1203 Gujarati 1209 Hausa...

Page 83: ...LETTER 4 3 PAN SCAN ON OFF PICTURE GRAPHICS BLUE BLACK JACKET INTERLACE PROGRESSIVE CUSTOM SETUP VCD COLOR SYSTEMa PARENTAL CONTROL TRACK SELECTION AUTO PAL NTSC OFF 8 7 NC17 STANDARD 6 R 5 4 PG13 3 PG 2 1 G USA OTHERSt CHANGE PASSWORD LEVEL OFF OFF AUTO SPEAKER SETUP SIZE DISTANCE FRONT CENTER SURROUND YES YES NONE BEHIND LOW SUBWOOFER BEHIND HIGH YES FRONT 1 0m 7 0m CENTER 1 0m 7 0m SURROUND 1 0...

Page 84: ... LANGUAGE SETUP 62 LEVEL 67 M MP3 26 Multi angle function 47 75 Multilingual function 41 75 MUTING 23 N NIGHT MODE 46 O On screen display Control Menu display 9 OSD 62 P PARENTAL CONTROL 51 64 75 PBC Playback 25 75 PLAY MODE 30 31 Preset Station 56 Program Play 30 R Radio 57 Rear Panel 80 Region Code 7 76 Remote 54 81 REPEAT 32 RESET 62 Resume Play 24 S S VIDEO 18 Scan 33 SCENE 9 Scene 6 76 SCREEN...

Page 85: ......

Page 86: ......

Page 87: ......

Page 88: ... Control Menu display on the TV screen to set or adjust the items S Select the TV Channel T Adjust the TV volume U Turns the TV on and off V Turns on and off the power of the system W Displays the REPEAT display on the TV screen X Activates the name function Y Select the sound field Z Press to store a preset station wj Makes sound clear at low volume wk Select the items of settings TV Select chann...

Reviews: