background image

10

DSC-W200

3-208-406-

61

(1)

D:\#SAGYO\sony\070322_1_841408S\3208406611\3208406611DSCW200U2\01GB-

DSCW200U2\040PRE.fm

master:Left_PrepL2

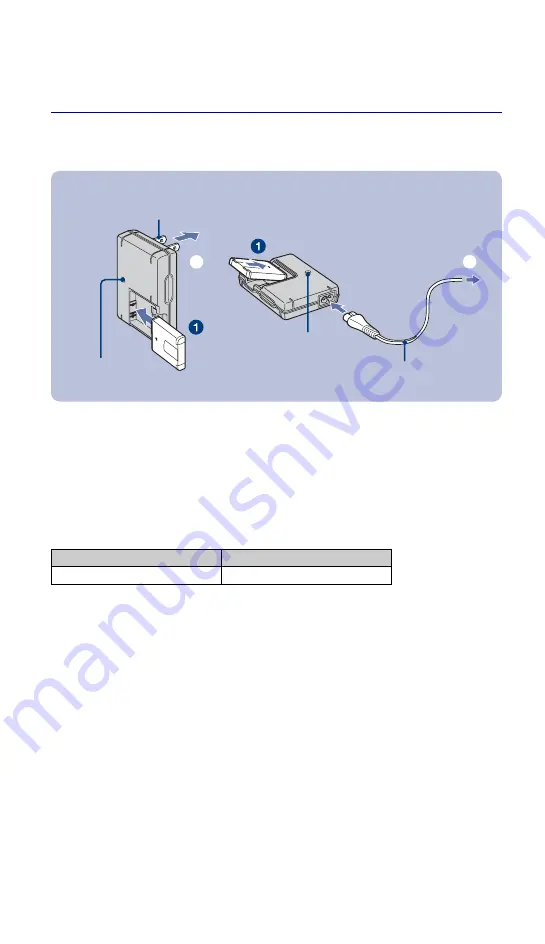
1 Preparing the battery pack

1

Insert the battery pack into the battery charger.

2

Connect the battery charger to the wall outlet (wall socket).

The CHARGE lamp lights on, and charging starts.
When the CHARGE lamp turns off, charging is finished (Practical charge).
If you continue charging the battery pack for about one more hour (until it is fully charged), the charge 
will last slightly longer.

[

Charging time

• Time required to charge a fully depleted battery pack at a temperature of 25°C (77°F). Charging may take 

longer under certain circumstances or conditions.

• See page 27 for the number of images that can be recorded.

• Connect the battery charger to an easily accessible wall outlet (wall socket) close by.

• Even if the CHARGE lamp is not lit, the battery charger is not disconnected from the AC power source 

(mains) as long as it is connected to the wall outlet (wall socket). If some trouble occurs while using the 
battery charger, immediately shut off the power by disconnecting the plug from the wall outlet (wall 
socket).

• When charging is finished, disconnect the power cord (mains lead) from the wall outlet (wall socket), and 

remove the battery pack from the battery charger.

• Designed for use with compatible Sony batteries.

ɟ

CHARGE lamp

Plug

CHARGE lamp

Power cord (mains lead)

For customers in the USA and 
Canada

For customers other than those in the USA and 
Canada

ɟ

Full charge time

Practical charge time

Approx. 330 min.

Approx. 270 min.

Summary of Contents for Cyber-shot DSC-W200

Page 1: ...instrucciones Antes de utilizar la unidad lea detenidamente este manual y consérvelo para consultarlo en el futuro For details on the advanced operations please access Cyber shot Handbook and Cyber shot Step up Guide contained on the supplied CD ROM via a computer Para obtener más información acerca de las opciones avanzadas consulte mediante un ordenador la Guía práctica de Cyber shot y la Guía a...

Page 2: ... may be equipped with a polarized ac power cord plug a plug having one blade wider than the other This plug will fit into the power outlet only one way This is a safety feature If you are unable to insert the plug fully into the outlet try reversing the plug If the plug should still fail to fit contact your electrician to have a suitable outlet installed Do not defeat the safety purpose of the pol...

Page 3: ...sunlight Lightning For added protection for this set during a lightning storm or when it is left unattended and unused for long periods of time unplug it from the wall outlet and disconnect the antenna or cable system This will prevent damage to the set due to lightning and power line surges Damage Requiring Service Unplug the set from the wall outlet and refer servicing to qualified service perso...

Page 4: ... floor mount position If you have any questions about this product you may call Sony Customer Information Center 1 800 222 SONY 7669 The number below is for the FCC related matters only Regulatory Information CAUTION You are cautioned that any changes or modifications not expressly approved in this manual could void your authority to operate this equipment CAUTION For Customers in the U S A and Ca...

Page 5: ... FCC Rules Perchlorate Material special handling may apply See www dtsc ca gov hazardouswaste perchlorate Perchlorate Material Lithium battery contains perchlorate This product has been tested and found compliant with the limits set out in the EMC Directive for using connection cables shorter than 3 meters 9 8 feet Attention The electromagnetic fields at the specific frequencies may influence the ...

Page 6: ... supplied need to be replaced a fuse of the same rating as the supplied one and approved by ASTA or BSI to BS 1362 i e marked with an or mark must be used If the plug supplied with this equipment has a detachable fuse cover be sure to attach the fuse cover after you change the fuse Never use the plug without the fuse cover If you should lose the fuse cover please contact your nearest Sony service ...

Page 7: ...lash Macro Self timer Display 15 Viewing deleting images 17 Learning the various functions HOME Menu 19 Using the HOME screen 19 HOME items 20 Using menu items 21 Menu items 22 Enjoying your computer 23 Supported Operating Systems for USB connection and application software supplied 23 Viewing Cyber shot Handbook and Cyber shot Step up Guide 24 Indicators on the screen 25 Battery life and memory c...

Page 8: ...dium unusable or cause image data breakdown damage or loss Clean the flash surface before use The heat of flash emission may cause dirt on the flash surface to become discolored or to stick to the flash surface resulting in insufficient light emission Notes on the LCD screen and lens The LCD screen is manufactured using extremely high precision technology so over 99 99 of the pixels are operationa...

Page 9: ...GB BC CSGC 1 Power cord mains lead 1 not supplied in the USA and Canada Rechargeable battery pack NP BG1 1 Battery case 1 USB A V cable for multi use terminal 1 Wrist strap 1 CD ROM Cyber shot application software Cyber shot Handbook Cyber shot Step up Guide 1 Instruction Manual this manual 1 Attach the strap and place your hand through the loop to prevent the camera from damage by being dropped e...

Page 10: ...onditions See page 27 for the number of images that can be recorded Connect the battery charger to an easily accessible wall outlet wall socket close by Even if the CHARGE lamp is not lit the battery charger is not disconnected from the AC power source mains as long as it is connected to the wall outlet wall socket If some trouble occurs while using the battery charger immediately shut off the pow...

Page 11: ...nute until the correct battery remaining indicator appears The displayed battery remaining indicator may not be correct under certain circumstances The Clock Set screen appears when the camera is turned on for the first time page 13 Insert the Memory Stick Duo with the terminal side facing the LCD screen Battery Memory Stick Duo cover ɟ ɠ Insert the battery pack while pressing the battery eject le...

Page 12: ...y Stick Duo Open the battery Memory Stick Duo cover Never remove the battery pack Memory Stick Duo when the access lamp is lit This may cause damage to data in the Memory Stick Duo Slide the battery eject lever Be sure not to drop the battery pack Make sure that the access lamp is not lit then push the Memory Stick Duo in once Battery pack Memory Stick Duo ...

Page 13: ...the numeric value with v V then press z 3 Select OK then press z To change the date and time Press the HOME button and select Clock Settings in Settings pages 19 20 When you turn on the power Once the battery is installed in the camera it may take time before operation becomes possible If the camera is running on battery power and you do not operate the camera for about three minutes the camera tu...

Page 14: ...ovies Press the shutter button fully down To stop recording press the shutter button fully down again Tripod receptacle bottom Shutter button ɠ W T Zoom button MENU button Control button HOME button Macro button Self timer button DISP button Flash button Mode dial Microphone Finder Position the subject in the center of the focus frame When shooting still images 1 Press and hold the shutter button ...

Page 15: ... losing the nighttime atmosphere Landscape Shoots with the focus on a distant subject SCN Scene Selection Selects a setting from the Scene Selection menu Scene Selection in the menu Extra High Sensitivity Shoots smoother images without a flash under low light conditions Beach Shoots seaside or lakeside scenes with the blueness of the water captured more vividly Snow Shoots snow scenes in white mor...

Page 16: ...the self timer Setting the 10 second delay self timer Setting the 2 second delay self timer Press the shutter button the self timer lamp flashes and a beep sounds until the shutter operates DISP Changing the screen display Press v DISP on the control button Each time you press v DISP button the display changes as follows Brightness of LCD backlight up r Histogram on r Indicators off r LCD screen o...

Page 17: ...op playback Press B to fast forward b to rewind Press z to return to normal playback Press V to display the volume control screen then press b B to adjust the volume To delete images 1 Display the image you want to delete then press MENU 2 Select Delete with v and select This Image with b B then press z 3 Select OK with v then press z To view an enlarged image playback zoom Press while displaying ...

Page 18: ...dex screen is displayed 2 Select Delete with v and select Multiple Images with b B then press z 3 Select the image you want to delete with v V b B then press z mark is checked in the checkbox of the image To cancel a selection select an image you have selected for deletion then press z again 4 Press MENU and select OK with v then press z To delete all the images in a folder select All In This Fold...

Page 19: ... HOME screen 1Press HOME to display the HOME screen 2 Select a category with b B on the control button 3 Select an item with v V then press z When you select the Manage Memory or Settings category 1 Select the desired item with v V on the control button This is functional only when you select Settings 2 Move to the right with B select a setting with v V then press z 3 Select a setting with v V the...

Page 20: ...Images Single Image Index Display Slide Show Printing Other Print Music Tool Download Music Format Music Manage Memory Memory Tool Memory Stick Tool Format Create REC Folder Change REC Folder Copy Internal Memory Tool Format Settings Main Settings Main Settings 1 Beep Function Guide Initialize Main Settings 2 USB Connect COMPONENT Video Out Shooting Settings Shooting Settings 1 AF Illuminator Grid...

Page 21: ... become visible depending on the selected mode 2Select the desired item with v V on the control button If the desired item is hidden keep pressing v V until the item appears on the screen 3Select the desired setting with b B on the control button If the desired item is hidden keep pressing b B until the item appears on the screen Press z after selecting an item in playback mode 4Press MENU to turn...

Page 22: ...EC Mode Selects the continuous shooting method Color Mode Changes the vividness of the image or adds special effects ISO Selects a luminous sensitivity EV Adjusts Exposure Metering Mode Selects the metering mode Focus Changes the focus method White Bal Adjusts the color tones Flash Level Adjusts the amount of flash light Red Eye Reduction Sets to reduce the red eye phenomenon Contrast Adjusts the ...

Page 23: ...t delivery If your OS does not support USB connections use a commercially available Memory Stick Reader Writer For further details on the operating environment of Picture Motion Browser Cyber shot application software refer to Cyber shot Handbook For Windows users For Macintosh users USB connection Windows 2000 Professional Windows XP Windows Vista Mac OS 9 1 9 2 Mac OS X v10 1 to v10 4 Applicatio...

Page 24: ...cintosh users Turn on your computer and insert the CD ROM supplied into the CD ROM drive Follow the instructions below To view the Cyber shot Handbook 1 Select the Handbook folder and copy Handbook pdf stored in the GB folder to your computer 2 After copying is complete double click Handbook pdf To view the Cyber shot Step up Guide 1 Copy the stepupguide folder in the stepupguide folder to your co...

Page 25: ...anges page 16 When shooting still images When shooting movies When playing back A Battery remaining E Low battery warning Image size Mode dial Menu Scene Selection Mode dial White balance Recording mode Metering mode Face Detection SteadyShot Vibration warning Zoom scaling Color mode PictBridge connecting Protect VOL Volume Print order DPOF mark Zoom scaling PictBridge connecting Contrast Sharpnes...

Page 26: ...abled 101 0012 Folder file number 2007 1 1 9 30 AM Recorded date time of the playback image z STOP z PLAY Function guide for playing image BACK NEXT Select images V VOLUME Adjust volume Recording playback Media Recording folder Playback folder 96 Remaining number of recordable images 12 12 Image number Number of images recorded in selected folder 00 00 00 Remaining recordable time Change folder AF...

Page 27: ...e flash is used frequently The camera has been turned on and off many times The zoom is used frequently The brightness of LCD Backlight is set to up AF Mode is set to Monitor SteadyShot is set to Continuous The battery power is low Face Detection is set to On When shooting still images Shooting in the following situations AF Mode is set to Single SteadyShot is set to Shooting Shooting once every 3...

Page 28: ...t to 640 Fine can only be recorded on a Memory Stick PRO Duo The size of a movie file is limited to approx 2 GB During recording movie recording stops automatically when the file size of the movie reaches approx 2 GB This camera does not support HD recordings or playbacks for movies Capacity Size Internal memory Memory Stick Duo formatted with this camera Approx 31 MB 128 MB 256 MB 512 MB 1 GB 2 G...

Page 29: ...ttery pack correctly page 11 The battery pack is discharged Insert charged battery pack page 10 The battery pack is dead Replace it with a new one Use a recommended battery pack page 9 The power turns off suddenly If you do not operate the camera for about three minutes while the power is on the camera turns off automatically to prevent wearing down the battery pack Turn on the camera again page 1...

Page 30: ...on Set the switch to the recording position You cannot record images while charging the flash When shooting a still image set the mode dial to a position other than Set the mode dial to when shooting movies The image size is set to 640 Fine when recording movies Do one of the following Set the image size to other than 640 Fine Insert a Memory Stick PRO Duo Cannot insert dates on images This camera...

Page 31: ...or insecticide etc Do not touch the camera with the above on your hand Do not leave the camera in contact with rubber or vinyl for a long time On operating temperatures Your camera is designed for use under the temperatures between 0 C and 40 C 32 F and 104 F Shooting in extremely cold or hot places that exceed this range is not recommended On moisture condensation If the camera is brought directl...

Page 32: ...dio output Monaural USB communication USB communication Hi Speed USB USB 2 0 compliant LCD screen LCD panel 6 2 cm 2 5 type TFT drive Total number of dots 115 200 480 240 dots Power general Power Rechargeable battery pack NP BG1 3 6 V AC LS5K AC Adaptor not supplied 4 2 V Power consumption during shooting with the LCD screen on 1 3 W Operating temperature 0 to 40 C 32 to 104 F Storage temperature ...

Page 33: ...oration in the United States and or other countries Macintosh Mac OS iMac iBook PowerBook Power Mac and eMac are trademarks or registered trademarks of Apple Inc Intel MMX and Pentium are trademarks or registered trademarks of Intel Corporation Google is a registered trademark of Google Inc In addition system and product names used in this manual are in general trademarks or registered trademarks ...

Page 34: ...s eléctricos y electrónicos al final de su vida útil aplicable en la Unión Europea y en países europeos con sistemas de recogida selectiva de residuos Este símbolo en el equipo o el embalaje indica que el presente producto no puede ser tratado como residuos domésticos normales sino que debe entregarse en el correspondiente punto de recogida de equipos eléctricos y electrónicos Al asegurarse de que...

Page 35: ...rsas funciones HOME Menú 15 Utilización de la pantalla HOME 15 Elementos del menú HOME 16 Utilización de los elementos del menú 17 Elementos del menú 18 Prestaciones del ordenador 20 Sistemas operativos admitidos para la conexión USB y software de aplicación suministrado 20 Visualización de la Guía práctica de Cyber shot y de la Guía avanzada de Cyber shot 21 Indicadores de la pantalla 22 Duración...

Page 36: ...able o que los datos de las imágenes se estropeen se dañen o se pierdan Limpie la superficie del flash antes de utilizarlo El calor de la emisión del flash puede hacer que la superficie del flash se ensucie que se descolore o incluso se puede adherir a ella lo que ocasionaría una emisión de luz insuficiente Notas sobre la pantalla LCD La pantalla LCD está fabricada mediante tecnología de muy alta ...

Page 37: ...Cable de alimentación 1 no suministrado en EE UU ni Canadá Batería recargable NP BG1 1 Funda de la batería 1 Cable USB A V para terminal multiuso 1 Correa para la muñeca 1 CD ROM software de aplicación Cyber shot Guía práctica de Cyber shot Guía avanzada de Cyber shot 1 Manual de instrucciones este manual 1 Coloque la correa y pase la mano a través de ella para evitar que la cámara caiga accidenta...

Page 38: ...página 24 el número de imágenes que se pueden grabar Conecte el cargador de la batería a una toma de corriente de pared próxima y de fácil acceso Aunque la lámpara CHARGE no esté encendido el cargador de batería no estará desconectado de la fuente de alimentación de ca en tanto que el mismo esté conectado a la toma de corriente de la pared Si ocurre algún problema mientras utiliza el cargador de b...

Page 39: ... suministrado hasta que llegue al final y quede encajado 3Introduzca la batería 4Cierre la tapa de la batería Memory Stick Duo Cuando no hay insertado un Memory Stick Duo La cámara graba y reproduce imágenes con la memoria interna aprox 31 MB Introduzca el Memory Stick Duo con el lado del terminal hacia la pantalla LCD Tapa del compartimiento para la batería y el Memory Stick Duo ɟ ɠ Introduzca la...

Page 40: ...ería Memory Stick Duo No retire la batería Memory Stick Duo cuando el indicador luminoso de acceso esté encendido Podría dañar los datos del Memory Stick Duo Indicador de carga restante Significado de la carga restante Carga suficiente Batería casi totalmente cargada Batería medio cargada Batería baja lagrabacióno reproducción se detendrán pronto Cambie la batería por otra totalmente cargada o car...

Page 41: ...or numérico con v V y a continuación pulse z 3 Seleccione OK y a continuación pulse z Para cambiar la fecha y la hora Pulse el botón HOME y seleccione Ajustes del reloj en Ajustes páginas 15 y 16 Al encender la cámara Una vez se ha instalado la batería en la cámara es posible que deba esperar unos min minuto antes de poderla utilizar Si no utiliza la cámara durante unos tres min minuto mientras es...

Page 42: ...el botón del disparador a fondo Para detener la grabación pulse de nuevo el botón del disparador a fondo Rosca para trípode parte inferior Botón del disparador ɠ Botón W T Zoom Botón MENU Botón de control Botón HOME Botón Macro Botón del autodisparador Botón DISP Botón Flash Dial de modo Micrófono Localizador Sitúe el motivo en el centro del cuadro de enfoque Para tomar imágenes fijas 1 Mantenga p...

Page 43: ...no Paisaje Permite tomar imágenes enfocando en sujetos lejanos SCN Selección escena Selecciona un ajuste desde el menú Selección escena Selección de escena en el menú Sensibilidad extra alta Toma imágenes más uniformes sin flash en condiciones de luz escasa Playa Permite tomar escenas en la orilla del mar o de un lago capturando el azul del mar con mayor intensidad Nieve Permite tomar escenas en l...

Page 44: ...retardo se ajusta el autodisparador de 2 s segundo de retardo Pulse el botón del disparador El indicador luminoso del autodisparador parpadeará y sonará un pitido hasta que funcione el disparador DISP Cambio de la visualización en pantalla Pulse v DISP del botón de control Cada vez que pulse el botón v DISP la pantalla cambia de la siguiente manera Aumento del brillo de la luz de fondo de la panta...

Page 45: ...ra rebobinar Pulse z para regresar a la reproducción normal Pulse V para visualizar la pantalla de control de volumen y a continuación pulse b B para ajustar el volumen Para borrar imágenes 1 Visualice la imagen que desee borrar y pulse MENU 2 Seleccione Borrar con v seleccione Esta ima con b B y a continuación pulse z 3 Seleccione OK con v y a continuación pulse z Para visualizar una imagen ampli...

Page 46: ...eccione Borrar con v y seleccione Múltiples imágenes con b B a continuación pulse z 3 Seleccione la imagen que desee borrar con v V b B y a continuación pulse z La marca aparecerá en el cuadro de verificación de la imagen Para cancelar la selección de una imagen seleccione la imagen que había marcado para borrar y pulse z otra vez 4 Pulse MENU seleccione OK con v y a continuación pulse z Para borr...

Page 47: ...HOME para visualizar la pantalla HOME 2Seleccione una categoría mediante b B del botón de control 3Seleccione un elemento con v V y a continuación pulse z Al seleccionar la categoría Gestión de memoria o Ajustes 1 Seleccione el elemento deseado con v V del botón de control Esto sólo funcionará cuando seleccione Ajustes 2 Desplácese hacia la derecha con B seleccione un ajuste con v V y a continuaci...

Page 48: ...ros Imprimir Herramienta música Desc música Format músi Gestión de memoria Herramienta memoria Her Memory Stick Formatear CrearCarp Grabación Camb Carp Grab Copiar Herr memoria interna Formatear Ajustes Ajustes principales Ajustes principales 1 Pitido Guía funciones Inicializar Ajustes principales 2 Conexión USB COMPONENT Salida vídeo Ajustes de toma imag Ajustes de toma de imagen 1 Iluminador AF ...

Page 49: ...se harán visibles diferentes elementos 2Seleccione el elemento deseado con v V del botón de control Si el elemento deseado está oculto siga pulsando v V hasta que el elemento aparezca en la pantalla 3Seleccione el ajuste deseado con b B del botón de control Si el elemento deseado está oculto siga pulsando b B hasta que el elemento aparezca en la pantalla Pulse z después de seleccionar un elemento ...

Page 50: ...nción de la escena Tam imagen Selecciona el tamaño de la imagen fija Detección de cara Detecta las caras de los sujetos y ajusta el enfoque etc Modo Grabación Selecciona el método de toma continua de imágenes Modo color Cambia la intensidad de la imagen o añade efectos especiales ISO Selecciona la sensibilidad luminosa EV Ajusta la exposición Modo medición Selecciona el modo de medición Enfoque Ca...

Page 51: ...e una serie de imágenes Retocar Retoca imágenes Proteger Impide el borrado accidental Permite añadir una marca de orden de impresión a la imagen que desea imprimir Imprimir Imprime imágenes mediante una impresora compatible con PictBridge Rotar Gira una imagen fija Seleccionar carpeta Selecciona la carpeta de visualización de imágenes Para obtener más información sobre la operación 1 página 17 ...

Page 52: ...mento de la entrega Si el sistema operativo no admite conexiones USB utilice un lector o grabador de Memory Stick disponible en el mercado Para obtener más información sobre el entorno operativo de la aplicación de software Picture Motion Browser para Cyber shot consulte la Guía práctica de Cyber shot Para usuarios de Windows Para usuarios de Macintosh Conexión USB Windows 2000 Professional Window...

Page 53: ...erte el CD ROM suministrado en la unidad de CD ROM Siga las instrucciones que se indican a continuación Para visualizar la Guía práctica de Cyber shot 1 Seleccione la carpeta Handbook y copie el archivo Handbook pdf almacenado en la carpeta ES de su ordenador 2 Una vez finalizada la copia haga doble clic en Handbook pdf Para visualizar la Guía avanzada de Cyber shot 1 Copie la carpeta stepupguide ...

Page 54: ...s fijas Cuando se filman películas Cuando se reproduce A Batería restante E Advertencia de poca batería Tamaño de imagen Dial de modo MENU selección de escena Dial de modo Balance del blanco Modo de grabación Modo de medición Detección de cara SteadyShot Aviso de vibración Relación del zoom Modo de color Conexión PictBridge Protección VOL Volumen Marca de orden de impresión DPOF Relación del zoom ...

Page 55: ...peta archivo 2007 1 1 9 30 AM Fecha hora grabada en la imagen en reproducción z STOP z PLAY Guía de función para reproducir imágenes BACK NEXT Seleccionan imágenes V VOLUME Ajustan el volumen Grabación reproducción de soportes Carpeta de grabación Carpeta de reproducción 96 Número restante de imágenes grabables 101 101 12 12 Número de imagen Número de imágenes grabadas en la carpeta seleccionada 0...

Page 56: ...ilizado frecuentemente El brillo de la luz de fondo de la pantalla LCD está ajustado en un nivel alto Modo AF está ajustado en Monitor SteadyShot está ajustado en Continuo La batería tiene poca energía Detección de cara está ajustado en Activar Cuando se toman imágenes fijas Tomando imágenes en las siguientes situaciones Modo AF está ajustado en Sencillo SteadyShot está ajustado en Tomando Tomando...

Page 57: ...n el tamaño ajustado en 640 Fina sólo pueden grabarse en un Memory Stick PRO Duo El tamaño de un archivo de película se limita a aproximadamente 2 GB La grabación de películas se detiene automáticamente cuando el tamaño del archivo de película alcanza aproximadamente los 2 GB Esta cámara no es compatible con la grabación ni la reproducción de películas en formato HD alta definición Capacidad Tamañ...

Page 58: ...tería está descargada Inserte una batería cargada página 6 La batería ha llegado al final de su vida útil Reemplácela por una nueva Utilice una de las baterías recomendadas página 5 La alimentación se desconecta de repente Si no utiliza la cámara durante unos tres min minuto mientras está conectada la alimentación la cámara se apaga automáticamente para evitar que la batería se descargue Encienda ...

Page 59: ...necesarias página 13 Cambie el Memory Stick Duo Está utilizando el Memory Stick Duo con el conmutador de protección contra escritura ajustado en la posición LOCK Ajuste el conmutador en la posición de grabación No es posible grabar imágenes mientras se carga el flash Cuando tome una imagen fija ajuste el dial de modo en una posición distinta de Ajuste el dial de modo en cuando tome películas El ta...

Page 60: ...otón Reproducción página 13 El nombre de la carpeta o del archivo ha sido modificado en el ordenador Si se ha procesado un archivo de imagen con un ordenador o si se ha grabado el archivo de imagen con un modelo distinto al de la cámara la reproducción en esta cámara no está garantizada La cámara se encuentra en el modo USB Elimine la conexión USB Visualización de imágenes ...

Page 61: ...pelente de insectos bronceador con filtro solar insecticida etc No toque la cámara con las sustancias anteriores en la mano No deje la cámara en contacto con objetos de goma o vinilo durante un tiempo prolongado Acerca de la temperatura de funcionamiento La cámara ha sido diseñada para utilizarse con temperaturas de entre 0 C y 40 C No se recomienda tomar imágenes en lugares extremadamente fríos o...

Page 62: ...iple Salida de vídeo Salida de audio monoaural Comunicación USB Comunicación USB Hi Speed USB cumple con el estándar USB 2 0 Pantalla LCD Panel LCD unidad de TFT de 6 2 cm tipo 2 5 Número total de puntos 115 200 480 240 puntos Alimentación general Alimentación batería recargable NP BG1 3 6 V Adaptador de alimentación de ca AC LS5K no suministrado 4 2 V Consumo de energía durante la toma con la pan...

Page 63: ...s Unidos y o en otros países Macintosh Mac OS iMac iBook PowerBook Power Mac y eMac son marcas comerciales o marcas comerciales registradas de Apple Inc Intel MMX y Pentium son marcas comerciales o marcas comerciales registradas de Intel Corporation Google es una marca comercial registrada de Google Inc Además los nombres de sistemas y productos utilizados en este manual son en general marcas come...

Page 64: ...iente puede encontrar información adicional sobre este producto y respuesta a las preguntas hechas con más frecuencia Printed in China Printed on 70 or more recycled paper using VOC Volatile Organic Compound free vegetable oil based ink Impreso en papel reciclado en un 70 o más utilizando tinta hecha con aceite vegetal exento de compuesto orgánico volátil COV ...

Reviews: