background image

19

18

Operating the Drive

Note:

When the drive is set up in vertical position, use the disc locks to
prevent your disc from falling. See “How to Use the Disc Locks” on
page 21 for details.

4

Gently push the tray or press the eject button to close the tray.
The drive will begin reading the Table of Contents (TOC) data
when it accepts the disc. The busy indicator lights up in amber
while the drive is reading the TOC.
When the busy indicator lights out, the drive is ready to receive
commands, and data may be retrieved from the disc.
After loading the CD-R or CD-RW disc, it takes a moment for
the drive to become ready while the Program Memory Area is
read.
For subsequent drive operations, follow the instructions provided
with the CD authoring software you are using.

Note:

The busy indicator stays lit in amber if:

– the disc is not properly placed on the loading tray
– a malfunction occurs.

In either case, eject the disc and place it in the loading tray again
making sure that it sits properly in the tray. If doing this does not
solve the problem and the busy indicator still remains lit in amber,
consult your dealer or qualified service personnel.
The busy indicator also lights amber during audio play. However,
this is not a malfunction.

Caution: Do not forcibly close the disc drawer. Applying excessive
force may damage the loading mechanism. The tray’s mechanism is
designed to operate with a “feather touch”.

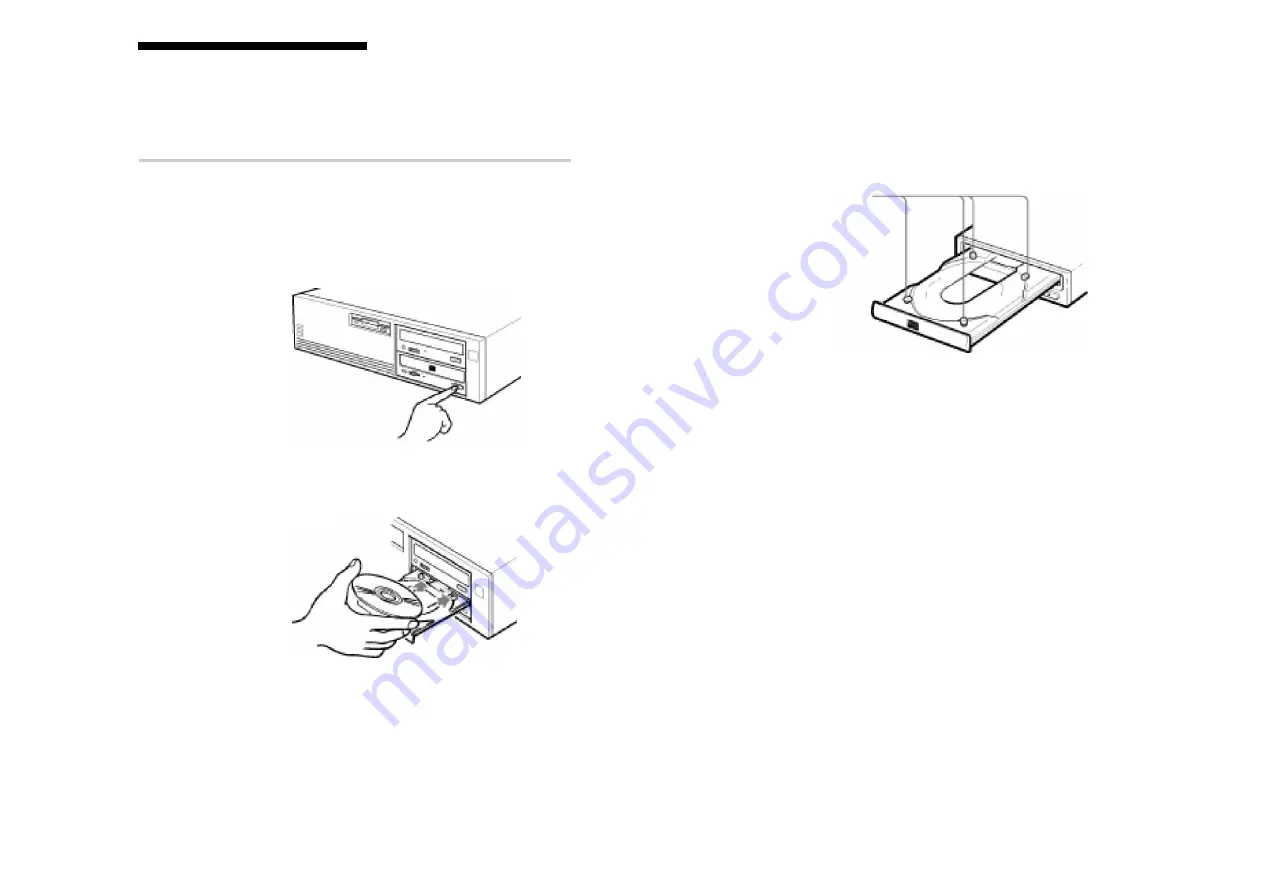
Disc locks

Operating the Drive

This section describes how to start the drive and eject a disc.

Starting the Drive

1

Turn on the power of your computer.

2

Press the eject button.
The tray comes out automatically.

3

Place a disc in the tray with its label side up.

Operating the Drive

Summary of Contents for CRX-160S

Page 1: ...CRX 160S CD R RW Drive Unit User s Guide 2000 by Sony Australia Limited This manual is subject to change without notice CRX 160S CD R RW Drive Unit User s Guide Revision 1 1 ...

Page 2: ...CT label is located at the top of the enclosure Owner s Record The model and serial numbers are located on the top of the drive Record these numbers in the spaces provided below Refer to them whenever you call upon your sales repre sentative regarding this product Model No Serial No Safety Regulations WARNING To prevent fire or shock hazard do not expose the unit to rain or moisture To avoid elect...

Page 3: ...d trademark of Apple Computer Contents Introduction 6 Location and Function of Parts and Controls 7 Front Panel 7 Rear Panel 8 Precautions 9 System Setup 10 Installing the Drive in Your Computer 10 Preparation 10 Setting the Jumpers 11 Opening the Computer 12 Mounting the Drive 12 Connecting the Drive 13 Mounting the Host Adapter 16 Closing the Computer 16 Installing the Software 17 Using Discs 17...

Page 4: ...ode 1 CD Rom XA mode 2 form 1 2 CD I mode 2 form 1 2 Video CD and CD text Reads data in Photo CD Single and Multi session The CRX 160S conforms to the specifications set out in Orange Book Part II version 3 1 and Orange Book Part III version 2 0 Supported write methods Disc At Once Session At Once Track At Once Variable Packet Fixed Packet and Track Reservation Performance Supports CD R write spee...

Page 5: ... one hour before you turn off the power Operating the drive immediately after a sudden increase in temperature may result in a malfunction during reading or writing Transportation Close the disc drawer before moving the drive Keep the original packing materials for future transport of the drive Precautions Rear Panel 1 F GND Frame ground tab Connect with one of the host computer s ground cables wh...

Page 6: ...SI Interface cable 50 pin flat cable Software Device Driver for reading discs only No device drivers are required from Sony to enable use of the CRX 160S Instead your SCSI controller and its device driver must support CD writer devices This should be checked at the SCSI controller manufactur ers web site Authoring Software for writing discs To write to a CD authouring software will be required The...

Page 7: ... Installing the Drive Unit into the Computer Installing the Drive Unit into the Computer Opening the Computer Refer to your computers user manual for instructions on how to open the computer Mounting the Drive Do not mount the drive at an angle it is only designed to be operated horizontally or vertically Some computers chasis require mounting rails on each side of the drive when installing new dr...

Page 8: ...es can introduce system problems Closing the Computer Refer to your computers user manual for instructions on how to close the computer Installing the Drive Unit into the Computer Installing the Drive Unit into the Computer Frame ground When installed the CD writer unit should have its metal chasis in contact with a grounded metal area of the computers frame This normally occurs naturally when the...

Page 9: ...ntaminated Using Discs Installing the Drive Unit into the Computer Installing the Software Device Driver No device drivers are required from Sony to enable use of the CRX 160S Instead your SCSI controller and its device driver must support CD writer devices This should be checked at the SCSI controller manufacturers web site Authoring Software To write to a CD authouring software will be required ...

Page 10: ...software you are using Note The busy indicator stays lit in amber if the disc is not properly placed on the loading tray a malfunction occurs In either case eject the disc and place it in the loading tray again making sure that it sits properly in the tray If doing this does not solve the problem and the busy indicator still remains lit in amber consult your dealer or qualified service personnel T...

Page 11: ...ces inward Disc locks locked unlocked to lock to unlock Operating the Drive Ejecting the Disc To eject the disc press the eject button on the front panel The tray comes out automatically Note The eject button does not work if it is disabled by the software you are using Opening the tray manually in an emergency You can open the tray manually when it fails to come out by means of the eject button o...

Page 12: ...eo CD CD EXTRA CD TEXT Writing Method Disc at once Session at once Track at once Variable packet Fixed packet writing Multi session Cache memory 4 Mbytes Read and Write speed Read CD Rom CD R 4X 8X 13 32X CAV Read CD RW 2X 4X 8X 8X 20X CAV Read DAO written CD RW 4X 8X 8X 20X CAV Read unfinalized CD R 1x 2X 4X 8X 10X 8X 20X CAV Write CD R 1X 2X 4X 8X 12X Write CD RW 1X 2X 4X 8X Operating the Drive ...

Page 13: ... 4X 1200 Kbytes s mode 1 8X 1800 Kbytes s mode 1 12X 2000 to 4800 Kbytes s mode 1 13 to 32X CAV 171 1 Kbytes s mode 2 1X 342 2 Kbytes s mode 2 2X 684 4 Kbytes s mode 2 4X 1368 8 Kbytes s mode 2 8X 2053 9 Kbytes s mode 2 12X 2281 3 to 5475 2 Kbytes s mode 2 13 to 32X CAV SCSI Interface Burst Rate Asynchronous 5 0 MBytes s Synchronous 10 0 MBytes s Access time Random stroke 150 ms 13 to 32X CAV typi...

Reviews: