background image

Managing pictures on a Windows computer

24

6

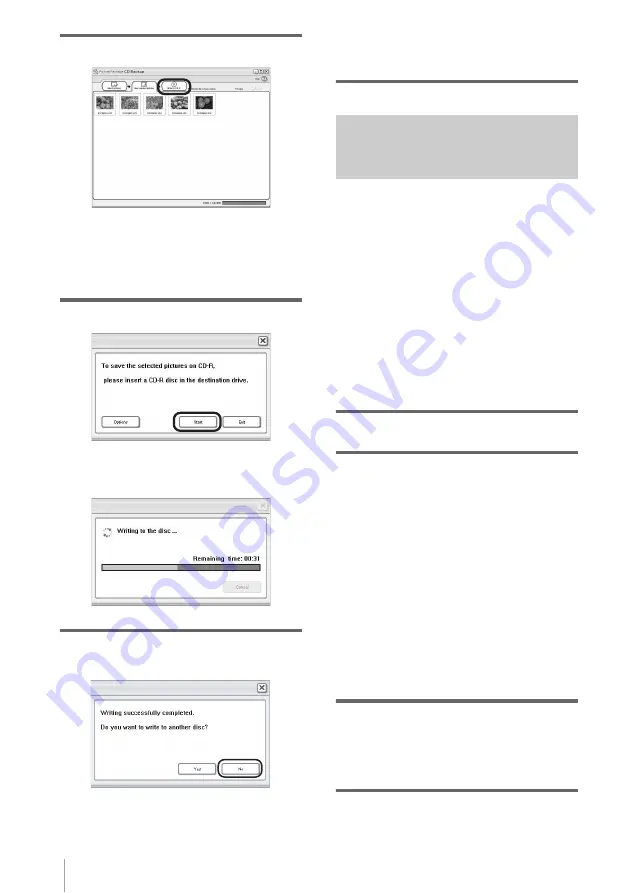
Click [Write to CD-R].

.

Place a new CD-R in the disc drive.

b

Note

• CD-RWs cannot be used.

7

Click [Start].

Saving to a CD-R starts. The remaining 
time appears on the computer screen.

.

8

Click [No] when you want to finish.

The disc tray comes out automatically.

.

To create another copy with the same 
content, click [Yes], then place a new CD-
R in the disc drive.

Creating a Video CD (Direct 
Access to Video CD Burn)
– Picture Package VCD Maker

You can copy recorded movies on a tape to a 
Video CD using a computer equipped with a 
disc drive compatible with CD-Rs.
The following procedure describes how to 
create a Video CD from a picture recorded on a 
tape (maximum length of about one hour).

b

Notes

• Some models are not compatible for this operation. 

Regarding supported models, check to see if there is 
a listing for the Burn VCD feature in the index of the 
separate Camera Operations Guide.

• You can only use a USB cable for this operation. 

You cannot use an i.LINK cable.

1

Turn on the computer.

2

Prepare the power source for your 
camcorder, then slide the POWER 
switch repeatedly to select the PLAY/
EDIT mode.

Use the supplied AC Adaptor as the power 
source since it takes a few hours to create a 
Video CD.
The name of the power switch on the 
camcorder varies depending on the model.

z

Tip

• Slide the POWER switch to select the 

CAMERA-TAPE mode, and you can view 
pictures recorded on your camcorder to the 
computer directly - USB Streaming.

3

Set [USB STREAM] in the menu 
settings of your camcorder to on.

The procedure of the menu settings varies 
depending on the model.

4

Insert a recorded cassette into your 
camcorder.

Summary of Contents for Computer Applications Guide

Page 1: ...3 087 936 12 1 2004 Sony Corporation Computer Applications Guide Digital Video Camera Recorder ...

Page 2: ... disc drive You need a CD R drive to create a Video CD For the compatible drive visit the following URL http www ppackage com When playing pictures recorded on a Memory Stick on a computer only the models with a Memory Stick slot OS Microsoft Windows 98 Windows 98SE Windows 2000 Professional Windows Millennium Edition Windows XP Home Edition or Windows XP Professional Standard installation is requ...

Page 3: ...d publishing any of the Music Contents without obtaining authorization or approval of the respective owners thereof License of Picture Package by Sony Corporation would not be construed as conferring to you by implication estoppel or otherwise any license or right to use the Music Contents On trademarks Picture Package is a trademark of Sony Corporation Memory Stick and are registered trademarks o...

Page 4: ...ture Package Viewer 17 Creating an original video Picture Package Auto Video 18 Creating an original slide show Picture Package Auto Slide 21 Saving the images on CD R Picture Package CD Backup 23 Creating a Video CD Direct Access to Video CD Burn Picture Package VCD Maker 24 Copying images for MEMORY MIX to a Memory Stick only the models with a Memory Stick slot 26 Connecting to a Macintosh compu...

Page 5: ...5 Additional information Troubleshooting 35 Index 41 ...

Page 6: ...tomatically You can easily transfer pictures recorded on a Memory Stick just by connecting your camcorder to the computer Creating your own original video You can easily create original videos with added music and effects using pictures recorded on a tape as materials You can also create video CDs Creating your own slide show You can select your favorites from pictures imported from a Memory Stick...

Page 7: ...onnect the Handycam Station to a computer You cannot directly connect your camcorder to the computer CD ROM supplied On your camcorder Step 2 Connecting your camcorder to a computer On your computer for the first time only Step 1 Installing the software on a computer Now start from Step1 There are two ways to connect your camcorder to a computer Connecting with a USB cable supplied Connecting with...

Page 8: ...tion b Note Do not connect the USB cable supplied before installing the software 1 Turn on the computer Close down all applications running on the computer before installing the software 2 Place the supplied CD ROM in the disc drive of your computer The installation screen appears If the screen does not appear 1 Double click My Computer 2 Double click PICTUREPACKAGE Disc drive Drive names such as ...

Page 9: ...lation starts 9 Make sure Yes I want to restart my computer now is checked then click Finish The computer turns off once then starts up again automatically Restart The short cut icons for Picture Package Menu and Picture Package Menu destination Folder appear on the desktop When DirectX 9 0b or later is not installed on the computer follow the steps below to install DirectX 9 0b 1 Read License Agr...

Page 10: ...puter and copying files to a Memory Stick When connecting the camcorder to a computer with a USB cable supplied the computer and camcorder must be recognized beforehand Follow the steps below Using the USB cable supplied when viewing pictures on a tape p 11 Using the USB cable supplied when copying pictures on a Memory Stick p 13 Connecting with an i LINK cable optional This method is good for cop...

Page 11: ...g on the computer USB Streaming 3 Set USB STREAM in the menu settings of your camcorder to on The procedure of the menu settings varies depending on the model 4 Connect the USB cable supplied to the USB jack on the camcorder The location of the USB jack varies depending on the model Refer to the separate Camera Operations Guide supplied with your camcorder for the location For the model that is su...

Page 12: ...ge quality then click Next Adjusting the slider in the direction makes the image quality higher and adjusting the slider in the direction makes the image quality lower b Note When you adjust the image quality the picture and the sound break off for a moment z Tip If the movie is not smooth adjust the slider in the direction 9 Adjust the brightness then click Next Adjusting the slider in the direct...

Page 13: ...4 b Notes Do not connect your camcorder to the computer at this point The computer may not recognize the camcorder if you connect them with the USB cable supplied before turning on your camcorder 1 Turn on the computer Close down all applications running on the computer For Windows 2000 Windows XP Log on as Administrators 2 Insert a Memory Stick into your camcorder 3 Prepare the power source for y...

Page 14: ...ckage Menu Double click the Removable Disk or Sony MemoryStick icon displayed in My Computer Then drag and drop a picture in the folder onto the hard disk drive of your computer On destination folders and file names Pictures transferred to the computer using Picture Package Menu The pictures are copied to the Date folders in the Picture Package created inside the My Documents or My Pictures folder...

Page 15: ...ied before turning off your camcorder Recommended connection Connect as shown in the following illustrations to operate the camcorder correctly Connect the camcorder to a computer via the USB cable supplied Make sure no other USB devices are connected to the computer If your computer has a USB keyboard and a USB mouse as standard equipment leave them connected and connect the camcorder to an avail...

Page 16: ...dycam Station connect the i LINK cable to the DV Interface on the Handycam Station z Tip You can use other image editing software that can read video signals to edit the recorded pictures For details on the operation of other software refer to the help files or the operating instructions of that software To disconnect the i LINK cable Turn off the power of the camcorder and disconnect the i LINK c...

Page 17: ...pictures imported from a Memory Stick and easily create your original slide show with added music and effects Picture Package CD Backup p 23 You can save pictures copied onto a computer to a CD R Picture Package VCD Maker p 24 You can create a Video CD from pictures recorded on a tape Application that starts up from the Start menu of the computer MEMORY MIX Image Tool p 26 You can copy images for ...

Page 18: ...desired folder and insert the comments You can also change the date of the folder If you change the date of a folder the folder sequence changes Creating an original video Picture Package Auto Video You can create original video that is edited automatically to match the music and effects you have selected The maximum length of your original movies you can create on a computer is 10 minutes z Tip Y...

Page 19: ...ptional p 11 15 Picture Package Menu starts up automatically 6 Click Automatic Video Producer Picture Package Auto Video starts up 7 Click Music settings then select the music You can select music from music files in the computer or music CDs other than sample music on the application Select music then click OK 8 Click Effect settings then select the effect You can select one of the 5 effects Sele...

Page 20: ...he respective owners thereof and except to the extent protected by applicable laws you are not permitted to use any of the third party musical contents Please refer to On Copyrights of Read this first above mentioned p 3 for further note on your use of such third party musical contents When you select a music file longer than 10 minutes the playback fades out automatically z Tips When the recorded...

Page 21: ...r is 10 minutes 1 Turn on the computer 2 Double click Picture Package Menu icon on the desktop Picture Package Menu starts up 3 Click Automatic Slide show Producer Picture Package Auto Slide starts up 4 Open the desired folder on the left side of the screen select pictures as materials for slide show The selected picture is marked with 5 Click the View selected pictures tab and make sure the desir...

Page 22: ...en select the effect You can select one of the 5 effects Select an effect then click OK 9 Click Output settings then select where to store the images When you select Video CD for where to store the images place a new CD R in the disc drive Select where to store the images then click OK b Note CD RWs cannot be used 10Click Start ...

Page 23: ...d party musical contents When you select a music file longer than 10 minutes the playback fades out automatically z Tips If you saved a created slide show on the hard disk you can view it as a movie file with Picture Package Viewer If you select CD R for where to save you can view the created slide show as a video CD For details on playback of video CDs see page 26 Saving the images on CD R Pictur...

Page 24: ...Notes Some models are not compatible for this operation Regarding supported models check to see if there is a listing for the Burn VCD feature in the index of the separate Camera Operations Guide You can only use a USB cable for this operation You cannot use an i LINK cable 1 Turn on the computer 2 Prepare the power source for your camcorder then slide the POWER switch repeatedly to select the PLA...

Page 25: ...e picture recorded on the tape is being copied to the computer CONVERTING The picture is being converted to the MPEG1 format WRITING The picture is being written onto the CD R b Notes The screen varies depending on the model You cannot cancel the operation after Finalizing VCD is displayed on the LCD screen of your camcorder 9 Follow the steps below to finish creating a Video CD For touch panel mo...

Page 26: ...t All Programs Accessories Entertainment then Windows Media Player For other operating systems Click Start Programs Accessories Entertainment then Windows Media Player 2 Open My Computer CD R then MPEGAV Then drag and drop the movie file sss DAT onto the Windows Media Player screen sss indicates the actual file name Copying images for MEMORY MIX to a Memory Stick only the models with a Memory Stic...

Page 27: ...on a Windows computer 27 7 Click Copy After copying is finished a new folder appears Normally a new folder is automatically created with a number one higher than the last created folder b Note You cannot copy pictures when all folders from 100 to 999 are used ...

Page 28: ...ur camcorder for the location For the model that is supplied with the Handycam Station connect the USB cable to the USB jack on the Handycam Station then set the USB ON OFF switch to ON b Note When you connect your camcorder to a computer make sure you insert the connector in the correct direction If you insert the connector forcibly it may be damaged and causes a malfunction of your camcorder 5 C...

Page 29: ...er VCD2 from the supplied CD ROM you can create video CDs using still images and movies recorded on your computer as materials An image file compatible with Video CD creation in Roxio s Toast will be created A Video CD can be created by writing the image file to disk in the Toast b Note You cannot copy pictures recorded on a tape into your computer using ImageMixer VCD2 To copy images connect your...

Page 30: ...line sony com tw vaio China http www sonystyle com cn vaio Thailand http www sony co th vaio index html Latin America http vaio online sony com Using the Direct Access to Click to DVD function for the first time The Direct Access to Click to DVD function enables you to copy pictures recorded on a tape to a DVD easily if your camcorder is connected to a computer Before operating the Direct Access t...

Page 31: ...f the operation on your computer is displayed on the LCD screen of your camcorder CAPTURING The picture recorded on the tape is being copied to the computer CONVERTING The picture is being converted to the MPEG2 format WRITING The picture is being written onto the DVD b Note The screen varies depending on the model z Tip If you use a DVD RW RW which has other data stored on it the message This is ...

Page 32: ...e following occurs copying of the picture is canceled A DVD containing the data up to the point the operation was canceled is created Refer to the help files of Click to DVD Automatic Mode Launcher for details When there is a blank portion of 10 seconds or longer on the tape When the data of the tape contains a date before the recording date of the later images When normal and wide size pictures a...

Page 33: ...vice such as a VCR to a digital signal and transfer it to a digital device such as a computer via your camcorder Software that can capture video signals must be installed on the computer Before operation Set DISPLAY in the menu settings to LCD PANEL the default setting 1 Turn on the analog video unit 2 Slide the POWER switch repeatedly to select the PLAY EDIT mode Use the supplied AC Adaptor as th...

Page 34: ...correctly depending on the condition of the analog video signal input to your camcorder You cannot transfer pictures with copyright protection signals to a computer You can use a USB cable instead of an i LINK cable optional to transfer pictures to a computer Note however that the picture displayed may lack the smoothness The location of the USB jack and the shape of the cable vary depending on th...

Page 35: ...corder to on You cannot view the pictures recorded on a tape on the computer cDisconnect the cable from the computer turn on the camcorder then connect it again cSlide the POWER switch repeatedly to select the PLAY EDIT mode set USB STREAM in the menu settings of your camcorder to on You cannot view the pictures recorded on a tape on the Macintosh computer only the models with a Memory Stick slot ...

Page 36: ...B Audio Device in the Sound video and game controllers folder USB Device in the Other devices folder USB Composite Device in the Universal Serial Bus Controller folder For copying and viewing pictures recorded on a Memory Stick only the models with a Memory Stick slot Sony Handycam or Sony DSC with a mark in the Other devices folder 5 When the Confirm Device Removal screen appears click OK 6 Turn ...

Page 37: ... folder Composite USB Device in the Other devices folder For copying and viewing pictures recorded on a Memory Stick only the models with a Memory Stick slot Sony Handycam or Sony DSC with a mark in the Other devices folder 7 When the Confirm Device Removal screen appears click OK 8 Turn off the power of your camcorder disconnect the USB cable then restart the computer 9 Place the supplied CD ROM ...

Page 38: ...ntrollers folder USB Device in the Other devices folder For copying and viewing pictures recorded on a Memory Stick only the models with a Memory Stick slot Sony Handycam or Sony DSC with a mark in the Other devices folder 8 When the Confirm Device Removal screen appears click OK 9 Turn off the power of your camcorder disconnect the USB cable then restart the computer 10 Place the supplied CD ROM ...

Page 39: ...isit the following URL http www ppackage com You cannot copy pictures only the models with a Memory Stick slot cDisplay pictures recorded on a Memory Stick with the following procedures 1 Double click My Computer 2 Double click the icon for the newly recognized drive Removable Disk F For Windows XP Sony Memory Stick It may take some time until the drive is recognized If the computer does not recog...

Page 40: ... Start Programs All Programs for Windows XP Picture Package Handycam Tools and USB Streaming Tool then start up USB Streaming Tool 2 Select another device on the Select audio device screen 3 Follow the on screen instructions click Next then click Done b Note Sound is not supported on Windows 98 The movie is not smooth cChange the settings as described in the following procedures 1 Select Start Pro...

Page 41: ...0 33 DVD 30 H Handycam Station 7 11 13 16 28 I i LINK cable 10 15 18 30 33 ImageMixer VCD2 29 Install 8 M Macintosh 28 MEMORY MIX 26 Memory Stick 13 26 29 O On line help 10 29 P Picture Package 6 17 Picture Package Auto Slide 21 Picture Package Auto Video 18 Picture Package CD Backup 23 Picture Package VCD Maker 24 Picture Package Viewer 17 S SEL PUSH EXEC dial models 25 31 STD USB 13 26 T Touch p...

Page 42: ......

Page 43: ......

Page 44: ...Printed in Japan Printed on 100 recycled paper using VOC Volatile Organic Compound free vegetable oil based ink ...

Reviews: