Sony CMT-VP100, Operating Instructions Manual
The Sony CMT-VP100 is a sleek and compact music system that delivers powerful audio performance. Enhance your user experience with the comprehensive Operating Instructions Manual. Easily download the manual for free from our website, ensuring you have all the necessary guidance to maximize your enjoyment of this exceptional product.
Share
Download


Reviews:
No comments
Related manuals for CMT-VP100

6 series
Brand: Samsung Pages: 36

DS1000
Brand: NEC Pages: 174

SC-AP01
Brand: Panasonic Pages: 2

ANPR
Brand: Parklio Pages: 29

VTO6 series
Brand: Dahua Pages: 23

VTO2000A Series
Brand: Dahua Pages: 41

DSS4004-S2
Brand: Dahua Pages: 18

Digital VTH
Brand: Dahua Pages: 85

JBL BAR 5.1 SURROUND
Brand: Harman Pages: 4

JBL BAR 1300
Brand: Harman Pages: 48

Infinity KAPPA 4100msb
Brand: Harman Pages: 8

JBL PARTYBOX ON-THE-GO
Brand: Harman Pages: 17

JBL CINEMA SB190
Brand: Harman Pages: 19

TR12
Brand: PAC Pages: 9

VVH-MDE304
Brand: Vacron Pages: 2

CXS Series
Brand: Vacon Pages: 17
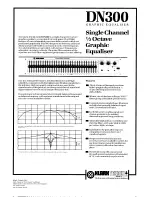
DN300
Brand: Klark Teknik Pages: 2

7I76
Brand: Mesa Pages: 58


