background image

3

Tabla de contenido

Bienvenido. . . . . . . . . . . . . . . . . . . . . . . . . . . . . 4

Procedimientos iniciales

Restauración de la unidad . . . . . . . . . . . . . . . . . 4
Preparación del control remoto de tarjeta . . . . . 4
Ajuste del reloj  . . . . . . . . . . . . . . . . . . . . . . . . . 4
Extracción del panel frontal. . . . . . . . . . . . . . . . 5

Colocación del panel frontal . . . . . . . . . . . . . 5

Ubicación de los controles y 
operaciones básicas

Unidad principal . . . . . . . . . . . . . . . . . . . . . . 6
Control remoto de tarjeta RM-X151. . . . . . . 6

CD

Elementos de la pantalla . . . . . . . . . . . . . . . . 8
Reproducción repetida y aleatoria  . . . . . . . . 8

Radio

Almacenamiento y recepción de emisoras  . . . . 8

Almacenamiento automático — BTM . . . . . 8
Almacenamiento manual  . . . . . . . . . . . . . . . 8
Recepción de las emisoras almacenadas. . . . 8
Sintonización automática  . . . . . . . . . . . . . . . 9

iPod

Reproducción en un iPod. . . . . . . . . . . . . . . . . . 9

Reproducción de pistas . . . . . . . . . . . . . . . . . 9
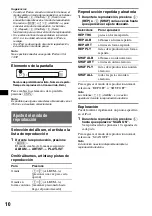
Elementos de la pantalla . . . . . . . . . . . . . . . 10

Ajuste del modo de reproducción . . . . . . . . . . 10

Selección del álbum, el artista o la lista de 
reproducción . . . . . . . . . . . . . . . . . . . . . . . . 10
Reproducción repetida y aleatoria  . . . . . . . 10
Exploración . . . . . . . . . . . . . . . . . . . . . . . . . 10

Otras funciones

Cambio de los ajustes de sonido . . . . . . . . . . . 11

Ajuste de las características del sonido 
— BAL/FAD/SUB . . . . . . . . . . . . . . . . . . . 11
Personalización de la curva de ecualizador 
— EQ3  . . . . . . . . . . . . . . . . . . . . . . . . . . . . 11

Definición de los elementos de configuración 
— SET . . . . . . . . . . . . . . . . . . . . . . . . . . . . . . . 11
Uso de un equipo opcional  . . . . . . . . . . . . . . . 12

Equipo auxiliar de audio . . . . . . . . . . . . . . . 12

Información complementaria

Precauciones . . . . . . . . . . . . . . . . . . . . . . . . . .  13

Notas sobre los discos  . . . . . . . . . . . . . . . .  13
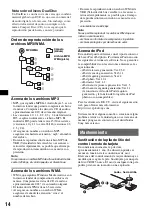
Orden de reproducción de los archivos 
MP3/WMA  . . . . . . . . . . . . . . . . . . . . . . . .  14
Acerca de los archivos MP3. . . . . . . . . . . .  14
Acerca de los archivos WMA  . . . . . . . . . .  14
Acerca de iPod . . . . . . . . . . . . . . . . . . . . . .  14

Mantenimiento  . . . . . . . . . . . . . . . . . . . . . . . .  14
Extracción de la unidad. . . . . . . . . . . . . . . . . .  15
Especificaciones . . . . . . . . . . . . . . . . . . . . . . .  16
Solución de problemas . . . . . . . . . . . . . . . . . .  16

Mensajes/indicaciones de error  . . . . . . . . .  17

Summary of Contents for CDX-GT42IPW - Fm/am Compact Disc Player

Page 1: ...numbers whenever you call upon your Sony dealer regarding this product Model No CDX GT42IPW Serial No CDX GT42IPW To cancel the demonstration DEMO display see page 11 Para cancelar la pantalla de demostración DEMO consulte la página 11 Operating Instructions Manual de instrucciones 3 217 561 31 1 US 2007 Sony Corporation ES FM AM Compact Disc Player ...

Page 2: ...the receiving antenna Increase the separation between the equipment and receiver Connect the equipment into an outlet on a circuit different from that to which the receiver is connected Consult the dealer or an experienced radio TV technician for help You are cautioned that any changes or modifications not expressly approved in this manual could void your authority to operate this equipment The us...

Page 3: ...g automatically 8 iPod Playing back iPod 9 Playing tracks 9 Display items 9 Setting the play mode 9 Selecting Album Artist or Playlist 9 Repeat and shuffle play 10 Scan 10 Other functions Changing the sound settings 10 Adjusting the sound characteristics BAL FAD SUB 10 Customizing the equalizer curve EQ3 10 Adjusting setup items SET 11 Using optional equipment 11 Auxiliary audio equipment 11 Addit...

Page 4: ...g the connections you must reset the unit Detach the front panel and press the RESET button with a pointed object such as a ball point pen Note Pressing the RESET button will erase the clock setting and some stored contents Preparing the card remote commander Before using the card remote commander for the first time remove the insulation film Tip For how to replace the battery see Replacing the li...

Page 5: ...Press OFF The unit is turned off 2 Press then pull it off towards you Notes Do not drop or put excessive pressure on the front panel and display window Do not subject the front panel to heat high temperature or moisture Avoid leaving it in a parked car or on a dashboard rear tray Attaching the front panel Engage part A of the front panel with part B of the unit as illustrated and push the left sid...

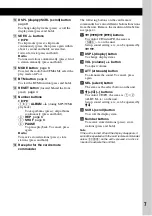
Page 6: ...er type XPLOD VOCAL EDGE CRUISE SPACE GRAVITY CUSTOM or OFF C Volume control dial select button page 10 To adjust volume rotate select setup items press and rotate D SOURCE button To power on change the source Radio CD AUX PD E Disc slot Insert the disc label side up playback starts F Display window G AUX input jack page 11 To connect a portable audio device H Z eject button To eject the disc I fr...

Page 7: ...ress store stations press and hold P Receptor for the card remote commander The following buttons on the card remote commander have also different buttons functions from the unit Remove the insulation film before use page 4 qj buttons To control CD radio PD the same as SEEK on the unit Setup sound setting etc can be operated by qk DSPL display button To change display items ql VOL volume button To...

Page 8: ...nd press MODE repeatedly You can select from FM1 FM2 FM3 AM1 or AM2 2 Press and hold BTM until BTM flashes The unit stores stations in order of frequency on the number buttons A beep sounds when the setting is stored Storing manually 1 While receiving the station that you want to store press and hold a number button 1 to 6 until MEM appears Note If you try to store another station on the same numb...

Page 9: ... stop playback Tips When the iPod is connected to the dock connector the mode changes to the Resuming mode In Resuming mode pressing 3 Repeat 4 Shuffle or 5 Scan does not function If you cancel Resuming mode by pressing MODE or 1 2 ALBUM 3 Repeat 4 Shuffle or 5 Scan now function to change the play mode When the ignition key is turned to the ACC position or the unit is on the iPod will be recharged...

Page 10: ...can be adjusted up to 21 steps 3 When AUX source is activated page 11 2 Rotate the volume control dial to adjust the selected item After 3 seconds the setting is complete and the display returns to normal play reception mode Customizing the equalizer curve EQ3 CUSTOM of EQ3 allows you to make your own equalizer settings 1 Select a source then press EQ3 repeatedly to select CUSTOM 2 Press the selec...

Page 11: ...automatically after a desired time when the unit is turned off A OFF NO z A OFF 30S Seconds A OFF 30M Minutes or A OFF 60M Minutes SUB REAR 1 To switch the audio output SUB OUT z to output to a subwoofer REAR OUT to output to a power amplifier DEMO Demonstration To set DEMO ON z or DEMO OFF DIM Dimmer To change the brightness of the display DIM ON to dim the display DIM OFF z to deactivate the dim...

Page 12: ...ut an hour until the moisture has evaporated To maintain high sound quality Be careful not to splash juice or other soft drinks onto the unit or discs Notes on discs To keep a disc clean do not touch its surface Handle the disc by its edge Keep your discs in their cases or disc magazines when not in use Do not subject discs to heat high temperature Avoid leaving them in a parked car or on a dashbo...

Page 13: ...tion technologies are marketed by some record companies Please be aware that among those discs there are some that do not conform to the CD standard and may not be playable by this product Playback order of MP3 WMA files About MP3 files MP3 which stands for MPEG 1 Audio Layer 3 is a music file compression format standard It compresses audio CD data to approximately 1 10 of its original size ID3 ta...

Page 14: ...h of children Should the battery be swallowed immediately consult a doctor Wipe the battery with a dry cloth to assure a good contact Be sure to observe the correct polarity when installing the battery Do not hold the battery with metallic tweezers otherwise a short circuit may occur Fuse replacement When replacing the fuse be sure to use one matching the amperage rating stated on the original fus...

Page 15: ...o outputs terminal front sub rear switchable Power antenna aerial relay control terminal Power amplifier control terminal Inputs Antenna aerial input terminal AUX input jack stereo mini jack iPod signal input terminal dock connector Tone controls Low 10 dB at 60 Hz XPLOD Mid 10 dB at 1 kHz XPLOD High 10 dB at 10 kHz XPLOD Loudness 4 dB at 100 Hz 2 dB at 10 kHz Power requirements 12 V DC car batter...

Page 16: ... are not used in the certain printed wiring boards Halogenated flame retardants are not used in cabinets Packaging cushions are made from paper The display disappears from does not appear in the display window The dimmer is set DIM ON page 11 The display disappears if you press and hold OFF tPress and hold OFF on the unit until the display appears The connectors are dirty page 14 The Auto Off func...

Page 17: ...he disc is dirty or inserted upside down tClean or insert the disc correctly A blank disc has been inserted The disc cannot play due to a problem tInsert another disc FAILURE The connection of speakers amplifiers is incorrect tSee the installation connections manual of this model to check the connection L SEEK The local seek mode is on during automatic tuning NO INFO Text information is not writte...

Page 18: ...establecido después de apagarla lo cual evita que se agote la batería Si no ajusta la función de desconexión automática mantenga presionado OFF hasta que la pantalla se apague cada vez que apague el motor Para obtener información sobre la instalación y las conexiones consulte el manual de instalación conexiones suministrado Microsoft Windows Media y el logotipo de Windows son marcas comerciales o ...

Page 19: ...Reproducción de pistas 9 Elementos de la pantalla 10 Ajuste del modo de reproducción 10 Selección del álbum el artista o la lista de reproducción 10 Reproducción repetida y aleatoria 10 Exploración 10 Otras funciones Cambio de los ajustes de sonido 11 Ajuste de las características del sonido BAL FAD SUB 11 Personalización de la curva de ecualizador EQ3 11 Definición de los elementos de configuraci...

Page 20: ...nidad Antes de utilizar la unidad por primera vez o después de sustituir la batería del automóvil o de cambiar las conexiones debe restaurarla Extraiga el panel frontal y presione el botón RESET con un objeto puntiagudo como por ejemplo un bolígrafo Nota Al presionar el botón RESET se borrará el ajuste del reloj y algunos contenidos memorizados Preparación del control remoto de tarjeta Antes de ut...

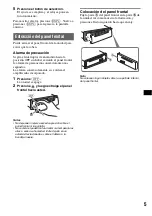
Page 21: ...os La alarma sonará solamente si se utiliza el amplificador incorporado 1 Presione OFF La unidad se apaga 2 Presione y luego extraiga el panel frontal hacia usted Notas No deje caer ni ejerza excesiva presión sobre el panel frontal ni la pantalla No someta el panel frontal al calor ni a temperaturas altas o excesiva humedad Evite dejarlo en un automóvil estacionado o sobre el tablero o la bandeja ...

Page 22: ... Para seleccionar el tipo de ecualizador XPLOD VOCAL EDGE CRUISE SPACE GRAVITY CUSTOM u OFF C Selector de control de volumen botón de selección página 11 Para ajustar el volumen girar para seleccionar elementos de configuración presionar y girar D Botón SOURCE Para encender para cambiar la fuente Radio CD AUX PD E Ranura del disco Inserte el disco con la etiqueta mirando hacia arriba y se iniciará...

Page 23: ... las emisoras almacenadas presionar para almacenar emisoras mantener presionado P Receptor del control remoto de tarjeta Los botones siguientes del control remoto de tarjeta también presentan botones y funciones distintos de los de la unidad Retire la película de aislamiento antes de usar la unidad página 4 qj Botones Para controlar el CD radio PD de la misma manera que con SEEK en la unidad Es po...

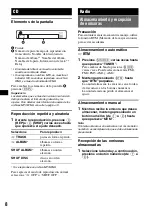
Page 24: ... o SHUF OFF Radio Almacenamiento y recepción de emisoras Precaución Para sintonizar emisoras mientras maneja utilice la función BTM Memoria de la mejor sintonía para evitar accidentes Almacenamiento automático BTM 1 Presione SOURCE varias veces hasta que aparezca TUNER Para cambiar de banda presione MODE varias veces Puede seleccionar entre FM1 FM2 FM3 AM1 y AM2 2 Mantenga presionado BTM hasta que...

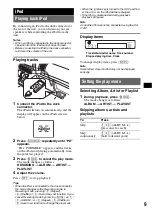
Page 25: ...automóvil y controlar el iPod desde la unidad Notas No es posible realizar ninguna acción desde el iPod si éste se encuentra conectado al conector de base Antes de conectar el iPod al conector de base baje el volumen de la unidad Reproducción de pistas 1 Conecte el iPod al conector de base El iPod se encenderá automáticamente y la indicación siguiente aparecerá en la pantalla del iPod tal y como s...

Page 26: ... Reproducción repetida y aleatoria 1 Durante la reproducción presione 3 REP o 4 SHUF varias veces hasta que aparezca el ajuste deseado Para regresar al modo de reproducción normal seleccione REP OFF o SHUF OFF Nota Los botones 1 2 ALBUM no están operativos durante la reproducción aleatoria Exploración Puede localizar rápidamente un punto específico en el iPod 1 Durante la reproducción presione 5 h...

Page 27: ...resionado el botón de selección antes de que finalice el ajuste Después de 3 segundos finaliza el ajuste y la pantalla vuelve al modo de reproducción recepción normal Sugerencia También es posible ajustar otros tipos de ecualizador Definición de los elementos de configuración SET 1 Mantenga presionado el botón de selección Aparecerá la pantalla de ajustes 2 Presione el botón de selección varias ve...

Page 28: ...la DIM ON para atenuar la pantalla DIM OFF z para desactivar el atenuador M DSPL Desplazamiento de indicaciones Para seleccionar el modo de desplazamiento de indicaciones M DSPL SA z para mostrar patrones en movimiento y el analizador de espectro M DSPL OFF para desactivar el desplazamiento de indicaciones A SCRL Desplazamiento automático Para desplazar automáticamente los elementos de la pantalla...

Page 29: ...o use este tipo de discos No es posible reproducir discos compactos de 8 cm Antes de reproducir los discos límpielos con un paño de limpieza disponible en el mercado Hágalo desde el centro hacia los bordes No utilice disolventes como bencina diluyentes productos de limpieza comerciales ni aerosoles antiestáticos para discos analógicos Notas sobre los discos CD R CD RW Según el estado del disco o e...

Page 30: ...formato de compresión sin pérdida archivos protegidos por derechos de autor Acerca de iPod Esta unidad puede utilizarse con el tipo de conector de base iPod iPod photo iPod mini e iPod nano con las siguientes versiones de software No se garantiza la compatibilidad con las versiones anteriores a las aquí indicadas iPod de tercera generación Ver 2 3 0 iPod de cuarta generación Ver 3 1 1 iPod de quin...

Page 31: ...r esta situación extraiga el panel frontal página 5 y limpie los conectores con un hisopo de algodón No aplique demasiada fuerza ya que podría dañar los conectores Notas Por razones de seguridad apague el motor antes de limpiar los conectores y extraiga la llave del interruptor de encendido No toque nunca los conectores directamente con los dedos ni con ningún dispositivo metálico Extracción de la...

Page 32: ... RM X151 Componentes de instalación y conexiones 1 juego El diseño y las especificaciones están sujetos a cambios sin previo aviso Solución de problemas La siguiente lista de comprobación le ayudará a solucionar los problemas que puedan producirse con la unidad Antes de consultarla revise los procedimientos de conexión y de funcionamiento Generales La unidad no recibe alimentación Revise la conexi...

Page 33: ... un ángulo inferior a 45 en una parte firme del automóvil Disco defectuoso o sucio Los botones de operación no funcionan El disco no se expulsa Presione el botón RESET página 4 Recepción de radio No es posible recibir las emisoras Hay ruidos que obstaculizan el sonido Conecte un cable de control de antena motorizada azul o un cable de fuente de alimentación auxiliar rojo al cable de fuente de alim...

Page 34: ...posible que se haya producido una falla interna tRevise la conexión Si el indicador de error permanece en pantalla póngase en contacto con el distribuidor Sony más cercano READ La unidad está leyendo toda la información de pistas y de álbumes del disco tEspere hasta que finalice la lectura y se inicie la reproducción automáticamente Es posible que demore más de un minuto en función de la estructur...

Page 35: ......

Page 36: ...s product please visit the web site below http esupport sony com http www sony com xplod If you have any questions problems regarding this product try the following 1 Read Troubleshooting in these Operating Instructions 2 Reset the unit Note Stored data may be erased 3 Please contact U S A only Call 1 800 222 7669 URL http www SONY com ...

Reviews: