background image

19

Using Sony Planning Metadata Add-in

1

Save the planning metadata as an XML file to a desired 
location on the computer that received it.

2

Connect the receiving computer and camcorder via 
Wi-Fi.

3

Launch a web browser on the receiving computer, and 
navigate to “http://IP address of camcorder/
mobile.htm”.

Example: if the IP address is “192.168.1.10”

Type “http://192.168.1.10/mobile.htm” in the address 
bar.

If the connection is complete, a page will appear 
asking you to enter the user name and password.

4

Fill in the [User name] and [Password] boxes, and 
click [OK].

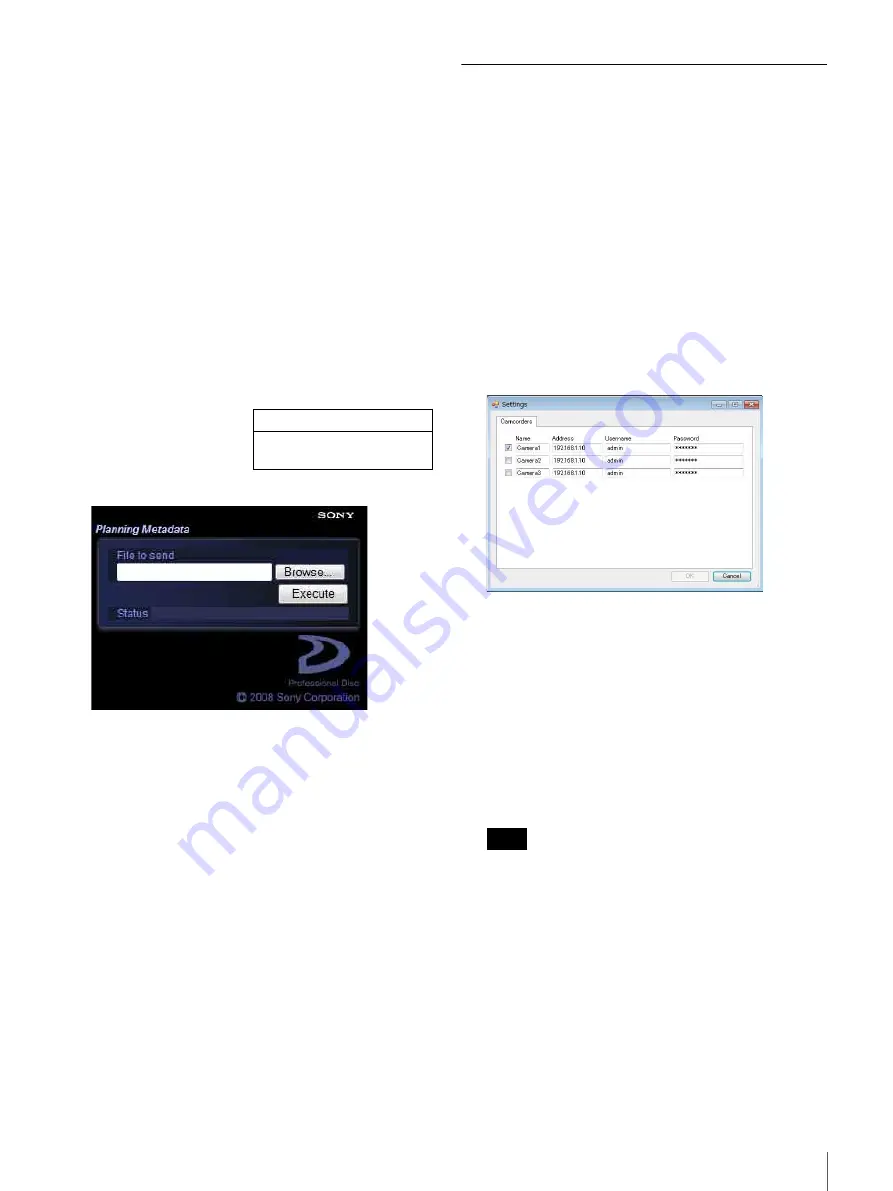
The [Planning Metadata] page appears.

5

Click [Browse…] to open the [Choose File] dialog.

6

Select the planning metadata file (XML) you saved in 
step 

1

, and then click [Open].

The path of the selected file appears in the [File to 
send] field.

7

Click [Execute].

The planning metadata is sent to the camcorder, and 
stored in the /General/Sony/Planning directory.
[OK] will appear in the [Status] field when sending is 
complete.

Transferring Planning Metadata to a 
Camcorder

You can use the Save to XDCAM feature to send planning 
metadata from your computer to your camcorder.
First, register the IP address, username, and password of 
the camcorder to transfer the file to.

When your computer and camcorder are connected, you 
can also save planning metadata to /General/Sony/
Planning.

To register a transfer destination

1

From the menu bar, click [Settings] to open the 
[Settings] dialog.

2

Enter the IP address, username, and password of the 
connection camcorder in the [Address], [Username], 
and [Password] fields of [Camera1].

3

Enter the IP addresses, usernames, and passwords of 
other camcorders (or cameras) in the [Address], 
[Username], and [Password] fields of [Camera2] and 
[Camera3] as needed.

4

Select the checkboxes of the camcorders to transfer to 
(multiple selections possible).

You can change the settings for [Name] fields 
(Camera1, Camera2, and Camera3).

5

Click [OK] to close the dialog.

To transfer planning metadata

1

Connect the receiving computer and camcorder via 
Wi-Fi.

User name:

admin

Password:

Type the model name in 
lower-case letters.

Example [Planning Metadata] page 
(when a disc camcorder is used)

Note

Summary of Contents for CBK-WA01

Page 1: ...Wi Fi Adapter Operating Instructions Before operating the unit please read this manual thoroughly and retain it for future reference CBK WA01 4 181 312 12 1 2010 Sony Corporation ...

Page 2: ...RRANTIES OF MERCHANTABILITY OR FITNESS FOR ANY PARTICULAR PURPOSE WITH REGARD TO THIS MANUAL THE SOFTWARE OR SUCH OTHER INFORMATION IN NO EVENT SHALL SONY CORPORATION BE LIABLE FOR ANY INCIDENTAL CONSEQUENTIAL OR SPECIAL DAMAGES WHETHER BASED ON TORT CONTRACT OR OTHERWISE ARISING OUT OF OR IN CONNECTION WITH THIS MANUAL THE SOFTWARE OR OTHER INFORMATION CONTAINED HEREIN OR THE USE THEREOF Sony Cor...

Page 3: ...less LAN from Your Camcorder 11 Connecting via WPS 11 Using the Web Menu For PDW 700 F800 Only 12 Displaying the Web Menu 12 Pages in the Web Menu 12 Starting a Wi Fi Connection 13 Performing IEEE 802 1x Authentication 14 Using Sony Planning Metadata Add in 15 Displaying Planning Metadata 15 Sony Planning Metadata Operation Screen 15 Creating Planning Metadata 16 Saving Planning Metadata to a Desi...

Page 4: ...r to pre set the names of files to save Send planning metadata created using Sony Planning Metadata Add in to a computer at the shooting location as an email attachment Send planning metadata created using Sony Planning Metadata Add in directly via a network connection to a camcorder connected via Wi Fi Save planning metadata created using Sony Planning Metadata Add in on your computer s hard disk...

Page 5: ...oc mode Shooting location Broadcasting station control center Smart phone CBK WA01 Computer Connecting in LAN infrastructure mode Send receive email Camcorder CBK WA01 Camcorder CBK WA01 Access point Computer Sony Planning Metadata Add in is installed Internet Broadcasting station Computer Sony Planning Metadata Add in is installed ...

Page 6: ...to the OPEARTION MANUAL or Operating Instructions supplied with each camcorder For details about the menu operations of the PDW 700 refer to the OPEARTION MANUAL supplied with the PDW 700 If the PDW 700 is connected to the computer via a LAN cable you can use the Web menu to perform steps 2 onward see page 12 1 Make the following settings on the 007 POWER SAVE page of the OPERATION menu ETHERNET U...

Page 7: ... under Preferred networks in the Wireless Networks tab to open the Advanced dialog Select Computer to computer ad hoc networks only then click Close to close the dialog 7 Click Add under Preferred networks in the Wireless Networks tab The Wireless Networks Properties dialog opens 8 Click to uncheck The key is provided for me automatically and make the following settings Set Network key to string o...

Page 8: ...ternet Protocol Version 4 TCP IPv4 Properties dialog opens 4 Click Use the following IP address and make the following settings For xxx enter the same value with the IP address assigned to the camcorder For yyy select a value which is not used for the IP address assigned to the camcorder 5 Click OK to close the dialog 6 Click Close to close the Wireless Network Connection Properties dialog When yo...

Page 9: ...to display the Wi Fi SETTING page Make the following settings to specify the network to connect to SSID network name WF1 NETWORK TYPE connection mode ADHOC CH channel 1 AUTH network authentication OPEN ENCRYPTION data encryption WEP WEP KEY INDEX 1 INPUT SELECT network security key input format ASCII5 Here the key is set to 12345 so select ASCII5 For a 13 letter ASCII string ASCII13 For a 10 digit...

Page 10: ...log and then click Disconnect For Windows Vista In the Network and Sharing Center window click Connect to a network under Tasks Click WF1 in the Connect to a network dialog and then click Disconnect To revert to the default settings reset If you have trouble making a connection or you want to start over you can reset your Wi Fi connection settings to their defaults 1 Select NET CFG RESET EXEC on t...

Page 11: ...set the wireless LAN WF_net enter the network key you configured for your access point and make the connection If the camcorder is connected to the computer via a LAN cable you can use the Web menu to find the access point see page 13 Connecting via WPS Make sure that your access point supports WPS The procedure below illustrates the use of the PDW 700 The menu numbers may be different for other c...

Page 12: ... make a Wi Fi connection between your camcorder and computer See your camcorder s operation manual for details about Ethernet connection Displaying the Web Menu 1 Connect the camcorder to the computer via a LAN cable 2 Launch a web browse on the computer and navigate to http camcorder s IP address Example when the IP address is 192 168 1 10 Type http 192 168 1 10 in the address bar If the connecti...

Page 13: ...ld in the Wi Fi Settings area The Wireless Networks list appears 5 Click the SSID to connect to network name or network ID of wireless LAN and then click OK If the desired SSID is not found Click Rescan to perform the scan again If it is still not found click Back to return to the Wi Fi page see the next section To configure a connection 6 Enter the network key in the WEP key field click Execute a...

Page 14: ...r on the Wireless Networks list enter the SSID and settings see page 9 then click Execute and then Reconnect Performing IEEE 802 1x Authentication Set 802 1X Enable to Enable on the Wi Fi page in order to perform IEEE 802 1x authentication The authentication settings area appears Consult with your network administrator for details about the authentication settings Authentication settings area ...

Page 15: ...Microsoft Outlook on the computer on which you installed Sony Planning Metadata Add in a Sony Planning Metadata folder is added to the Tasks window Click the Sony Planning Metadata folder to display the Sony Planning Metadata operation screen see page 15 appears To use the Sony Planning Metadata folder for the first time When you start Microsoft Outlook after installing Sony Planning Metadata Add ...

Page 16: ...ecord When a disc camcorder is used up to 50 bytes of Loading planning metadata see page 18 Saving planning metadata see page 18 Sending planning metadata as email attachments see page 18 Transferring planning metadata to a camcorder see page 19 Registering camcorders as transfer destination see page 19 Displaying information about Sony Planning Metadata Add in Sony Planning Metadata folder Double...

Page 17: ...All Fields in the IPM Task Planning Task tab of the IPM Task Planning Task window 2 Select IPM Task Planning Task in the Select from list Available fields for the IPM Task Planning Task format appear By default Filename name of planning metadata file Send To recipient of the planning metadata and shot marks 0 to 9 can be set To use all shot marks 0 to 9 use the numeric keys of a USB keyboard To di...

Page 18: ...ename of the planning metadata The name that appears in the Filename field is the file name set for the clip Loading Planning Metadata from a Specified Location You can use the Import feature to load planning metadata that you have previously saved on your system 1 Click Import on the menu bar The Open dialog appears 2 Select the planning metadata you wish to load and then click Open When you impo...

Page 19: ...ete Transferring Planning Metadata to a Camcorder You can use the Save to XDCAM feature to send planning metadata from your computer to your camcorder First register the IP address username and password of the camcorder to transfer the file to When your computer and camcorder are connected you can also save planning metadata to General Sony Planning To register a transfer destination 1 From the me...

Page 20: ...rders 2 Click on the Filename field of the planning metadata you wish to transfer and click Save to XDCAM on the menu bar The Save To XDCAM dialog appears and the transfer begins The dialog will close automatically when the transfer is complete and the planning metadata is loaded on the camcorder If the transfer fails A message will appear to inform you of this fact Click Close to close the dialog...

Page 21: ...i Fi connections with the PDW 700 F800 When making a wireless Wi Fi connection Notes Problem Resolution The camcorder does not recognize the adapter Make sure that the adapter s USB cable is plugged securely into the camcorder s USB port The adapter s green LED will not come on Make the following settings on the POWER SAVE page of the camcorder s OPERATION menu ETHERNET USB ENABL Wi Fi ENABL If th...

Page 22: ...er and camcorder do not match Check the settings of the camcorder and computer If it is solid status 4 The wireless connection is complete If your application Sony Planning Metadata Add in or live logging does not function in this status confirm the procedure in Configuring Your Camcorder to Enable Wi Fi Connections page 6 I cannot connect to the access point a Check the IP addresses of your camco...

Page 23: ...s 4 The wireless connection is complete If your application Sony Planning Metadata Add in or live logging does not function in this status confirm the procedure in Configuring Your Camcorder to Enable Wi Fi Connections page 6 Make sure that there are no devices using the 2 4 GHz frequency band nearby If there are devices nearby that use the 2 4 GHz frequency band examples are microwave ovens and B...

Page 24: ...r signal in the same frequency band or the computer and camcorder are too far apart the transfer speed could become too slow causing playback to stop The proxy image does not appear Make sure that the camcorder s Live Logging Mode is not set to LIVE If it is set to LIVE then only metadata will be transferred and the proxy image data will not be sent Change the setting to VIEW Problem Resolution Wh...

Page 25: ......

Reviews: