- 14 -
TT mode is available by setting the TV and Remote Commander for operation in Service Mode [ As shown on Page 1
2
]. The functions
described below are then available by selecting the two numbers. To release the ‘TT mode’ press 00. To release the TT menu press the
menu key.
3-5. TT MODE
00
'TT' mode off
03
Set volume to 35%
04
Set volume to 50%
05
Set volume to 65%
06
Set volume to 80%
07
Ageing mode on
08
Shipping Condition
09
WB level check
19
Factory mode toggle (on/off)
27
CBA mode toggle (ON/OFF)
31
ECS mode toggle (ON/OFF)
32
Set BCN channels preset
33
Disconnect/Connect EDID WRITE to/from I2C general
bus
34
HDMI log enable/disable
39
Enable digital test
41
Re-initialise NVM
43
Select Dual Sound A
44
Select Dual Sound B
45
Select Dual Sound Mono
46
Select Dual Sound Stereo
48
Set NVM as non-virgin
49
Set NVM as virgin
51
EG1LL-GAUDI NW 40
52
EG1LL-GAUDI NW 46
53
EG1LL-GAUDI NW 52
54
Watchdog toggle
55
EG1LL-GAUDI BM 40
56
EG1LL-GAUDI BM-L 40
57
EG1LL-40L4000
59
Visual I2C toggle (VCT micro slave mode)
61
EG1LL-GAUDI NW 40 - VE Panel
62
EG1LL-GAUDI NW 46 - VE Panel
63
EG1LL-GAUDI NW 52 - VE Panel
65
EG1LL-GAUDI BM 40 - VE Panel
66
EG1LL-GAUDI BM-L 40 - VE Panel
67
EG1LL-40L4000 - VE Panel
72
VESA/JEIDA panel selection
73
HDMI number of inputs (2 or 3)
75
Set centred balance
76
Set volume to max
77
Set volume to min
78
Set balance full left
79
Set balance full right
81
Digital BER display
82
Digital Service menu
83
Digital colour bar output from DENC
84
TS CI path through
85
Digital tuner power down (Only one power cycle,
default is no power down)
86
Switch between two digital SW banks
87
Local keys test
88
Digital shipping conditions (Clear tune database)
89
LED test
91
OAD enable/disable toggle
92
TS CI path through with Reed Solomon off
93
LNA Setting On/Off (toggle)
96
Digital debug output: Enable/Disable
97
Digital 656 output: Enable/Disable
98
Digital Auto Reset function: Enable/Disable
Note :
There are 2 types of panel fitted to this product:
1. Non-VE Panel
2. VE Panel
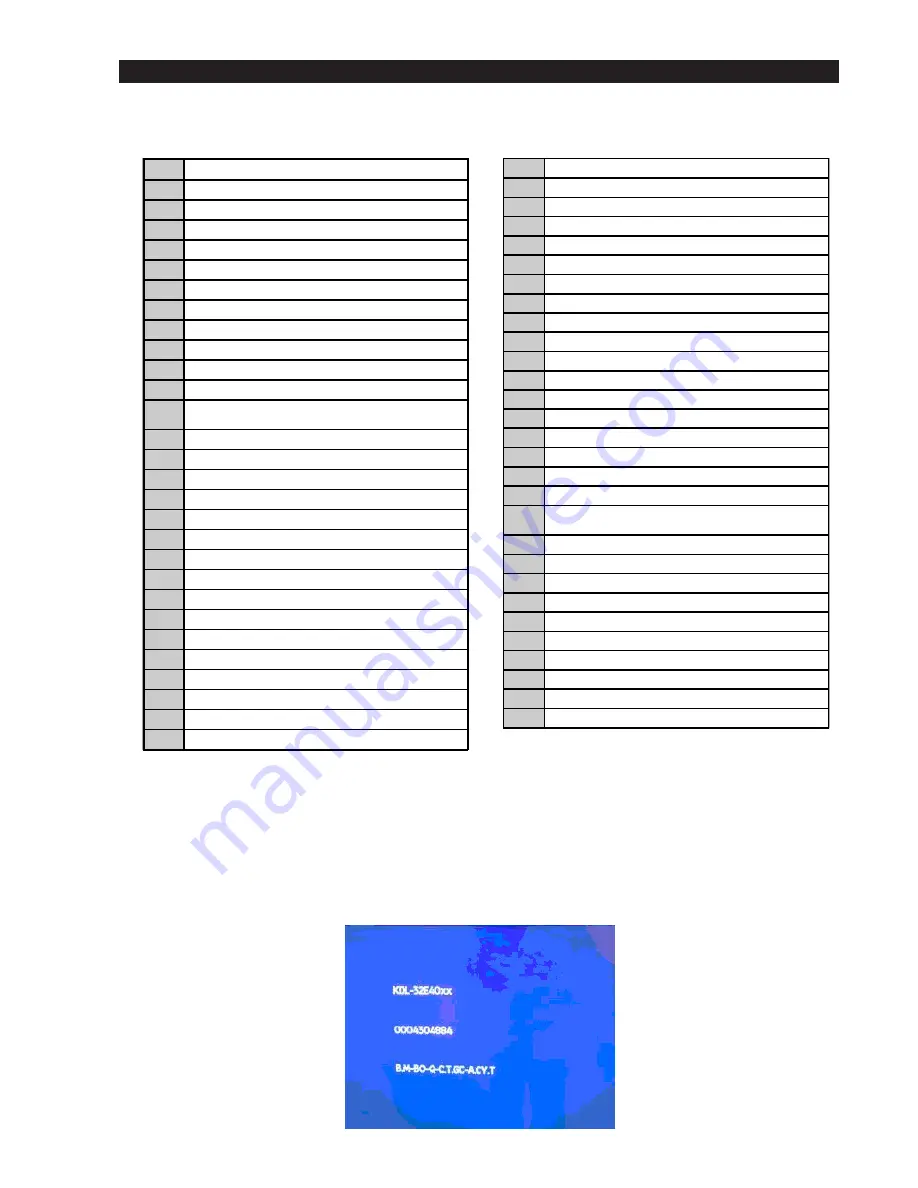
Ensure correct ‘TT’ commands are used for panel and screen size as shown in the above table. Check settings as follows.
Press the MENU on the Remote Commander and use the arrow keys to select the following menu options
SETTINGS -> SET-UP -> PRODUCT INFORMATION.
The screen as shown in the example below will appear. Check that the correct model information is displayed. If incorrect repeat
above procedure.
}
See Technical Bulletin
Ver 4.0


