background image

23

GB

Addit

iona

l Info

rm

atio

n

For children

Do not allow children to climb on the 
TV set.

Keep small accessories out of the reach 
of children, so that they are not 
mistakenly swallowed. 

If the following problems 
occur...

Turn off

 the TV set and unplug the mains 

lead immediately if any of the following 
problems occur.

Ask your dealer or Sony service centre to 
have it checked by qualified service 
personnel.

When:

Mains lead is damaged.

Poor fitting of mains socket.

TV set is damaged by being dropped, 
hit or having something thrown at it.

Any liquid or solid object falls through 
openings in the cabinet.

Warning

To prevent the spread of fire, keep candles 
or other open flames away from this 
product at all time.

Precautions

Viewing the TV

Some people may experience discomfort 
(such as eye strain, fatigue, or nausea) 
while watching 3D video images or 
playing stereoscopic 3D games. Sony 
recommends that all viewers take regular 
breaks while watching 3D video images 
or playing stereoscopic 3D games. The 
length and frequency of necessary 
breaks will vary from person to person. 
You must decide what works best. If you 
experience any discomfort, you should 
stop watching the 3D video images or 
playing stereoscopic 3D games until the 
discomfort ends; consult a doctor if you 
believe necessary. You should also 
review (i) the instruction manual of any 
other device or media used with this 
television and (ii) our website (http://
www.sony-europe.com/myproduct) for 
the latest information. The vision of 
young children (especially those under 
six years old) is still under development. 
Consult your doctor (such as a 
pediatrician or eye doctor) before 
allowing young children to watch 3D 
video images or play stereoscopic 3D 
games. Adults should supervise young 
children to ensure they follow the 
recommendations listed above.

Do not use, store, or leave the 3D 
Glasses or the battery near fire, or in 
places with a high temperature, e.g., in 
direct sunlight, or in sun-heated cars.

When using the simulated 3D function, 
please note that the displayed image is 
modified from the original due to the 
conversion done by this television.

View the TV in moderate light, as 
viewing the TV in poor light or during 
long period of time, strains your eyes.

When using headphones, adjust the 
volume so as to avoid excessive levels, 
as hearing damage may result.

LCD Screen

Although the LCD screen is made with 
high-precision technology and 99.99% 
or more of the pixels are effective, black 
dots may appear or bright points of light 
(red, blue, or green) may appear 
constantly on the LCD screen. This is a 
structural property of the LCD screen 
and is not a malfunction.

Do not push or scratch the front filter, or 
place objects on top of this TV set. The 
image may be uneven or the LCD screen 
may be damaged.

If this TV set is used in a cold place, a 
smear may occur in the picture or the 
picture may become dark. This does not 
indicate a failure. These phenomena 
disappear as the temperature rises.

Ghosting may occur when still pictures 
are displayed continuously. It may 
disappear after a few moments.

The screen and cabinet get warm when 
this TV set is in use. This is not a 
malfunction.

The LCD screen contains a small 
amount of liquid crystal. Some 
fluorescent tubes used in this TV set also 
contain mercury. Follow your local 
ordinances and regulations for disposal.

Handling and cleaning the 
screen surface/cabinet of 
the TV set

Be sure to unplug the mains lead 
connected to the TV set from mains socket 
before cleaning.

To avoid material degradation or screen 
coating degradation, observe the following 
precautions.

To remove dust from the screen surface/
cabinet, wipe gently with a soft cloth. If 
dust is persistent, wipe with a soft cloth 
slightly moistened with a diluted mild 
detergent solution.

Do not spray water or detergent directly 
on the TV set. It may drip to the bottom 
of the screen or exterior parts, and may 
cause a malfunction.

Never use any type of abrasive pad, 
alkaline/acid cleaner, scouring powder, 
or volatile solvent, such as alcohol, 
benzene, thinner or insecticide. Using 
such materials or maintaining prolonged 
contact with rubber or vinyl materials 
may result in damage to the screen 
surface and cabinet material.

Periodic vacuuming of the ventilation 
openings is recommended to ensure to 
proper ventilation.

When adjusting the angle of the TV set, 
move it slowly so as to prevent the TV 
set from moving or slipping off from its 
table stand.

Optional Equipment

Keep optional components or any 
equipment emitting electromagnetic 
radiation away from the TV set. 
Otherwise picture distortion and/or noisy 
sound may occur.

This equipment has been tested and 
found to comply with the limits set out in 
the EMC Directive using a connection 
signal cable shorter than 3 meters.

Batteries

Observe the correct polarity when 
inserting batteries.

Do not use different types of batteries 
together or mix old and new batteries.

Dispose of batteries in an 
environmentally friendly way. Certain 
regions may regulate the disposal of 
batteries. Please consult your local 
authority.

Handle the remote with care. Do not 
drop or step on it, or spill liquid of any 
kind onto it.

Do not place the remote in a location 
near a heat source, a place subject to 
direct sunlight, or a damp room.

Wireless Function of the 
unit

Do not operate this unit near medical 
equipment (pacemaker, etc.), as 
malfunction of the medical equipment 
may result.

Although this unit transmits/receives 
scrambled signals, be careful of 
unauthorised interception. We cannot be 
responsible for any trouble as a result.

Disposal of the TV set

Disposal of Old 
Electrical & 
Electronic 
Equipment 
(Applicable in 
the European 

Union and other European 
countries with separate 
collection systems)

This symbol on the product or on its 
packaging indicates that this product shall 
not be treated as household waste. Instead 
it shall be handed over to the applicable 
collection point for the recycling of 
electrical and electronic equipment. By 
ensuring this product is disposed of 
correctly, you will help prevent potential 
negative consequences for the 
environment and human health, which 
could otherwise be caused by 
inappropriate waste handling of this 
product. The recycling of materials will 
help to conserve natural resources. For 
more detailed information about recycling 
of this product, please contact your local 
Civic Office, your household waste 
disposal service or the shop where you 
purchased the product.

Disposal of 
waste batteries 
(applicable in the 
European Union 
and other 
European 

countries with separate 
collection systems)

This symbol on the battery or on the 
packaging indicates that the battery 
provided with this product shall not be 
treated as household waste. On certain 
batteries this symbol might be used in 
combination with a chemical symbol. The 
chemical symbols for mercury (Hg) or 
lead (Pb) are added if the battery contains 
more than 0.0005% mercury or 0.004% 
lead. By ensuring these batteries are 
disposed of correctly, you will help 
prevent potentially negative consequences 
for the environment and human health 

(Continued)

Summary of Contents for BRAVIA KDL-40NX703

Page 1: ...4 180 179 16 1 LCD Digital Colour TV Operating Instructions Setting Up Watching TV Additional Information KDL 55NX813 52NX803 46NX713 46NX703 40NX803 40NX713 40NX703 ...

Page 2: ...Interface are trademarks or registered trademarks of HDMI Licensing LLC in the United States and other countries DLNA the DLNA Logo and DLNA CERTIFIED are trademarks service marks or certification marks of the Digital Living Network Alliance DivX is a video file compression technology developed by DivX Inc DivX DivX Certified and associated logos are registered trademarks of DivX Inc and are used ...

Page 3: ...9 Detaching the Table Top Stand from the TV 9 Watching TV To watch programmes 10 To utilise the TV s features 10 To use i Manual 11 Additional Information Troubleshooting 12 Specifications 13 Installing the Accessories Wall Mount Wall Hanging Bracket 16 Safety Information 22 Precautions 23 Operating instructions are built into your BRAVIA TV Refer to To use i Manual for operation page 11 Before op...

Page 4: ...ling screws for Table Top Stand M5 16 4 KDL 40NX803 and KDL 40NX703 only For KDL 55NX813 KDL 46 40NX713 models Hexagon wrench 1 Assembling screws for Table Top Stand 4 KDL 55NX813 KDL 46NX713 only Assembling screws for Table Top Stand 2 KDL 40NX713 only SCART Adaptor 1 Disassembled except for KDL 52NX803 and KDL 46NX703 Refer to the supplied Table Top Stand leaflet to assemble the stand Inserting ...

Page 5: ...l evaporate after the TV has warmed up For KDL 52 40NX803 KDL 46 40NX703 1 Place the TV set on the Table Top Stand 2 Fix the TV to the Table Top Stand according to the arrow marks that guide the screw holes using the supplied screws If using an electric screwdriver set the tightening torque at approximately 1 5 N m 15 kgf cm 3 After all the screws are tightened attach the supplied stand rear cover...

Page 6: ... within the angles shown below To return to 0 reverse the below procedure For KDL 52 40NX803 KDL 46 40NX703 For KDL 55NX813 KDL 46 40NX713 1 4 2 3 Remove screw as shown 6º 0º Install screw into the top screw hole of the Table Top Stand Slide in Lift up and tilt 6º 0º ...

Page 7: ... Angle Type Universal SCART Lead is recommended for this connection For KDL 55NX813 KDL 46 40NX713 Connecting a Set Top Box recorder e g DVD recorder with HDMI For KDL 52 40NX803 after connecting cables install the bottom cover and stand rear cover Set Top Box recorder e g DVD recorder Set Top Box recorder e g DVD recorder SCART adaptor supplied Set Top Box recorder e g DVD recorder ...

Page 8: ...ew hole of the TV For KDL 52 40NX803 KDL 46 40NX703 Use M4 16 screw For KDL 55NX813 KDL 46 40NX713 Use M4 8 screw 3 Tie the wood screw and the machine screw with a strong cord not supplied Bundling the cables Do not bundle the AC power cord mains lead together with other cables For KDL 52 40NX803 KDL 46 40NX703 For KDL 55NX813 KDL 46 40NX713 KDL 52 40NX803 only ...

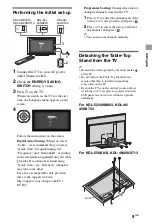
Page 9: ...s refer to the support web site http support sony europe com TV DVBC Programme Sorting Changes the order of analogue channels stored in the TV 1 Press F f to select the channel you want to move to a new position then press 2 Press F f to select the new position for the channel then press You can also tune channels manually Detaching the Table Top Stand from the TV Remove the screws guided by the a...

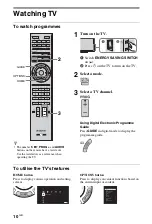
Page 10: ...a tactile dot Use the tactile dots as a reference when operating the TV 1 Turn on the TV 1 Switch ENERGY SAVING SWITCH on z 2 Press 1 on the TV to turn on the TV 2 Select a mode 3 Select a TV channel Using Digital Electronic Programme Guide Press GUIDE in digital mode to display the programme guide GUIDE OPTIONS HOME 2 3 Settings TV System Settings Picture Sound BRAVIA ENGINE 3 PRO Add to Favourit...

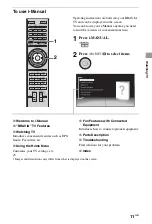
Page 11: ... Equipment Introduces how to connect optional equipment x Parts Description x Troubleshooting Find solutions for your problem x Index Images and illustrations may differ from what is displayed on the screen Operating instructions are built into your BRAVIA TV and can be displayed on the screen You can browse your i Manual anytime you need to find the varieties of convenient functions 1 Press i MAN...

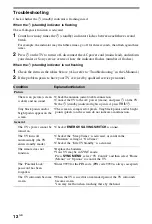
Page 12: ...sound Check the antenna aerial cable connection Connect the TV to the AC power mains and press 1 on the TV If the 1 standby indicator lights up in red press TV 1 Tiny black points and or bright points appear on the screen The screen is composed of pixels Tiny black points and or bright points pixels on the screen do not indicate a malfunction General The TV s power cannot be turned on Check if ENE...

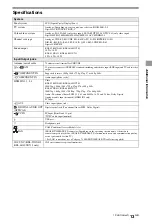
Page 13: ...ts 1080p 1080i 720p 576p 576i 480p 480i COMPONENT IN Audio input phono jacks HDMI IN1 2 3 4 Video KDL 52 40NX803 KDL 46 40NX703 1080 24p 1080p 1080i 720p 576p 576i 480p 480i KDL 55NX813 KDL 46 40NX713 1080 24p 1080p 1080i 720 24p 720p 576p 576i 480p 480i Audio Two channel linear PCM 32 44 1 and 48 kHz 16 20 and 24 bits Dolby Digital Analogue audio input minijack HDMI IN2 only PC Input AV2 Video in...

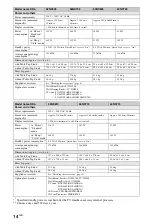
Page 14: ...ies See Checking the accessories page 4 Optional accessories Wall Mount Bracket SU WL700 Wall Hanging Bracket SU WH500 TV stand SU 52NX1 KDL 52NX803 SU 46NX1 KDL 46NX703 SU 40NX1 KDL 40NX803 40NX703 Model name KDL 55NX813 46NX713 40NX713 Power and others Power requirements 220 V 240 V AC 50 Hz Screen size measured diagonally Approx 138 8cm 55 inches Approx 116 8 cm 46 inches Approx 101 6 cm 40 inc...

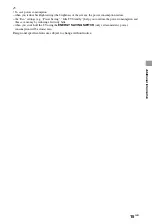
Page 15: ...umption reduce the Eco settings e g Power Saving Idle TV Standby help you to reduce the power consumption and thus save money by reducing electricity bills when you switch off the TV using the ENERGY SAVING SWITCH only certain models power consumption will be almost zero Design and specifications are subject to change without notice ...

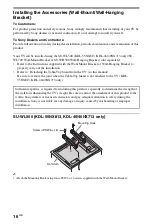
Page 16: ... Bracket or Wall Hanging Bracket to properly carry out the installation Refer to Detaching the Table Top Stand from the TV in this manual Be sure to remove the joint when the Table Top Stand is not attached to the TV KDL 55NX813 KDL 46 40NX713 only SU WL500 KDL 55NX813 KDL 46 40NX713 only Attach the Mounting Hook using four PSW6 16 screws supplied with the Wall Mount Bracket Sufficient expertise i...

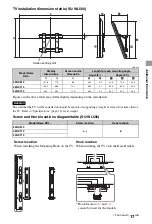
Page 17: ...e SU WL500 Model Name KDL Display dimensions Screen centre dimension Length for each mounting angle Angle 0 Angle 20 A B C D E F G H 55NX813 127 6 77 0 8 6 48 2 9 2 31 8 72 3 49 5 46NX713 108 3 66 0 14 1 48 2 9 1 28 0 62 0 49 5 40NX713 94 4 58 2 17 8 48 2 9 1 25 2 54 7 49 5 Model Name KDL Screw location Hook location 55NX813 e j b 46NX713 40NX713 Screen centre point WARNING Screw location When ins...

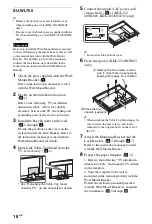
Page 18: ...e Base Bracket Refer to the instruction manual provided with the Wall Mount Bracket for details 4 Detach the Table Top Stand from the TV if necessary 4 1 See Detaching the Table Top Stand from the TV in this manual for details 5 Connect the supplied AC power cord mains lead 5 1 KDL 52 40NX803 KDL 40 46NX703 only Do not attach the bottom cover 6 Place the spacers KDL 52 40NX803 only When attaching ...

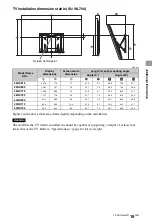
Page 19: ...e 14 for its weight Model Name KDL Display dimensions Screen centre dimension Length for each mounting angle Angle 0 Angle 20 A B C D E F G H 55NX813 127 6 77 0 1 7 41 3 5 2 36 3 72 3 47 1 52NX803 126 1 78 7 1 3 42 1 7 5 38 9 74 5 48 8 46NX713 108 3 66 0 7 2 41 3 5 1 32 5 62 0 47 1 46NX703 112 7 71 6 5 2 42 7 7 5 36 2 67 9 49 3 40NX803 99 4 63 5 8 9 42 1 7 5 33 7 60 2 48 8 40NX713 94 4 58 2 10 9 4...

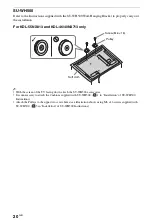
Page 20: ...y With the screen of the TV facing down attach the SU WH500 accessories It is unnecessary to attach the Cushions supplied with SU WH500 3 1 in Installation of SU WH500 Instructions Attach the Pulleys to the upper two screw holes see illustration above using M6 16 screws supplied with SU WH500 3 3 in Installation of SU WH500 Instructions Pulley Screw M6 16 Soft cloth ...

Page 21: ...the Wall Hanging Bracket is millimeters Figures in the above table may differ slightly depending on the installation The wall that the TV will be installed on should be capable of supporting a weight of at least four times that of the TV Refer to Specifications page 14 for its weight Model Name KDL A B C D E 55NX813 127 6 77 0 30 5 70 2 4 7 46NX713 108 3 66 0 25 0 59 2 4 7 40NX713 94 4 58 2 21 7 5...

Page 22: ...lly into the mains socket Operate the TV set on a 220 240 V AC supply only When wiring cables be sure to unplug the mains lead for your safety and take care not to catch your feet on the cables Disconnect the mains lead from the mains socket before working on or moving the TV set Keep the mains lead away from heat sources Unplug the mains plug and clean it regularly If the plug is covered with dus...

Page 23: ...ted to the TV set from mains socket before cleaning To avoid material degradation or screen coating degradation observe the following precautions To remove dust from the screen surface cabinet wipe gently with a soft cloth If dust is persistent wipe with a soft cloth slightly moistened with a diluted mild detergent solution Do not spray water or detergent directly on the TV set It may drip to the ...

Page 24: ...re that the battery will be treated properly hand over the product at end of life to the applicable collection point for the recycling of electrical and electronic equipment For all other batteries please view the section on how to remove the battery from the product safely Hand the battery over to the applicable collection point for the recycling of waste batteries For more detailed information a...

Page 25: ... TV has a digital tuner built in which means it is ready to receive the Freeview signal by simply plugging it into your aerial socket check if you can get digital TV through your aerial now or whether you ll have to wait until switchover at www digitaluk co uk When the TV switchover happens in your area there are at least two occasions when you will need to re tune your TV in order to continue rec...

Page 26: ...Tuning 6 Follow the on screen instructions If you are missing any channels it may be that they are not available in your area or that your aerial needs upgrading If you have any questions please contact Sony on 08705 111 999 or call Digital UK on 0845 6 50 50 50 or visit www digitaluk co uk Calls charged at BT rate of 3p per minute daytime and 1p per minute evenings and weekends Rates may vary for...

Page 27: ......

Page 28: ...4 180 179 16 1 For useful information about Sony products 2010 Sony Corporation ...

Reviews: