background image

38

Using functions for shooting

Shooting menu

The function in shooting mode using MENU button are described below. For details on how to 
operate the menu, see page 27.

The default settings are marked with 

.

When the mode has been set to playback, switch it to shooting mode with 

 (Play) button.

The approximate number of still images

(Units: Images)

• The number of still images may vary depending on the shooting conditions and the memory card.
• When the number of remaining shootable images is greater than 9,999, the “>9999” indicator appears.
• When images recorded using earlier Sony models are played back on this camera, the display may differ 

from the actual image size.

• When measuring media capacity, 1 GB equals 1 billion bytes, a portion of which is used for data 

management.

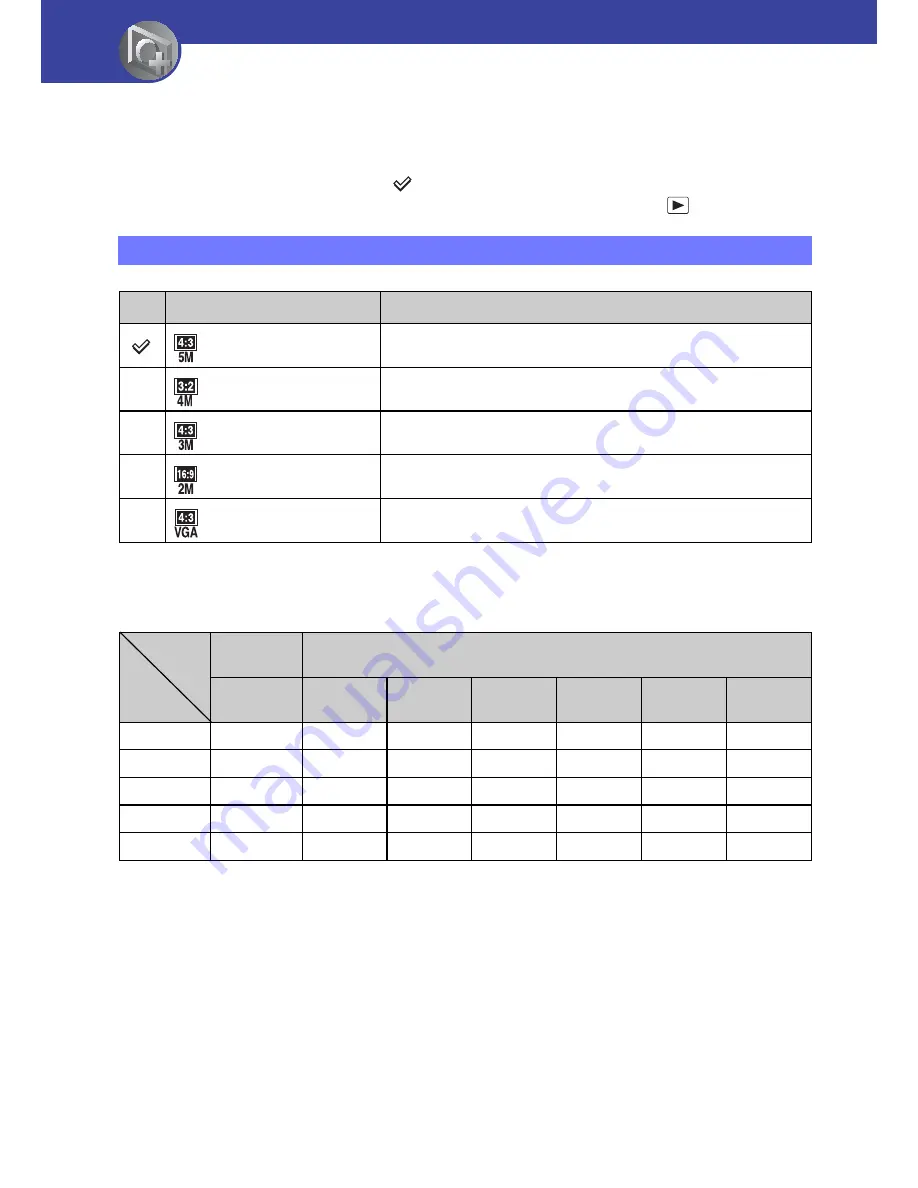
Photo Size: Selecting the photo size according to use

Image size

Guidelines

 5M (2592×1944)

For prints up to A4 (8×10")

 3:2 (2592×1728)

3:2 aspect ratio as in photo prints and postcards

 3M (2048×1536)

For prints up to 10×15 cm (4×6") or 13×18 cm (5×7")

 16:9 (1920×1080)

For viewing on a high-definition TV

 VGA (640×480)

Shoot at a small image size for e-mail attachment

Capacity

Size/
Quality

Internal 

memory

Memory card formatted with this camera

Approx. 

26 MB

1 GB

2 GB

4 GB

8 GB

16 GB

32 GB

5M

6

390

770

1550

3100

6200

12400

3:2

10

550

1100

2200

4400

8800

17600

3M

17

620

1250

2500

5000

10000

20000

16:9

30

980

2000

4000

8000

16000

32000

VGA

110

6000

12000

23500

48000

96000

192000

Summary of Contents for bloggie MHS-CM5

Page 1: ...Mobile HD Snap Camera MHS CM5 Table of contents Getting started Basic Operations Using with your computer Using functions for shooting Using functions for viewing Customizing the settings Viewing images on a TV Troubleshooting Others Index VCLICK GB ...

Page 2: ...ool dry place This is to maintain the battery functions For details on the battery see page 64 No compensation for contents of the recording The contents of the recording cannot be compensated for if recording or playback is not possible due to a malfunction of your camera or recording media etc Internal memory and memory cards back up Do not turn off the camera or remove the memory card while the...

Page 3: ...s on the LCD screen in a cold location This is not a malfunction Note on disposal transfer When using software embedded in the camera personal information such as IDs and mail addresses may be saved on the internal memory of the camera When transferring the camera to others or on disposal do so after deleting the information input On image data compatibility This camera supports MP4 format as movi...

Page 4: ...ndbook The photographs used as examples of pictures in this Handbook are reproduced images and are not actual images shot using this camera Design and specifications of recording media and other accessories are subject to change without notice ...

Page 5: ...d which reads out all image pixels at once Movie Size Usage guidelines 1920 1080 30P Shoot HD high definition quality movies in sizes suited for display on computer or high definition TV 1280 720 60P Shoots the rapidly moving action scenes such as sports smoothly with HD high definition quality 1280 720 30P Shoot HD high definition quality movies in sizes suited for display on computer 640 480 30P...

Page 6: ... close the LCD screen as illustrated Be careful not to block the lens with your finger when shooting Do not hold the camera by only holding the battery memory card cover USB jack jack cover or the LCD screen See page 14 for how to attach the wrist strap ...

Page 7: ...nu items 28 Using with your computer 29 Connecting the camera to the computer 31 Uploading videos and still images to media services 33 Using the software 36 Shooting menu 38 Photo Size Selecting the photo size according to use Movie Size Selecting the movie size according to use SteadyShot Allows you to reduce camera shake when shooting images Face Detection Detects the faces of your subjects and...

Page 8: ...44 Shooting Settings 45 Digital Zoom Flicker Reduction Main Settings 1 2 46 Main Settings 2 2 47 LUN Settings Video Out Memory Card Tool 48 Format Copy Internal Memory Tool 49 Format Clock Settings 50 Clock Settings Viewing images on a TV 51 Troubleshooting 54 Warning indicators and messages 60 Using functions for viewing Customizing the settings Viewing images on a TV Troubleshooting Beep LCD Bac...

Page 9: ...9 Table of contents On the Memory Stick media 62 On the battery 64 Precautions 65 Specifications 66 Index 67 Others Index ...

Page 10: ... T 24 For viewing Playback zoom Index 26 M Multi selector Menu on v V b B 27 Menu off DISP 24 N Jack cover O HDMI OUT jack 52 Used when connecting to a TV etc with an HDMI cable sold separately P A V OUT jack 51 Used when connecting to a TV etc with an A V connecting cable Q USB jack 31 Used when connecting to a computer with a USB connection support cable R Access lamp 18 S Memory card slot T Bat...

Page 11: ...appear for only 5 seconds however See the pages in parentheses for details of operation When shooting still images When recording movies A B C Display Indication Battery remaining 16 Low battery warning 60 SteadyShot 40 Zoom scaling AF range finder frame 22 Self timer 24 Display Indication Image size 38 Information on the still image settings appears near the Photo icon 400 Remaining number of rec...

Page 12: ...and their positions are approximate and differ from what you actually see Display Indication Image size 38 00 00 05 Remaining recordable time 38 Movie recording red 01 23 Recording time 39 Information on the movie settings appears near the Movie icon ...

Page 13: ...tery remaining 16 Image size 38 Protect 42 VOL Volume 25 Zoom scaling Low battery warning 60 Display Indication Playback bar 00 00 00 Counter 2010 1 1 9 30 AM Recorded date time of the playback image BACK NEXT Select images VOLUME Adjust volume Display Indication Playback folder This does not appear when using internal memory 12 12 Image number Number of images recorded in selected folder Playback...

Page 14: ...able 1 USB connection support cable 1 Wrist strap 1 Lens cap 1 Mounted on the lens at factory CD ROM 1 PMB software including PMB Help bloggie Handbook PDF Instruction Manual Important Notice Attach the strap and place your hand through the loop to prevent the camera from damage by being dropped etc Hook ...

Page 15: ... support cable from the USB jack of your camera b Notes While the camera is connected to a computer you cannot operate the camera Be sure to disconnect the camera before operation Charging the battery with customized or hand built computers is not guaranteed Depending on the type of USB device used charging may not function properly Do not apply force to the camera when you connect the camera to a...

Page 16: ...f 1280 720 30P 2 Typical recording time shows the time when you repeat recording start stop turning the power on off and zooming To check the remaining battery time Open the LCD screen to turn on and check the remaining battery on the LCD screen Full charge time Approx 300 min Recording time 1 Continuous recording time 105 Typical recording time 2 50 Playback time 150 Battery remaining indicator B...

Page 17: ...remaining indicator may not be correct under certain circumstances If the camera is running on battery power and you do not operate the camera for about five minutes the camera turns off automatically to prevent wearing down the battery Auto power off function The Language Setting screen appears when the camera is turned on for the first time page 19 ...

Page 18: ...ys back images using the internal memory approx 26 MB When the movie size is set to 1920 1080 30P or 1280 720 60P you cannot record movies however To remove the memory card Open the cover Never remove the memory card when the access lamp is lit This may cause damage to data in the memory card Battery memory card cover 1 2 3 Be careful of the direction of the notched corner Make sure that the acces...

Page 19: ...ower Charge lamp lights up in green Open the LCD screen up to a 90 degrees angle from the camera 1 then rotate it to the desired angle 2 2 Select the desired language with the multi selector tilt to v V then press the multi selector LCD screen Power Charge lamp MENU button Multi selector 2 270 degrees max 1 90 degrees max ...

Page 20: ...tor 2 Select each item with b B and set the numeric value with v V 3 Select OK with B then press the multi selector To turn the power off Close the LCD screen with it facing inside To change the language settings Press MENU and select Setup t Main Settings 1 2 t Language Setting page 46 To change the date and time Press MENU and select Setup t Clock Settings page 50 ...

Page 21: ...urn the power on The Power Charge lamp lights up in green 2 Confirm the composition Zoom lever Power Charge lamp Movie button Photo button Movie button You can use this button when you open the LCD screen Multi selector MENU button Position the subject in the center of the screen ...

Page 22: ...ll images the angle of view may change from that in shooting standby When a face is detected in shooting standby a white frame appears When multiple faces are detected multiple frames appear If you press and hold Photo button halfway down a white frame becomes green and the image quality is optimized automatically When shooting movies Press Movie button Start shooting movies To stop recording pres...

Page 23: ...operations Tilt the multi selector to v DISP Carry out any operation other than those using the zoom lever The indicators appear for only 5 seconds however By tilting to v DISP longer you can increase the brightness of the LCD backlight Tilt to v DISP longer again to return the brightness of the LCD backlight to normal If you view images in bright outside light adjust the brightness of the LCD bac...

Page 24: ...layed and after rapid beep sounds are heard the camera will shoot Recording in mirror mode Open the LCD screen 90 degrees to the camera 1 then rotate it 270 degrees as shown in the illustration 2 A mirror image of the subject appears on the LCD screen but the image will be normal when recorded The same image as those recorded appears on the LCD screen instead of the mirror image in playback mode U...

Page 25: ... multi selector to pause and playback a movie Tilt to B to fast forward b to rewind Press the multi selector to return to normal playback Tilt to V to display the volume control screen then adjust the volume with b B When shooting movies of fast moving subjects such as a sport scene the movie may not be played back smoothly When the playback of the first movie ends the playback of the next movie a...

Page 26: ... zoom lever toward W Adjust the position v V b B Cancel playback zoom Press the multi selector To return to the index screen Slide the zoom lever toward Index while displaying a still image or pausing the playback of a movie To delete the images Allows you to select unwanted images for deletion You can delete images from the MENU button page 41 ...

Page 27: ...layed only during shooting and playback mode Different items will become visible depending on the selected mode 2 Select the desired menu item with the multi selector tilt to v V 3 Select a setting with v V then press the multi selector 4 Press MENU to turn off the menu Multi selector MENU button ...

Page 28: ...s available only in the shooting mode and the viewing menu is available only in the playback mode Only the available items are displayed on the screen Menu for shooting page 38 Photo Size Movie Size SteadyShot Face Detection Setup Menu for viewing page 41 Delete Slideshow Protect Rotate Setup ...

Page 29: ... the same time some devices including the camera may not operate depending on the types of USB devices you are using Connecting the camera using a USB interface that is compatible with Hi Speed USB USB 2 0 compliant allows advanced transfer high speed transfer as the camera is compatible with Hi Speed USB USB 2 0 compliant When your computer resumes activity from suspend or sleep mode communicatio...

Page 30: ...othly due to dropped frames Note that the transferred image itself is not affected If you are using a notebook PC be sure to use the PC with the AC adaptor plugged in Sometimes normal operations are not possible due to the power savings function of the PC b Note Operations are not guaranteed even on computers fulfilling the above system requirements For example other open or background application...

Page 31: ...ges to the computer 1 Connect the camera to your Macintosh computer first Double click the newly recognized icon on the desktop t DCIM or MP_ROOT t the folder where the images you want to import are stored 2 Drag and drop the image files to the hard disk icon The image files are copied to the hard disk 3 Double click the hard disk icon t the desired image file in the folder containing the copied f...

Page 32: ...ff the camera 1 Double click the disconnect icon on the task tray 2 Click USB Mass Storage Device t Stop 3 Confirm the device on the confirmation window then click OK b Note Drag and drop the icon of the memory card or the drive icon to the Trash icon beforehand when you use a Macintosh computer and the camera is disconnected from the computer Deleting the USB connection Windows Vista Windows XP D...

Page 33: ...ect the camera to the computer using a USB connection 1 The connection of the camera and the computer is established the auto execution wizard automatically starts 2 Eliminate the unwanted drives with If the auto execution wizard does not appear click Computer My Computer in Windows XP t PMBPORTABLE then double click PMBP_Win exe 2 Click PMB Portable If PMB Portable does not appear on the auto exe...

Page 34: ...ly delete PMB Portable you can download the PMB Portable installer from the Internet and restore the software You can download the URLs of some websites from servers managed by Sony Corporation hereinafter called the Sony server using PMB Portable Please note the following when you use image uploading services provided by these website hereinafter called the Services using PMB Portable Depending o...

Page 35: ...y the Sony servers we will notify you of the termination of the service on the Sony website in advance We may record the URLs to which you are redirected by the Sony servers and utilize the collected information for the improvement of the products or services offered by Sony We never record personal information however ...

Page 36: ...ead the agreement click the radio button t to accept the terms of the agreement and then click Next 5 Follow the instructions on the screen to complete the installation To continue the installation connect the camera to the computer halfway through this step page 31 When the restarting confirmation message appears restart the computer following the instructions on the screen DirectX may be install...

Page 37: ...camera to a computer for display Make a USB connection between the camera and your computer and click Import You can save and print images with the date You can display images stored on a computer by shooting date in a calendar display You can correct still images and change the shooting date and time You can create discs with CD or DVD disc writing drive You can upload images to media services An...

Page 38: ...splay may differ from the actual image size When measuring media capacity 1 GB equals 1 billion bytes a portion of which is used for data management Photo Size Selecting the photo size according to use Image size Guidelines 5M 2592 1944 For prints up to A4 8 10 3 2 2592 1728 3 2 aspect ratio as in photo prints and postcards 3M 2048 1536 For prints up to 10 15 cm 4 6 or 13 18 cm 5 7 16 9 1920 1080 ...

Page 39: ...ically stop Movie Size Selecting the movie size according to use Movie image size Usage guidelines 1920 1080 30P Shoot HD high definition quality movies in sizes suited for display on computer or high definition TV 1280 720 60P Shoots the rapidly moving action scenes such as sports smoothly with HD high definition quality 1280 720 30P Shoot HD high definition quality movies in sizes suited for dis...

Page 40: ...ing time of the memory card Movies containing quickly moving and complex images are recorded at a higher bit rate and this reduces the overall recording time SteadyShot Allows you to reduce camera shake when shooting images On Activates the camera shake reduction function Off Does not activate the camera shake reduction function Face Detection Detects the faces of your subjects and adjusts the foc...

Page 41: ...start playback To stop the slideshow Press the multi selector You cannot resume the slideshow from this status To change the setup Before starting slideshow you can change the settings using the multi selector The default settings are marked with Delete Allows you to select and delete unwanted images This Image Deletes the currently displayed image in single image mode Multiple Images Allows you t...

Page 42: ...te with the multi selector tilt to v V b B then press the multi selector 3 Press MENU to display the menu Interval 1 sec Sets the slide show interval 3 sec 5 sec 10 sec Repeat On Plays back images in a continuous loop Off After all the images have been played back the slide show ends Protect Preventing accidental erasure This Image Protects the currently displayed image in single image mode Multip...

Page 43: ... the image with b B 6 Select OK with v V then press the multi selector You cannot rotate the following types of images Movies Protected still images You may not be able to rotate images shot with other cameras When viewing images on a computer the image rotation information may not be reflected depending on the software See page 44 Setup Changing Setup items ...

Page 44: ...d item is highlighted 4 Tilt to B to enter the setting You can also enter the setting by pressing the multi selector To turn off the Setup screen press MENU To return to the menu from the Setup screen tilt to b repeatedly To cancel the setting change Select Cancel if it appears then press the multi selector If it does not appear select the previous setting again This setting is maintained even whe...

Page 45: ...cluding the optical zoom 5 The picture quality deteriorates when the zoom exceeds the optical zoom scale When the movie is shot in either of the following conditions the Digital Zoom will be set to Off The size of 1920 1080 30P The camera is connected to a TV etc with the Component A V cable at the same time Curbs the flicker generated by fluorescent by using the electro shutter Digital Zoom On Us...

Page 46: ...g Even if you execute this function the images stored in the internal memory are retained 1 Select Initialize with the multi selector tilt to v V then press the multi selector or tilt to B The message Reset to default settings appears 2 Select OK with v then press the multi selector The settings are reset to the default setting To cancel the resetting Select Cancel in step 2 then press the multi s...

Page 47: ...ent TV color systems If you want to view images on a TV screen check page 53 for the TV color system of the country or region where the camera is used LUN Settings Multi Displays the images both on the memory card and in the internal memory of the camera Select this when you connect the camera to a computer Single Displays only the images on the memory card when a memory card is inserted and displ...

Page 48: ...t Cancel in step 2 then press the multi selector Copies all images in the internal memory to the memory card 1 Insert the memory card 2 Select Copy with the multi selector tilt to v V b B then tilt to B The message All data on internal memory will be copied appears 3 Select OK with v then press the multi selector Copying starts To cancel the copying Select Cancel in step 3 then press the multi sel...

Page 49: ...mory Note that formatting irrevocably erases all data in the internal memory including even protected images 1 Select Format with the multi selector tilt to v V b B then tilt to B The message All data on internal memory will be erased appears 2 Select OK with v then press the multi selector The format is completed To cancel the formatting Select Cancel in step 2 then press the multi selector Forma...

Page 50: ... to v V then press the multi selector or tilt to B 2 Select the date display format with v V then press the multi selector 3 Select each item with b B and set the numeric value with v V 4 Select OK with v V then press the multi selector To cancel the clock setting Select Cancel in step 4 then press the multi selector Clock Settings ...

Page 51: ... TV color system page 47 Image will not be displayed on the LCD screen when an image signal is output to TV Images recorded with HD high definition quality is converted to SD standard definition and played back Images recorded with SD standard definition image quality are played back with SD standard definition image quality During playback of a movie at HD high definition on SD standard definitio...

Page 52: ... record movies in HD high definition image quality 1920 1080 30P 1280 720 60P or 1280 720 30P while connecting the camera to high definition TV with a component cable the image output to the TV is shown in SD image quality When connecting with the HDMI cable sold separately Do not connect the camera and equipment to be connected using output terminals When the camera and TV are connected using out...

Page 53: ... with a video input jack and the A V connecting cable The color system of the TV must match that of your camera Check the following lists for the TV color system of the country or region where the camera is used NTSC system Bahama Islands Bolivia Canada Central America Chile Colombia Ecuador Jamaica Japan Korea Mexico Peru Surinam Taiwan the Philippines the U S A Venezuela etc PAL system Australia...

Page 54: ...opy nor save your data 1 Check the items on pages 55 to 59 2 Turn the power off and turn it on again after about one minute 3 Consult your Sony dealer or local authorized Sony service facility Battery and power 55 Shooting still images movies 56 Viewing images 57 Computers 58 Deleting Editing images 58 Memory card 59 Internal memory 59 Others 59 Click one of the following items to jump to the page...

Page 55: ...e battery pack is too high Remove the battery pack and place it in a cool place The USB connection support cable is not properly connected to the computer Disconnect the USB connection support cable and then connect it again Be sure to use the USB connection support cable supplied The computer is not turned on Turn on the computer The computer is in the standby sleep or hibernation mode Release th...

Page 56: ... the USB connector of the computer using the USB connection support cable supplied Your camera cannot record images Check the free capacity of the internal memory or the memory card If it is full do one of the following Delete unnecessary images pages 26 41 Change the memory card It is recommended that you use a memory card of 1 GB or larger for recording movies Continuous shooting is possible for...

Page 57: ...ther one The date and time are not displayed In the default settings in effect when you purchased the camera DISP is set to AUTO So indicators on the screen disappear after about 5 seconds If you want to make indicators appear again tilt the multi selector to v DISP page 23 The image appears rough right after playback starts The image may appear rough right after playback starts due to image proce...

Page 58: ... mode correctly You cannot install PMB Check the computer environment required to install PMB Install PMB in an orderly manner page 36 After making a USB connection PMB Portable does not start Make the USB connection after the computer is turned on Set LUN Settings to Multi page 47 Connect the computer to the network PMB does not work correctly Finish PMB and restart your computer Your camera is n...

Page 59: ...rd The memory card is full Check the capacity Cannot copy the data on the memory card or the computer to the internal memory Data on the memory card or a computer cannot be copied to the internal memory The lens gets fogged Moisture condensation has occurred Turn off the camera and leave it for about an hour before using it The camera becomes warm when you use it for a long time This is not a malf...

Page 60: ... type error The inserted memory card cannot be used in your camera page 62 Cannot access memory card Access denied You are using a memory card with the access controlled Error formatting internal memory Format the internal memory again page 49 Error formatting memory card Format the memory card again page 48 memory card locked You are using the memory card with the write protect switch and the swi...

Page 61: ...sed an error Maximum number of images already selected Up to 100 files can be selected when using Multiple Images Low battery power When copying a image recorded in the internal memory to the memory card use a fully charged battery Operation cannot be executed for movie files You have selected a function that is not available for movies Operation cannot be executed in unsupported files Processing ...

Page 62: ... PRO Duo media or turn the power off on your camera while your camera is reading or writing image files on the Memory Stick PRO Duo media while the access lamp is lit or flashing If you use the Memory Stick PRO Duo media near magnets or magnetic fields It is recommended you make a back up of important data on the hard disk of a computer Do not attach a label or the like on Memory Stick PRO Duo med...

Page 63: ...o sized M2 Adaptor then insert the adaptor into the Memory Stick Duo media slot If you insert Memory Stick Micro media into this camera without using a Duo sized M2 Adaptor you might not be able to remove it from the camera Do not leave the Memory Stick Micro media within the reach of small children They might accidentally swallow it On image data compatibility Image data files recorded on Memory ...

Page 64: ...in a dry cool place To use the battery up leave your camera in slide show page 41 playback mode until the power goes off On battery life The battery life is limited Battery capacity decreases little by little as you use it more and more and as time passes If the battery operating time seems shortened considerably a probable cause is that the battery has reached the end of its life Contact your Son...

Page 65: ...s with a soft cloth to remove fingerprints dust etc Cleaning the camera surface Clean the camera surface with a soft cloth slightly moistened with water then wipe the surface with a dry cloth Do not use the following or they may damage the finish or the casing Chemical products such as thinner benzine alcohol disposable cloths insect repellent sunscreen or insecticide etc Do not touch the camera w...

Page 66: ...rature 0 to 40 C 32 to 104 F Storage temperature 20 to 60 C 4 to 140 F Dimensions Approx 39 0 101 4 67 1 mm 1 9 16 4 2 3 4 inches W H D excluding protrusions Mass including NP BK1 battery pack memory card Approx 196 g 6 9 oz Microphone Monaural Speaker Monaural Rechargeable battery pack NP BK1 Used battery Lithium ion battery Maximum output voltage DC 4 2 V Mean output voltage DC 3 6 V Maximum cha...

Page 67: ...ator 11 Initialize 46 Install 36 Internal Memory Tool 49 L Language Setting 46 LCD Backlight 46 LUN Settings 47 M Macintosh computer 29 Main Settings 46 Memory card 2 Memory Card Tool 48 Memory Stick PRO Duo media 62 Menu Items 28 Shooting 38 Viewing 41 Mirror mode 24 N NTSC 47 O OS 29 P PAL 47 Playback zoom 26 PMB 36 Protect 42 R Rechargeable battery 14 66 Rotate 42 S Screen Indicator 11 LCD back...

Page 68: ...O IN COMPLIANCE WITH THE AVC STANDARD AVC VIDEO AND OR ii DECODE AVC VIDEO THAT WAS ENCODED BY A CONSUMER ENGAGED IN A PERSONAL AND NON COMMERCIAL ACTIVITY AND OR WAS OBTAINED FROM A VIDEO PROVIDER LICENSED TO PROVIDE AVC VIDEO NO LICENSE IS GRANTED OR SHALL BE IMPLIED FOR ANY OTHER USE ADDITIONAL INFORMATION MAY BE OBTAINED FROM MPEG LA L L C SEE HTTP MPEGLA COM ...

Page 69: ...Additional information on this product and answers to frequently asked questions can be found at our Customer Support Website ...

Page 70: ...ˋ ˎ 2 Inserting the memory card sold separately See illustration ȏ Open the battery memory card cover Insert the memory card sold separately all the way in as shown in the illustration until it clicks Close the battery memory card cover 3 Turning the camera on setting the language and clock See illustration Ȑ Open the LCD screen to turn the camera on The Power Charge lamp lights up in green Set th...

Page 71: ...u déposées de HDMI Licencing LLC En outre les noms de systèmes et de produits utilisés dans ce manuel sont en général des marques de commerce ou des marques déposées de leurs développeurs ou fabricants respectifs Cependant les symboles ː ou ˊ ne sont pas utilisés dans tous les cas dans ce manuel ˎ ˎ ˎ ˎ ˎ ˎ Español Comprobación de los accesorios suministrados Batería recargable NP BK1 1 Cable de c...

Page 72: ...nserve natural resources For more detailed information about recycling of this product please contact your local Civic Office your household waste disposal service or the shop where you purchased the product Applicable accessories VCL BPPI Memory Stick PRO Duo media Only for MHS PMSK I Disposal of waste batteries applicable in the European Union and other European countries with separate collectio...

Page 73: ...ntia suministrados por separado Este producto se ha probado y cumple con la normativa que establece la Directiva EMC si se utiliza un cable de conexi6n de menos de 3 metros de longitud IAtencion Los campos electromagneticos a frecuencias especificas podran influir en la imagen y eI sonido de esta unidad IAviso Si la electricidad estatica 0 el electromagnetismo interrumpen la Iransmision de datos f...

Page 74: ......

Page 75: ......

Page 76: ...SONY make believe CANADIAN CUSTOMERS ONLY CLIENTS DU CANADA SEULEMENT Receive your next purchase of select Digital Imaging accessories ...

Page 77: ...tion within Canada to which the unit may be returned If shipped to the service facility the repaired unit will be returned to customer freight prepaid All accessories that are enclosed with the unit must be listed individu ally on the packing slip for the shipping documentation Defective accessories should be shipped to Sony as aseparate repair item Sony shall have no liabil ity whatsoever for los...

Page 78: ...sera retournee au client port paye Tous les accessoires compris avec I unite doivent etre enumeres individuellement sur Ie bordereau d expedition aux fins de documentation d expedition Les accessoires defectueux doivent etre expedies a Sonya titre d article distinct a reparer Sony n est pas responsable des pertes ou dommages des articles en transit expedies aux centres de reparation Toute piece re...

Page 79: ... product with a new or refurbished product For purposes ofthis Limited Warranty refurbished means a product or part that has been returned to its original specifications In the event of a defect these are your exclusive remedies Visit Sony s Web Site www sony com support LIMITED WARRANTY US Only This Limited Warranty covers only the hardware components packaged with the Product It does not cover t...

Reviews: