background image

28

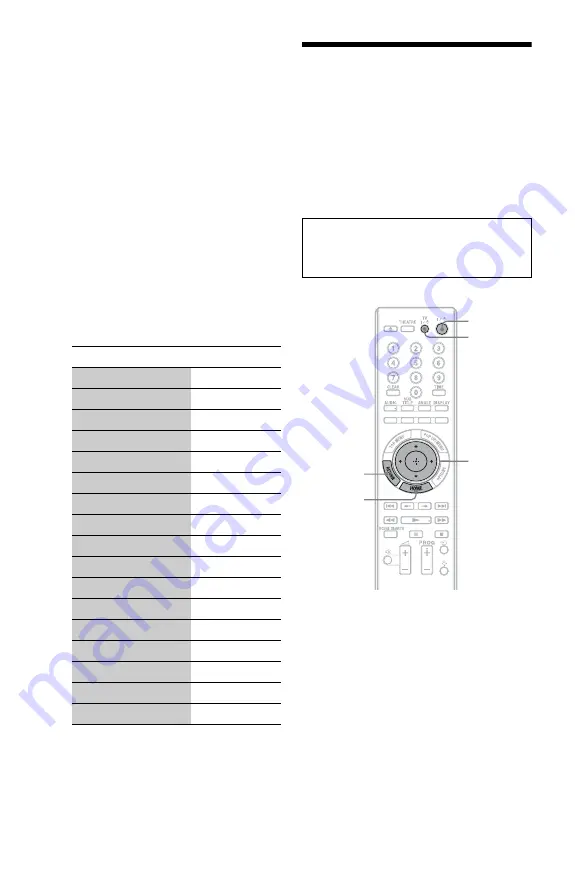
To control other TVs with the remote

You can control the volume, input source, 
programme position, and power switch of 
non-Sony TVs as well.
If your TV is listed in the table below, set the 
appropriate manufacturer’s code.

b

If you enter a new code number, the code number 
previously entered will be erased.

1

While holding down TV 

[

/

1

, enter the 

TV’s manufacturer code using the 
number buttons. 
For instance, to enter “09,” press “0” then 
“9.”

Code numbers of controllable TVs

If more than one code number is listed, 
try entering them one at a time until you 
find the one that works with your TV.

2

Release TV 

[

/

1

.

Step 7: Easy Setup

Follow the steps below to make the minimum 
number of basic adjustments for using the 
player. If you do not complete Easy Setup, it 
will appear each time you turn on your 
player.
Make the settings below in the following 
order.

1

Turn on the TV. 

2

Press 

[

/

1

 to turn on the player.

The player turns on after a moment.

3

Switch the input selector on your TV so 
that the signal from the player 
appears on your TV screen.

The display for OSD language selection 
appears.
• If the display for OSD language 

selection does not appear
Press HOME, and select “Easy Setup” 
in the “Setup” setup (page 55). Then, 
select “Start,” and press ENTER.

Manufacturer

Code number

Sony

01 (default)

Grundig

11

Hitachi

24

ITT

15, 16

JVC

33

LG/Goldstar

76

Loewe

45

Nokia

15, 16, 69, 73

Panasonic

17, 49

Philips

06, 07, 08, 72

Saba

12, 13, 74

Samsung

22, 23, 71

Sanyo

25

Sharp

29

Telefunken

36

Thomsom

43, 75

Toshiba

38

When turned on for the first time

Wait for a short while before the player 
turns on and starts Easy Setup.

[

/

1

<

/

M

/

m

/

,

ENTER

RETURN

TV 

[

/

1

HOME

Summary of Contents for 3-452-779-11(1)

Page 1: ...y Corporation Printed in Japan 3 452 779 11 1 Operating Instructions Blu ray Disc DVD Player BDP S550 z To find out useful hints tips and information about Sony products and services please visit www sony europe com myproduct ...

Page 2: ...trical and electronic equipment By ensuring this product is disposed of correctly you will help prevent potential negative consequences for the environment and human health which could otherwise be caused by inappropriate waste handling of this product The recycling of materials will help to conserve natural resources For more detailed information about recycling of this product please contact you...

Page 3: ...cs A disc that has a non standard shape e g card heart A disc with a label or sticker on it A disc that has cellophane tape or sticker adhesive on it Do not resurface the playing side of a disc to remove surface scratches Precautions On safety To prevent fire or shock hazard do not place objects filled with liquids such as vases on the player or place the player near water such as near a bathtub o...

Page 4: ...y be collected for reuse or recycling purposes Copyrights and Trademarks This product incorporates copyright protection technology that is protected by U S patents and other intellectual property rights Use of this copyright protection technology must be authorized by Macrovision and is intended for home and other limited viewing uses only unless otherwise authorized by Macrovision Reverse enginee...

Page 5: ... details see Playable Discs page 61 Instructions in this manual describe the controls on the remote You can also use the controls on the player if they have the similar symbols as those on the remote The on screen display illustrations used in this manual may not match the graphics displayed on your TV screen NEED to know information to prevent incorrect operation is listed under the b icon NICE t...

Page 6: ...4 Step 4 Connecting to the Network 25 When connecting to a broadband router directly 25 When connecting via a wireless LAN router 26 Step 5 Connecting the Mains Lead 26 Step 6 Preparing the Remote 27 Controlling TVs with the remote 27 Step 7 Easy Setup 28 Playback Playing BDs DVDs 31 Using the BD s or DVD s menu 33 Enjoying BonusView BD Live 34 Searching for a scene quickly Scene Search 34 Searchi...

Page 7: ...ut Resolution 64 Audio Output Signals 65 Specifications 66 Language Code List 67 Parental Control Area Code 67 Terms and Conditions of Use and End User License Agreement 68 Glossary 70 Index 73 Before operating the player please read Terms and Conditions of Use and End User License Agreement page 68 ...

Page 8: ...ected to a Theatre Mode compatible TV TV 1 on standby page 27 Turns on the TV or sets to standby mode 1 on standby page 28 Turns on the player or sets to standby mode B Number buttons page 35 54 Enters the title chapter numbers etc CLEAR Clears the entry field C TIME page 11 Displays the elapsed remaining playback time in the front panel display Each time you press the button the display switches ...

Page 9: ...n M1 10 t M2 30 t M3 120 Reverse direction n 1 t m1 10 t m2 30 t m3 120 When you press and hold the button fast forward fast reverse continues at the selected speed until you release the button Search speed does not change when playing CDs Speed multiple values are approximate To resume normal playback press N N play page 31 Starts or re starts playback Resumes playback from the point where you pr...

Page 10: ...r page 44 Lights up when outputting 1080p 24 Hz video signals of BD ROMs G N play X pause x stop page 31 Starts pauses or stops playback H A open close page 31 Opens or closes the disc tray To lock the disc tray Child Lock You can lock the disc tray to prevent it being opened by mistake When the player is turned on hold down X on the player for more than 10 seconds until LOCKED appears in the fron...

Page 11: ...ress TIME repeatedly during playback The display changes as follows When playing a BD ROM DVD VIDEO Elapsed time of the current title r Remaining time of the current title When playing a CD Elapsed time of the current track r Remaining time of the current track r Elapsed time of the current disc r Remaining time of the current disc z T Title or Track C Chapter or D Disc may be displayed depending ...

Page 12: ...TI CHANNEL OUTPUT FRONT L R SURROUND L R SUR BACK L R CENTER SUB WOOFER jacks page 22 E AC IN terminal page 26 F Ventilation holes The ventilation fan is inside the player G EXT slot page 24 H DIGITAL OUT OPTICAL COAXIAL jacks page 21 I LINE OUT VIDEO jack page 18 J HDMI OUT jack page 15 20 K LAN 100 terminal page 25 Rear panel ...

Page 13: ...e following items Audio video cable phono plug 3 1 Mains lead 1 External memory 1 Remote commander remote 1 R6 size AA batteries 2 Follow steps 1 through 7 to hook up and adjust the settings of the player Do not connect the mains lead until you reach Step 5 Connecting the Mains Lead page 26 ...

Page 14: ...onnect to a TV with DVI input Use an HDMI DVI converter cable not supplied The DVI jack will not accept any audio signals so you have to use another audio connection in addition to this connection page 19 Furthermore you cannot connect the HDMI OUT jack to DVI jacks that are not HDCP compliant e g DVI jacks on PC displays Jack type Video resolution Hookup High quality Standard quality Digital High...

Page 15: ...ector Carefully align the HDMI OUT jack on the rear of the player and the HDMI connector by checking their shapes Make sure the connector is not upside down or tilted Be sure to disconnect the HDMI cable when moving the player If you place the player on a cabinet with the HDMI cable connected do not apply too much pressure to the cabinet wall It may damage the HDMI OUT jack or the HDMI cable When ...

Page 16: ... the optimum video mode for watching movies When connected with an AV amplifier receiver using the HDMI cable the speaker output also switches automatically When connected with a Theatre Mode compatible TV using the HDMI cable the TV s video mode switches to Theatre Mode Press the button again to return to the original setting Language Follow When you change the language for the on screen display ...

Page 17: ...cks using the audio video cable b When you connect the player and TV using a component video cable disconnect the video plug yellow of the audio video cable Connecting to component video jacks Y PB CB PR CR Audio video cable supplied Component video cable not supplied green red blue Signal flow Match the colour of the plug to that of the jack Blu ray Disc DVD player TV Match the colour of the plug...

Page 18: ...ound b When you connect the player and TV using an S video cable disconnect the video plug yellow of the audio video cable Connecting to an audio video or S VIDEO jack Audio video cable supplied Signal flow Match the colour of the plug to that of the jack Blu ray Disc DVD player TV S video cable not supplied or yellow red white yellow red white ...

Page 19: ...able do one of the following Connect your AV amplifier receiver to your TV using an HDMI cable or Connect the player to your TV using a video cable other than an HDMI cable component video cable S video cable or audio video cable If you connect a component that does not conform to the selected audio signal a loud noise or no sound will come from the speakers which could damage your ears or the spe...

Page 20: ...sound from the connected AV amplifier receiver Set Audio Output Priority to HDMI in the Audio Settings setup page 45 Set Audio HDMI to Auto in the Audio Settings setup page 48 Set BD Audio Setting to Direct in the Audio Settings setup page 48 b Not all HDMI compatible AV amplifiers receivers accept 8ch Linear PCM signals Refer as well to instructions supplied with the connected AV amplifier receiv...

Page 21: ...and your AV amplifier receiver 2 Set Audio Output Priority to Coaxial Optical in the Audio Settings setup page 45 3 Make the appropriate settings in Dolby Digital and DTS under the Audio Settings setup page 48 Otherwise no sound or a loud noise will come from your speakers Connecting to digital jacks OPTICAL COAXIAL AV amplifier receiver Coaxial digital cable not supplied Blu ray Disc DVD player O...

Page 22: ...to Multi Channel Analogue in the Audio Settings setup page 45 3 Make the appropriate settings in Speaker Settings under the Audio Settings setup page 45 Connecting to 7 1 channel jacks AV amplifier receiver Blu ray Disc DVD player Stereo audio cable not supplied Monaural audio cable not supplied Signal flow Stereo audio cable not supplied Stereo audio cable not supplied Monaural audio cable not su...

Page 23: ...receiver only has L and R audio input jacks use this connection Connecting to audio L R jacks AV amplifier receiver Audio video cable supplied Signal flow Blu ray Disc DVD player white red white red Match the colour of the plug to that of the jack ...

Page 24: ...he external memory into the slot this will cause damage to both the external memory and the player Keep the external memory away from small children to prevent them from accidentally swallowing the external memory Do not apply too much pressure to the external memory in the slot as it may cause a malfunction We recommend use of the Sony USM1GH available as of April 2008 Other USB flash devices may...

Page 25: ...s in Internet Settings under the Network Settings setup page 53 To update the player s software using the network See Network Update page 41 and Software Update Notification page 53 b Do not connect a phone line to the LAN 100 terminal as it may cause a malfunction To enjoy the BD Live function See Enjoying BonusView BD Live page 34 About network LAN cables Depending on the modem or router the typ...

Page 26: ...d mains lead AC power cord to the AC IN terminal of the player Then plug the player and TV mains leads AC power cords into the mains When connecting via a wireless LAN router Blu ray Disc DVD player To PC Wireless LAN router access point Internet ADSL modem Cable modem Ethernet wireless LAN media converter Network cable not supplied Network cable not supplied to mains to AC IN 1 2 ...

Page 27: ...tery compartment and insert new batteries Do not expose the remote sensor marked on the front panel to strong light such as direct sunlight or a lighting apparatus The player may not respond to the remote You can control the volume input source programme position and power switch of your Sony TV with the supplied remote b When you replace the batteries of the remote the code number may be reset to...

Page 28: ...layer If you do not complete Easy Setup it will appear each time you turn on your player Make the settings below in the following order 1 Turn on the TV 2 Press 1 to turn on the player The player turns on after a moment 3 Switch the input selector on your TV so that the signal from the player appears on your TV screen The display for OSD language selection appears If the display for OSD language s...

Page 29: ...a video output resolution for the connected TV and press ENTER For details about the video output resolution see page 44 When you select HDMI in step 6 Select from Auto 480i 576i 480p 576p 720p 1080i or 1080p When connecting the HDMI OUT jack and other video output jacks at the same time video signals may not output from the jacks other than from the HDMI OUT jack when Auto or 1080p is selected Wh...

Page 30: ...ith a wide mode function Select 4 3 when connecting to a 4 3 screen TV without a wide mode function 9 Only when connecting your TV using the HDMI cable Set the Control for HDMI function to On or Off and press ENTER Select On to use the Control for HDMI function when connecting Sony components that are compatible with the Control for HDMI function page 16 If you do not use the Control for HDMI func...

Page 31: ...ress Z and place a disc on the disc tray 3 Press Z to close the disc tray When you insert a commercially available BD ROM or DVD VIDEO playback automatically starts depending on the disc b Playback does not start by pressing N while the disc tray is open DVD BD x OPTIONS Z X N M m ENTER HOME Number buttons Playing side facing down continued ...

Page 32: ...ngs on the player or you remove the external memory for BD ROMs The player may not resume playback depending on the disc or stop point To play restricted BDs or DVDs Parental Control When you play a restricted BD change the BD Parental Control setting in the BD DVD Viewing Settings setup page 50 When you play a restricted DVD the display for entering your password appears on the screen Enter your ...

Page 33: ... 2 Select an item using M m colour buttons or the number buttons and follow the on screen instructions Items Details A V Settings Adjusts settings for picture and sound Video Settings page 36 Audio Settings page 37 Title List Displays the title list Play Plays the title from the point where you pressed x Play from start Plays the title from the beginning Top Menu Displays the disc s Top Menu page ...

Page 34: ...Erase and press ENTER 6 Select OK and press ENTER The data of the selected disc will be deleted z To delete all data in the external memory at once select Erase All in step 5 Press ENTER instead of OPTIONS in step 4 to skip step 5 b Depending on the BD ROM the disc name may not be displayed You can move quickly between scenes within the title currently being played back 1 Press SCENE SEARCH during...

Page 35: ... and re enter another number 4 Press ENTER After a while the player starts playback from the selected number You can check the title information including the video transmission rate etc Press DISPLAY The displayed information differs depending on the disc type and player status Example When playing a BD ROM A The current selected angle B Title number or name C The currently selected audio or subt...

Page 36: ...4 above and press ENTER 2 Select an item and press ENTER Adjusting pictures and sound for videos Items Details PictureQuality Mode Standard Brighter Room Theatre Room Memory Selects the picture settings for different lighting environments Video Equaliser This setting isselectable when Picture Quality Mode is set to Memory see Video Equaliser elements on page 36 NR Noise Reduction Reduces the noise...

Page 37: ... Insert a CD The Music Player screen appears 2 Press N Playback starts To select a track 1 Press HOME 2 Select Music using 3 Select and press ENTER The music list appears 4 Select a track using M m To play the selected track press N or ENTER Available OPTIONS 1 Press OPTIONS The options menu appears 2 Select an item using M m and press ENTER The available items differ depending on the situation It...

Page 38: ...e file list or folder list appears 4 Select a file or folder using M m and press ENTER When you select a folder select a file in the folder using M m and press ENTER The selected photo file is displayed To play a slideshow press N Buttons Operations N Starts playback from the point where you pressed x x Stops playback X Pauses playback Skips to the beginning of the current or next track To go to t...

Page 39: ...o files that have an extension other than jpeg or jpg photo files that have an extremely long name photo files in the 5th tree or lower 501th or more folders when the total number of folders and files in a single tree exceeds 500 Photo files edited on a PC may not be played Thumbnail images of some photo files may not be displayed Large photo files may take some time to display or to start a slide...

Page 40: ... menu when you need to change the settings of the player 1 Press HOME 2 Select Setup using 3 Select the setup category icon to change using M m and press ENTER For details on setting options and setup category icons see Setting list page 41 Example Video Settings 4 Set the options ...

Page 41: ...layer informs you of newer software version information when Software Update Notification is set to On default page 53 b Do not disconnect the mains lead or network cable while downloading or updating software Any operations including opening the disc tray are not available while updating Downloading times may differ depending on the server provider or line status When error messages on network co...

Page 42: ... 53 The Setup settings remain after updating For information about other software update methods refer to the following website or consult your nearest Sony dealer or local authorised Sony Service facility http support sony europe com b Do not disconnect the mains lead while updating Any operations including opening the disc tray are not available while updating Video Settings The default settings...

Page 43: ...jack or COMPONENT VIDEO OUT jacks using M m and press ENTER When you change the video output resolution a picture is displayed in the selected resolution for about 30 seconds then the display asks for confirmation Follow the on screen instructions The HD indicator lights up when outputting 720p 1080i 1080p video signals DVD Aspect Ratio Letter Box Displays a wide picture with black bands on the to...

Page 44: ...conditions are met You connect a 1080 24p compatible TV using the HDMI OUT jack Output Video Format is set to HDMI and HDMI Resolution is set to Auto or 1080p The 24P indicator lights up when outputting 1920 1080p 24 Hz video signals b No BD ROM picture appears when the connected TV is non compatible with 1080 24p and BD ROM 1080 24p Output is set to On In this case press HOME to display the home ...

Page 45: ... level This setting is selectable when Audio Output Priority is set to Multi Channel Analogue To set the speakers 1 Select Speaker Settings in Audio Settings and press ENTER YCbCr RGB HDMI Auto Automatically detects the connected TV type and switches to the matching colour setting YCbCr 4 2 2 Outputs YCbCr 4 2 2 video signals YCbCr 4 4 4 Outputs YCbCr 4 4 4 video signals RGB 16 235 Select this whe...

Page 46: ...st A 1 0 m to 15 0 m Then adjust the values in Centre centre speaker B Surround surround speakers C Surround Back surround back speakers D and Subwoofer E to reflect the actual distance to your centre speaker surround speakers surround back speakers and subwoofer Large Normally select this position Small Select this when the speakers cannot reproduce adequate low frequencies Large Normally select ...

Page 47: ...For example if Front is set to 1 6 metres Centre can be set between 0 metre and 2 2 metres 0 3 0 15 6 m Surround Set this within 5 0 metres and 0 6 metre of the Front setting in 0 2 metre increments For example if Front is set to 5 0 metres Surround can be set between 0 metre and 5 6 metres 0 3 0 15 6 m Surround Back Set this within 5 0 metres and 0 6 metre of the Front setting in 0 2 metre increm...

Page 48: ...nce from the MULTI CHANNEL OUTPUT jacks to adjust the sound level from each speaker When you select one of the Speaker Settings items the test tone is emitted from the selected speaker Off The test tone is not emitted from the speakers Audio HDMI Auto Normally select this Outputs audio signals according to the status of the connected HDMI device 2ch PCM Downmixes to 2 channel Linear PCM signals be...

Page 49: ...i Channel Analogue or Stereo Analogue Sets the downmix method of multi channel to two channel sound b Downmix has no effect on the bitstream audio output from the DIGITAL OUT OPTICAL COAXIAL HDMI OUT jack 48kHz 96kHz PCM 48kHz 16bit Outputs audio signals of 96 kHz sampling as 48 kHz 16 bit 96kHz 24bit Outputs audio signals of 96 kHz sampling as 96 kHz 24 bit However the signals will be output as 4...

Page 50: ...K and press ENTER 4 Select the age restriction and press ENTER The lower the value the stricter the limitation If you select Select Age Restriction you can enter the age from 0 to 255 using M m or the number buttons To cancel the Parental Control setting select No Restrictions z You can change the password see Password on page 51 b If you forget the password reset the player page 55 and set a new ...

Page 51: ... 55 and set a new password see Password on page 51 When you play discs which do not have the Parental Control function playback cannot be limited on this player Depending on the disc you may be asked to change the Parental Control level while playing the disc In this case enter your password then change the level Sets or changes the password for the Parental Control function A password allows you ...

Page 52: ...entilation fan may turn on depending on the surrounding temperature Slideshow Speed Fast Photos change rapidly Normal Photos change at normal speed Slow Photos change slowly OSD Dimmer Bright Bright lighting Dark Low lighting Off Turns off the lighting during playback Low lighting other than during playback Control for HDMI On Allows you to use the Control for HDMI function page 16 Off Turns off t...

Page 53: ...Network Settings and press ENTER 2 Select IP Address Acquisition and press ENTER 3 Select an item and press ENTER When you select Use DHCP If you set DNS Server Auto Acquisition to Off set the following item DNS Server Primary DNS Server Secondary When you select Use Static IP Address Set the following items IP Address Subnet Mask Default Gateway DNS Server Primary DNS Server Secondary Auto Displa...

Page 54: ... characters appears when you select Proxy Server in Proxy Settings 1 Press a number button repeatedly to select a character Example Press the number 3 button once to enter D Press the number 3 button three times to enter F 2 Press and enter the next character 3 Press the blue button Finish to finish Available buttons Buttons Details Red button Letter Type Switches the keyboard between alphabet and...

Page 55: ...ss ENTER 2 Select Reset to Factory Default Settings and press ENTER 3 Select the settings you want to reset to default and press ENTER The display asks for confirmation You can reset the following settings Video Settings Audio Settings BD DVD Viewing Settings Photo Settings System Settings Network Settings All Settings 4 Select Start using and press ENTER b When All Settings is selected in step 3 ...

Page 56: ...e A new software version has been found on the network Perform update under Network Update appears on the screen when turning the player on See Network Update page 41 to update the player to a newer software version The disc does not play The disc is dirty The disc is upside down Insert the disc with the playback side facing down The disc is skewed You are attempting to play a disc with a format t...

Page 57: ...e Adjusting pictures and sound for videos on page 36 The picture is not output correctly Check the Output Video Format settings in the Video Settings setup page 43 No BD ROM picture appears Check the BD ROM 1080 24p Output setting in the Video Settings setup page 44 See also Connecting to an HDMI jack page 20 when connecting equipment using the HDMI cable There is no sound Check that all the conne...

Page 58: ...rely connected If the HDMI indicator does not appear in the front panel display check the HDMI connection page 15 20 Set Control for HDMI to On page 52 Make sure that the connected component is compatible with the Control for HDMI function For details refer to the operating instructions supplied with the component Check the connected component s setting for the Control for HDMI function For detail...

Page 59: ...mote page 33 Multi lingual tracks subtitles or multi angles are not recorded on the BD or DVD being played The BD or DVD prohibits the changing of the language for the sound track subtitle or angles The disc tray does not open and LOCKED or TLK ON appears in the front panel display When LOCKED appears the player is locked To cancel the Child Lock hold down X on the player until UNLOCK appears in t...

Page 60: ...s in the front panel display When just appears without any messages on the entire screen Contact your nearest Sony dealer or local authorised Sony service facility Error code Corrective action Exxxx SYS ERR Contact your nearest Sony dealer or local authorised Sony service facility and give the error code FAN ERR Check that the ventilation holes on the rear of the player are not blocked Place the p...

Page 61: ...see page 65 Type Disc Logo Icon used in this manual Characteristics Blu ray Disc BD ROMs and BD REs BD Rs in BDMV and BDAV mode including 8 cm discs single layer and DL discs DVD VIDEO Discs such as movies that can be purchased or rented DVD DVD RWs DVD Rs in VR mode or DVD RWs DVD Rs in video and VR mode including 8 cm discs single layer and DVD R DL DVD R DL discs DATA DVD DVD RWs DVD Rs DVD RWs...

Page 62: ...D disc will not play if it has not been correctly finalised For more information refer to the operating instructions supplied with the recording device Note that some playback functions may not work with some DVD RWs DVD Rs even if they have been correctly finalised In this case view the disc using normal playback Music discs encoded with copyright protection technologies This product is designed ...

Page 63: ...udio data The MPEG 4 AVC H 264 format is capable of compressing images at higher efficiency than that of the conventional image compressing format The MPEG 4 AVC H 264 format enables a high definition HD video signal shot on a digital video camera recorder to be recorded on DVD discs in the same way as it would be for a standard definition SD television signal 1 A high definition specification whi...

Page 64: ...576p video signals are output from the HDMI OUT jack Resolution setting When Output Video Format is set to HDMI When Output Video Format is set to Component Video LINE OUT VIDEO S VIDEO jack COMPONENT VIDEO jack HDMI OUT jack LINE OUT VIDEO S VIDEO jack COMPONENT VIDEO jack HDMI OUT jack 480i 576i 480i 576i 480i 576i 480i 576i 480i 576i 480i 576i 480i 576i 480p 576p 480i 576i 480i 576i 480p 576p 4...

Page 65: ...S LPCM 2ch is output 6 The 2 channel or less channel primary secondary audio signals are output as LPCM 2ch signals b When outputting 480i 576i or 480p 576p video signals from the HDMI OUT jack Dolby TrueHD and DTS HD Master Audio are output as LPCM Dolby Digital or DTS bitstream signals even if BD Audio Setting is set to Direct in the Audio Settings setup page 48 Jacks settings 1 Disc source Digi...

Page 66: ... CR Phono jack Y 1 0 Vp p PB CB PR CR 0 7 Vp p 75 ohms LINE OUT VIDEO Phono jack 1 0 Vp p 75 ohms LINE OUT S VIDEO 4 pin mini DIN Y 1 0 Vp p C 0 3 Vp p 75 ohms LAN 100 100BASE TX Terminal EXT External memory slot For connecting the external memory DC output 5 V 500 mA Max General Power requirements 220 240 V AC 50 60 Hz Power consumption 28 W Dimensions approx 430 mm 220 mm 70 mm width depth heigh...

Page 67: ...90 Chile cl 2092 China cn 2093 Colombia co 2115 Denmark dk 2165 Finland fi 2174 France fr 2109 Germany de 2200 Greece gr 2219 Hong Kong hk 2248 India in 2238 Indonesia id 2239 Ireland ie 2254 Italy it 2276 Japan jp 2304 Korea kr 2333 Luxembourg lu 2363 Malaysia my 2362 Mexico mx 2376 Netherlands nl 2390 New Zealand nz 2379 Norway no 2427 Pakistan pk 2424 Philippines ph 2428 Poland pl 2436 Portugal...

Page 68: ...d that you agree that the security functionality improvements error corrections other functional updates or any other changes offered by Sony through such updates would not be made to the Software and that your current and further use of the Software may be affected thereby When the automatic update functionality described in the previous paragraph is activated it is assumed that you agree a that ...

Page 69: ...h or alleged breach by you of this Agreement in any manner ii any information you submit to Sony hereunder iii any breach or alleged breach by you of a third party s rights or iv any damage caused by or alleged to have been caused by you to the Service You will cooperate as fully as reasonably required in Indemnified Party s defense of any claim Sony and or Indemnified Parties reserve the right at...

Page 70: ... definition content AVCHD page 63 The AVCHD format is a high definition digital video camera format used to record SD standard definition or HD high definition signals of either the 1080i specification 1 or the 720p specification 2 on DVDs using efficient data compression coding technology The MPEG 4 AVC H 264 format is adopted to compress video data and the Dolby Digital or Linear PCM is used to ...

Page 71: ... HD High Resolution Audio has a maximum transmission rate of 6 Mbps with lossy compression Lossy DTS HD Master Audio page 65 DTS HD Master Audio has a maximum transmission rate of 24 5 Mbps and uses lossless compression Lossless and DTS HD Master Audio corresponds to a maximum sampling frequency of 192 kHz and maximum of 7 1ch HDMI High Definition Multimedia Interface page 15 HDMI is an interface ...

Page 72: ...CRT and flat panels display frames either at 1 60 or 1 50 second intervals the 24 frames do not appear at an even pace When connected to a TV with 24p capabilities the player displays each frame at 1 24 second intervals the same interval originally shot with the film camera thus faithfully reproducing the original cinema image ...

Page 73: ...cters 54 External memory 24 34 58 F Front panel display 11 H HDMI 15 20 29 43 45 48 58 71 HOME 9 Home menu 37 38 40 L Language Follow 16 Local storage 24 34 58 LTH 71 M MULTI CHANNEL OUTPUT 22 45 Music 37 N Network Diagnostic 54 Network Settings 53 Network Update 25 41 O One Touch Play 16 32 OPTIONS 9 33 37 39 OSD 52 P Parental Control 32 50 Photo 38 Photo Settings 52 PhotoTV HD 39 71 Playable dis...

Page 74: ...74 ...

Page 75: ...75 ...

Reviews: