background image

2

Installation Preparation

Prior to attaching SSDs to the Tempo SSD Pro 
and installing the card, you should perform the 
steps below as necessary. Remove the Sonnet card 
from its packaging, handling the card by its edges 
and without touching any components or gold 
connector pins. Set the card down on a flat, level 
surface to perform the steps.

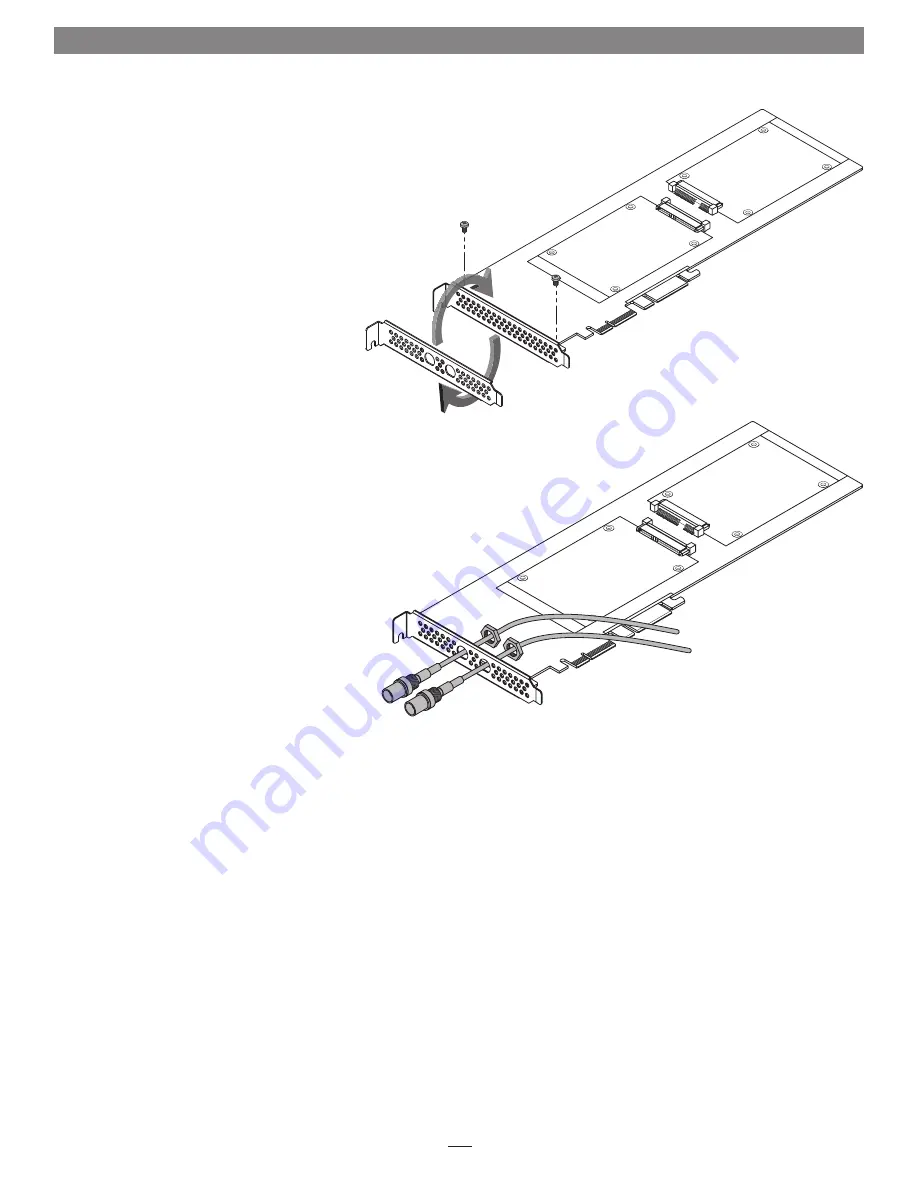
BNC Connector Installation Steps

If you intend to install BNC connectors like those 
included with the RED ROCKET card, you must 
swap PCIe brackets first.


1.

 Remove and set aside the two screws securing 

the standard PCIe bracket to the Tempo SSD 
Pro card 

(Figure 1)


2.

 Using the screws you just removed, secure 

the optional PCIe bracket to the card; do not 
overtighten the screws 

(Figure 1)

.


3.

 If necessary, remove the BNC connectors 

from the I/O plate from the video card you’re 
working with.


4.

 Route the BNC connectors’ cables through 

the openings in the Tempo SSD Pro card’s 
optional PCIe bracket 

(Figure 2)

.


5.

 Slide the connectors’ locking hex nuts over 

the cables, and then secure the connectors to 
the bracket 

(Figure 2)

.

Optional Card Preparation Steps

Figure 1

Figure 2

Summary of Contents for Tempo SSD Pro 6Gb/s SATA PCIe Drive Card

Page 1: ...Quick Start Guide for Tempo SSD Pro 6Gb s SATA PCIe Drive Card for SSDs For Windows Tempo SSD Pro shown with SSDs attached drives not included sold separately ...

Page 2: ...This page left intentionally blank ...

Page 3: ...additional drivers 1 Tempo SSD Pro Card 2 Support Tabs In longer PCIe slots these tabs provide additional support for the Tempo SSD Pro card In some installations it may be necessary for you to snap off one or more of the tabs to allow the card to fit properly 3 Optional PCIe Bracket This bracket supports the installation of two BNC connectors like those supplied with the RED ROCKET card for SDI o...

Page 4: ...OCKET card you must swap PCIe brackets first 1 Remove and set aside the two screws securing the standard PCIe bracket to the Tempo SSD Pro card Figure 1 2 Using the screws you just removed secure the optional PCIe bracket to the card do not overtighten the screws Figure 1 3 If necessary remove the BNC connectors from the I O plate from the video card you re working with 4 Route the BNC connectors ...

Page 5: ...ainst the card flip the Tempo SSD Pro over again 5 Using four of the eight screws provided secure the SSD to the Tempo SSD Pro card do not overtighten the screws Figure 4 6 Flip the Tempo SSD Pro over again and then place the second SSD label side up on top of the card with the SSD s and card s connectors aligned with each other Figure 5 7 Push the SSD s connector into the Tempo SSD Pro card s con...

Page 6: ...4 SSD Installation Steps 9 Using the remaining four screws secure the SSD to the card do not overtighten the screws Figure 6 10 Tempo SSD is ready for installation proceed to the next page Figure 6 ...

Page 7: ...ve formatting tools Disk Management you may locate the information by using format volume and create striped volume as search items in Windows Help Booting From Attached SSDs OS X Tempo SSD Pro supports booting OS X 10 6 8 and later from attached SSDs including those configured as a RAID set when installed in early 2008 and later Mac Pro computers and Thunderbolt to PCIe expansion chassis as descr...

Page 8: ...tions Internal Connectors Two SATA Bus Interface PCI Express 2 0 x4 mechanical x4 electrical Drives Supported Two 2 5 inch SATA SSDs or hard disk drives HDDs Drive Types Supported SATA 6 Gb s SATA 3 Gb s and SATA 1 5 Gb s SSDs and HDDs Mac Compatibility Mac Pro Mac OS X Version 10 5 Windows Compatibility PC with PCIe slots Windows 8 Windows 7 Windows Vista Thunderbolt Compatibility Any computer wi...

Reviews: