background image

Quick Start Guide for Tempo SATA X4i

About Tempo SATA X4i’s Ports and LEDs


1.

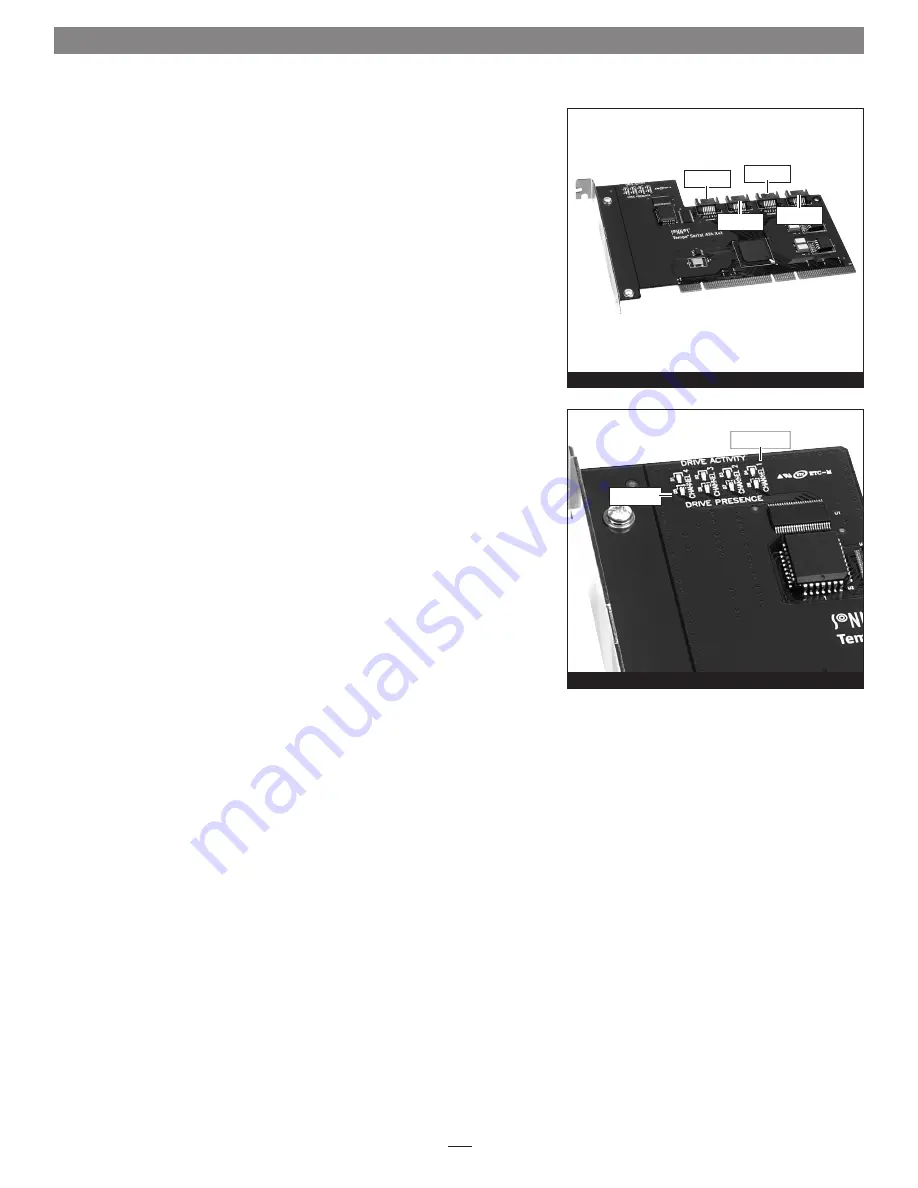
 Each SATA connector on the Tempo card is assigned a channel number 

that may be helpful if you need to diagnose any issues 

(Figure 12)


2.

 When drives connected to the Tempo card are powered and active, the 

status LEDs on the card will light 

(Figure 13)

• Green LED ON: Drive(s) present and ready. 
• Amber LED ON/Flashing: Drive(s) reading/writing data.

Figure 12

Figure 13

channel 4

channel 3

channel 2

channel 1

green LEDs

amber LEDs

Summary of Contents for TEMPO SATA X4i

Page 1: ...7 a m 5 p m Pacific Time Customer Service Phone 1 949 472 2772 E mail support sonnettech com Sonnet Technologies Inc Irvine California USA Tel 1 949 587 3500 Fax 1 949 457 6350 2006 Sonnet Technologies Inc All rights reserved Sonnet the Sonnet logotype Simply Fast the Simply Fast logotype and Tempo are trademarks of Sonnet Technologies Inc Macintosh and Mac are trademarks of Apple Computer Inc reg...

Page 2: ...ion Steps This section covers the installation of the Tempo SATA X4i into your system and connection of one or more hard drives 1 Shut down the computer 2 Open your computer to access its expansion card area PCI X or PCI slots refer to your computer s user manual for specific information 3 Install your hard drives now Depending on your computer model drive mounting hardware may be required to secu...

Page 3: ...next to it and save the file to your desktop 4 Locate the tempo x file on the desktop Right click it and select Extract All 5 Click Start Control Panel When the Control Panel window appears double click the System icon If the System icon is not visible click the Switch to Classic View link to make it appear 6 When the System Properties window appears click the Hardware tab and then click Device Ma...

Page 4: ...w regardless of being for matted or not 3 Select a drive you want to format by clicking the drive symbol or the name of the drive Figure 6 At the bottom of the window drive capac ity connection type and connection ID information are listed 4 Click on the Partition button Figure 6 Click on the drop down menu beneath Volume Scheme and select a number of partitions for the vol ume you may optionally ...

Page 5: ...nder Mac OS X Version 10 4 If you choose to do so you may format your drives using SoftRAID 3 1 or later refer to that product s documentation for instructions 1 Turn on your computer During startup your computer will display one or more messages referring to an unreadable disk click Initialize to launch Disk Utility Figure 8 After Disk Utility launches click the Initialize but ton in each remaini...

Page 6: ... Set and then type in the name for your RAID set Figure 10 Click the Create button 6 When the Creating RAID window appears click the Create button all of the selected drives will be formatted and the RAID set created Figure 11 Close Disk Utility your drives are now ready for use and your installation is complete Figure 10 Figure 11 Support Notes The remaining steps in this section describe the cre...

Page 7: ...at may be helpful if you need to diagnose any issues Figure 12 2 When drives connected to the Tempo card are powered and active the status LEDs on the card will light Figure 13 Green LED ON Drive s present and ready Amber LED ON Flashing Drive s reading writing data Figure 12 Figure 13 channel 4 channel 3 channel 2 channel 1 green LEDs amber LEDs ...

Reviews: