background image

Quick Start Guide for Tempo HD (Windows Version)

6

Figure 8

6.

From the 

Change Current Fixed Disk Drive

screen, select the last disk listed

(assuming you’ve connected only one drive at this time), and then press
Enter. 

Do not unintentionally choose an existing formatted drive

7.

When the 

FDISK Options

screen appears again, select “Create DOS Partition

or Logical DOS Drive,” and then press Enter.

8.

From the 

Create DOS Partition or Logical DOS Drive

screen, select “Create

Primary DOS Partition,” and then press Enter.

9.

As the primary DOS partition is created, the progress will be displayed. When
drive integrity verification is complete, press Enter.

10

. The progress will be displayed again, followed by the message “Primary DOS

Partition created, drive letters changed or added;” press Esc to continue.

11.

When the next screen appears instructing you to restart your system, press
Esc two times.

12.

At the DOS prompt, type 

EXIT

, and then press Enter.

13.

From the taskbar, select Start > Shut Down… When the 

Shut Down

window

appears, select Restart, and then click OK.

14.

After your computer restarts, double-click My Computer.

15.

Right click on the new drive and select “Format…” 

(Figure 6)

.

16.

When the 

Format

window appears, select “Full” under Format Type, and

then click Start 

(Figure 7)

.

17.

When the warning window appears, click OK.

18.

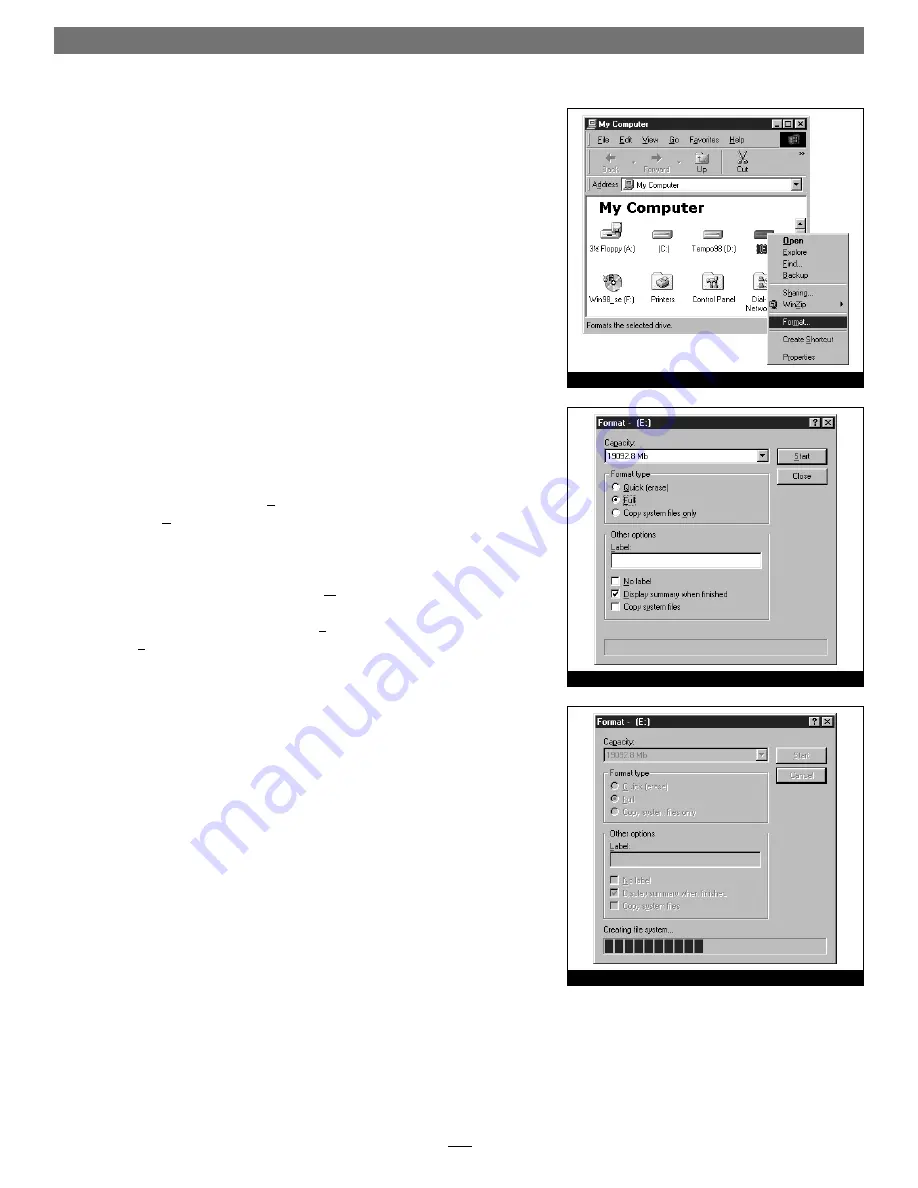
While the format process continues, a progress bar will appear at the bottom
of the Format window 

(Figure 8)

19.

When the drive formatting process is complete, a 

Format Results

window will

appear; press Enter. 

20.

When the dialogue appears suggesting you run ScanDisk; press Enter.

21.

Windows Help

window will appear; follow the instructions to run ScanDisk.

Once ScanDisk is finished, your installation is complete; you may access your
newly-formatted drive through your applications, as well as My Computer. 

Figure 6

Figure 7

Summary of Contents for TEMPO HD

Page 1: ...its anti static packaging and lay it on a flat surface with the surface mounted connector face up 3 Lay the 2 5 inch hard drive on the card within the rectangle imprinted on the Tempo HD card and align the hard drive s pins with the Tempo HD card s surface mounted connector Figure 2 Push the hard drive s pins into the Tempo HD card s connector until the drive is completely seated 4 Holding the dri...

Page 2: ......

Page 3: ...rom the Sonnet web site at www sonnettech com Online support form available at http supportform sonnettech com Sonnet Technologies Customer Service hours are Mon Fri 7 a m 5 p m Pacific Time Customer Service Phone 1 949 472 2772 E mail support sonnettech com Sonnet Technologies Inc 15 Whatney Irvine California 92618 2808 USA Tel 1 949 587 3500 Fax 1 949 457 6350 2002 SonnetTechnologies Inc All rig...

Page 4: ...ation Preparation and Hard Drive Installation Steps on page 4 7 Close your computer Windows 98SE and Windows Me Driver Installation This section describes the installation of drivers to support the Tempo HD in sys tems running Windows 98SE or Windows Me If your system is running Windows 2000 or Windows XP skip to the next page 1 Turn on your computer during Windows startup the New Hardware Found w...

Page 5: ...s click Next 8 When the Digital Signature Not Found window appears click Yes the appro priate driver will be installed 9 When the Completing the Found New Hardware Wizard window appears click Finish you must now format the attached drive Skip to Drive Formatting Windows 2000 and Windows XP on page 7 Windows XP Driver Installation This section describes the installation of drivers to support the Te...

Page 6: ...rd drives jumpers as follows When installing one drive you must set its jumpers to the single setting when available or the master setting when not When connecting two drives you must set the jumpers on one drive to the master setting and to the slave setting on the other 4 Install the hard drives into your computer s expansion bays Depending on your computer model drive mounting brackets carriers...

Page 7: ... HD and the hard drives 10 Close your computer and carefully replace its cover be very careful not to crimp the cables Drive Formatting Windows 98SE and Windows Me Formatting prepares a hard drive for use by dividing the data area into tracks and sectors enabling your computer to store and retrieve data from the drive This section describes the process of formatting hard drives connected to the Te...

Page 8: ...en appears instructing you to restart your system press Esc two times 12 At the DOS prompt type EXIT and then press Enter 13 From the taskbar select Start Shut Down When the Shut Down window appears select Restart and then click OK 14 After your computer restarts double click My Computer 15 Right click on the new drive and select Format Figure 6 16 When the Format window appears select Full under ...

Page 9: ...ol Panel window double click Administrative Tools 4 In the Administrative Tools window double click Computer Management 5 In the Computer Management window double click Storage in the right win dow pane Figure 9 6 In the right pane of the Computer Management window double click Disk Management Local the Write Signature and Upgrade Disk Wizard will appear Figure 10 Click Next to continue 7 In the S...

Page 10: ... complete the formatting procedure Once the formatting procedure is fin ished your installation is complete you may access your newly formatted drive through your applications as well as My Computer Please note depending on the capacity of the drive you are working with the formatting procedure may take anywhere from a few seconds to a few minutes to complete WARNING By default NTFS will be select...

Page 11: ...Performance and Maintenance 4 In the Performance and Maintenance window click Administrative Tools 5 In the Administrative Tools window double click the Computer Management shortcut Figure 15 6 In the left pane of the Computer Management window double click Disk Management the Initialize and Convert Disk Wizard will appear Figure 16 Click Next to continue 7 In the Select Disks to Initialize window...

Page 12: ...plete the formatting procedure Once the formatting procedure finishes your installation is complete you may access your newly formatted drive through your applications as well as My Computer Please note depending on the capacity of the drive you are working with the formatting procedure may take anywhere from a few seconds to a few minutes to complete WARNING By default NTFS will be selected as th...

Reviews: