background image

Drive Installation and Enclosure Setup

5

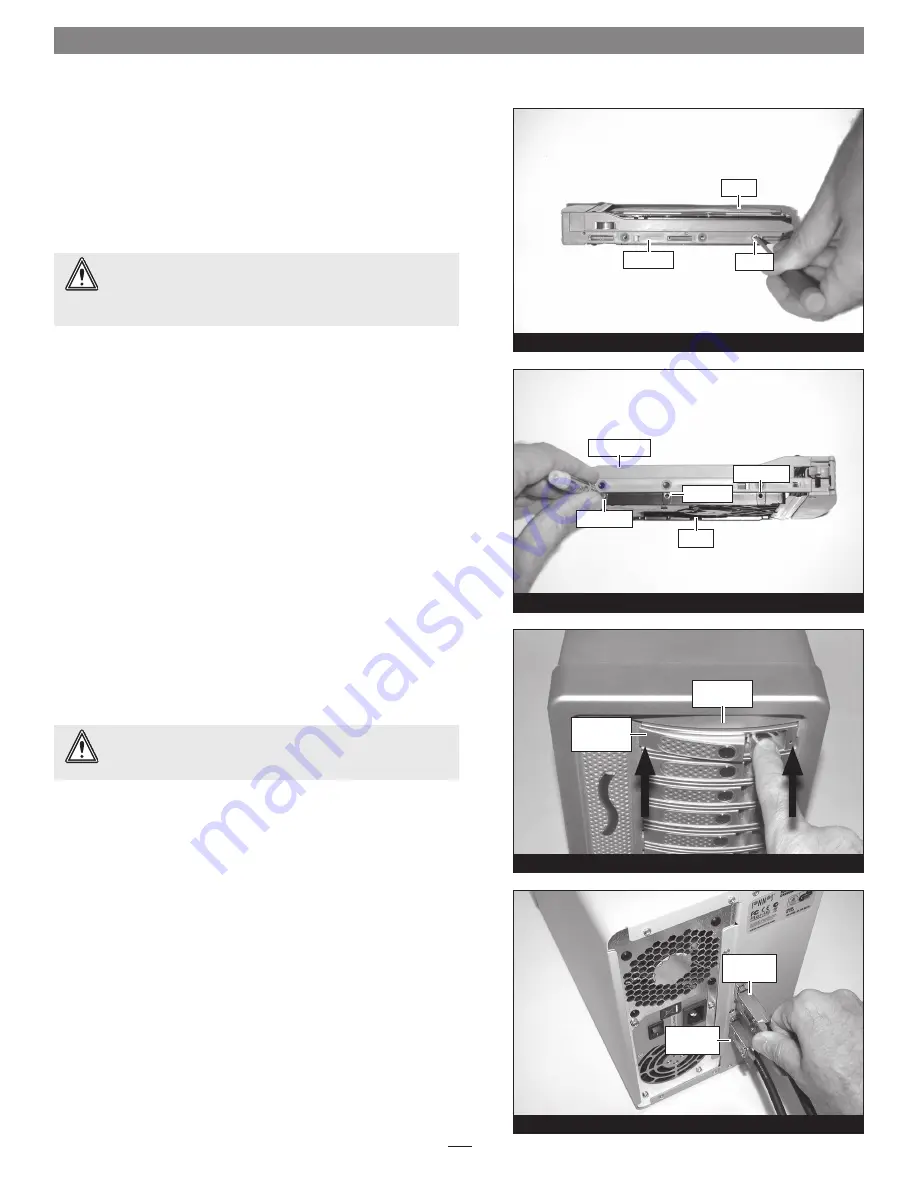
Figure 9

Figure 10

mini-SAS 

connector

mini-SAS 

connector

Push lever in 

until it snaps 

closed

Push tray in 

until it stops

Figure 8

Figure 7

drive tray

screw

drive

drive

drive tray rail

screw hole

screw hole

screw hole

Install Drives Into Drive Trays (continued)


6.

 With the lever facing the left, slide a drive tray over the drive and 

align its holes with the screw holes in the drive 

(Figure 7)

.


7.

 Using three of the supplied screws, secure the drive tray to the 

drive; tighten each screw to secure the tray snugly to the drive; 

do not overtighten the screws


(Figure 7)

.


8.

 Flip the drive and drive tray over so that they are resting on 

the other side. Push the drive tray rail up to expose the screw 
holes on the side of the drive, and then apply a 

single

 drop of 

threadlocker inside each of the three holes

 (Figure 8)

.


9.

 Using three of the supplied screws, secure the drive tray to the 

drive; tighten each screw to secure the tray snugly to the drive; 

do not overtighten the screws (Figure 8)

.


10.

 Repeat steps 5–9 for each remaining drive.


 11.

 With the lever fully opened, carefully slide the drive module 

into the enclosure until it stops, and then secure it by pushing 
the lever in until it snaps closed 

(Figure 9)

. Repeat with the 

remaining drive modules.


Connect Fusion DX800RAID Drive Enclosure to Sonnet 

RAID Controller

This section describes the connection of the Fusion DX800RAID drive 
enclosure to the Sonnet RAID controller card.  


1.

 Insert one end of each of the supplied data cables to the mini-

SAS ports on the enclosure; 

verify the connectors are plugged in 

securely


(Figure 10)


 WARNING:

 When securing the trays to the hard drives, you 

must verify the screw heads are flush with the tray. Otherwise,

a screw may catch on the side of the enclosure and prevent you from 
removing the tray. 


 WARNING:

 When inserting drive modules into the enclosure, 

do not force the levers closed

. If a lever does not close easily, 

remove and reinsert the module, and then push the lever in again.

Summary of Contents for FUSION DX800RAID

Page 1: ...8 Drive Serial ATA Disk Array Storage System FUSION DX800RAID Drive Enclosure User s Guide For Windows ...

Page 2: ...Weight 14 7 lbs 6 7 kg Fusion DX800RAID Enclosure Specs and Features 2 Figure 1 Figure 2 Drive Module Bay 1 Power Switch Power LED Primary Mini SAS Port Drive Module Bay 2 Drive Module Bay 3 Drive Module Bay 4 Drive Module Bay 5 Drive Module Bay 6 Drive Module Bay 7 Drive Module Bay 8 Drive Activity Blue and Identification Fault Red Indicator LEDs Power Cable Connector Secondary Expansion Link Min...

Page 3: ...ors for just a few seconds while standard hard drives may take minutes Because RAID controller cards and software based RAID schemes allow only a very short time for drives to recover before dropping them from the RAID group hard drive manufacturers recommend against using standard hard drives in RAID storage systems The hard drives qualified by Sonnet also feature improved vibration characteristi...

Page 4: ...urface with the label facing away from you and the connectors to the right Open the supplied tube of threadlocker and apply a single drop inside each of the three screw holes on the side of the drive Figure 6 Figure 4 Figure 5 4 Pull lever out until it stops Figure 6 screw hole screw hole screw hole flush cut GOOD rough cut NO GOOD WARNING When handling computer products take care to prevent compo...

Page 5: ...drive tray to the drive tighten each screw to secure the tray snugly to the drive do not overtighten the screws Figure 8 10 Repeat steps 5 9 for each remaining drive 11 With the lever fully opened carefully slide the drive module into the enclosure until it stops and then secure it by pushing the lever in until it snaps closed Figure 9 Repeat with the remaining drive modules Connect Fusion DX800RA...

Page 6: ...ter and Fusion storage systems powered off 1 In order to connect a second Fusion DX800RAID enclosure to the Sonnet RAID controller card you must first disconnect the bottom data cable from the first enclosure and then connect it to the top primary mini SAS port of the second enclosure Figure 12 2 To connect three or four Fusion DX800RAID enclosures to the Sonnet RAID controller card plug in an add...

Page 7: ...rd installed in a desktop PC or server Connections If you experience issues where a drive or volume does not appear on your computer or you see an error message stating a drive is missing when you have the drives configured as a RAID set the cause may be as simple as a loose connector or a drive module that is not fully seated Disconnect the data cables and reconnect them one at a time making sure...

Page 8: ...d Here and Fusion are trademarks of Sonnet Technologies Inc Mac the Mac logo and Mac OS are trademarks of Apple Inc registered in the United States and other countries Other product names are trademarks of their respective owners Product specifications subject to change without notice Printed in the USA UG FUS DX8R 0TB E E 112910 ...

Reviews: