background image

4

Chapter 3 – PCIe Card Installation Steps

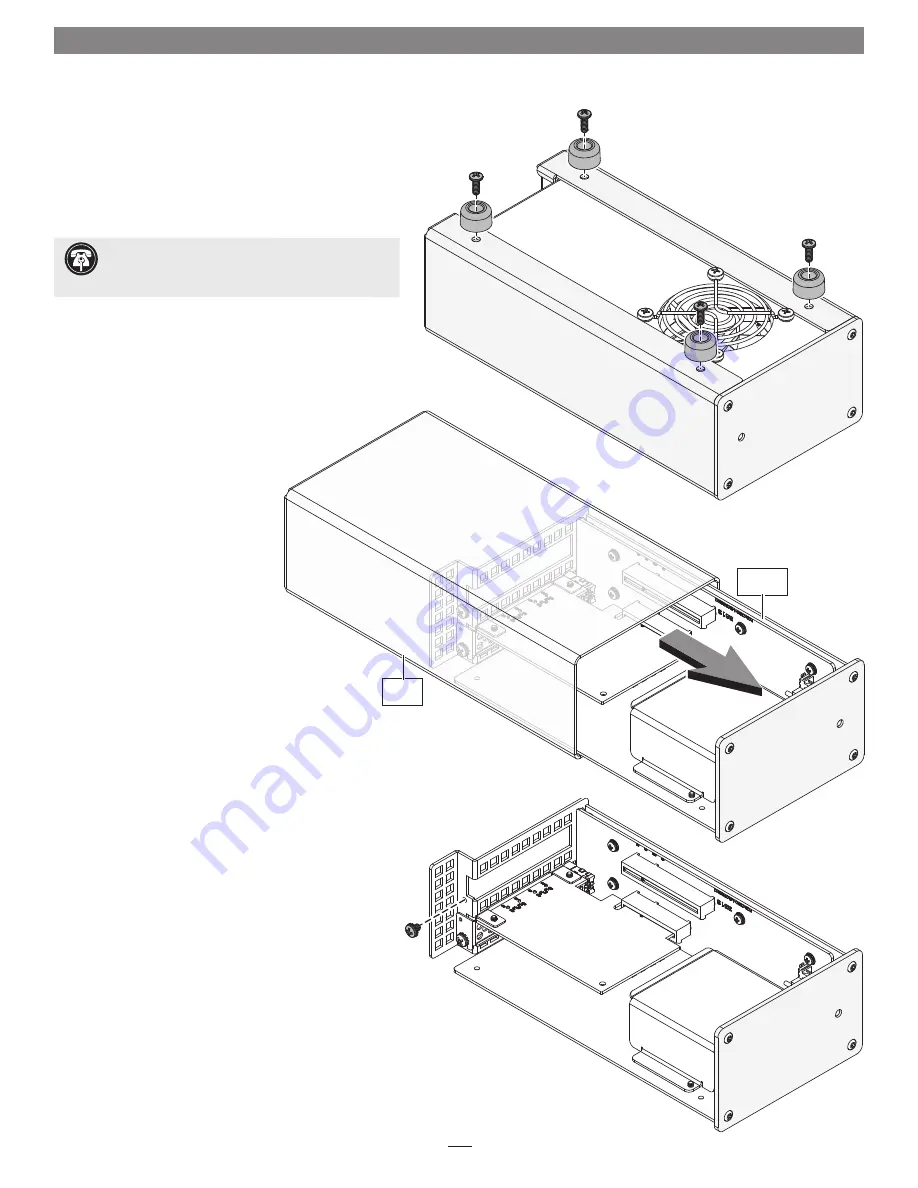
Figure 1


1.

 Remove the Echo Express SEL chassis from its packaging, and then set it 

upside-down on a soft, flat, level surface. 


2. 

Remove and set aside the four screws securing the feet to the  
bottom of the outer case 

(Figure 1)

. Set aside the screws  

and feet.


3.

 Turn the Echo Express SEL chassis right-side-up  

(Figure 2)

.


4.

 Place your hand on top of the outer  

case. Remove the inner assembly  
by gently grasping its faceplate by  
the edges and pulling 

(Figure 3)

.  

Set aside the outer case.


5.

 Remove and set aside the screw used to secure a PCIe card from the 

Echo Express SEL chassis’ inner assembly 

(Figure 3)

.


 Support  Note:

 To avoid damaging components due 

to static electricity discharge, wear an antistatic wrist 

strap while working inside Echo Express SEL.

Figure 2

Figure 3

Inner 

Assembly

Outer 

Case

Summary of Contents for Echo Express SEL

Page 1: ...User s Guide for Echo Express SEL Thunderbolt 2 to PCIe Card Expansion Chassis For Windows ...

Page 2: ......

Page 3: ... PCIe Card Installation Steps 4 4 Verify Connections Using System Information 7 Verify the Echo Express SEL is Recognized Verify the Installed Card is Recognized 5 Tips General Information and Known Issues 8 Tips General Information Known Issues 6 Specifications Precautions FCC Compliance and Support Information 9 Specifications Safety Precautions FCC Compliance Contacting Customer Service Visit O...

Page 4: ...This page left intentionally blank ...

Page 5: ...r Windows Compatibility Windows PC with a Thunderbolt 2 or Thunderbolt port Windows 8 7 System Requirements While the Echo Express SEL chassis requires no drivers the expansion card you install does Thunderbolt compatible drivers to enable it to work properly through the Thunderbolt interface are required More information on which cards are compatible with Echo Express SEL is available at http son...

Page 6: ...Thunderbolt device connected between the computer and Echo chassis must also be powered on before the Echo chassis power indicator will light up 2 12V DC Socket Connect the included DC power adapter between this socket and the included power cord 3 Thunderbolt Ports Connect the included Thunderbolt cable between either port and your computer s Thunderbolt port or other Thunderbolt device in the ch...

Page 7: ...revent overheating Echo Express SEL Power Adapter 1 Power Adapter Connect this to the Echo Express SEL chassis power port Note that the power indicator on top lights when the adapter is connected to AC power 2 Power Cord Connect this between a power outlet and the power adapter Note that the power cord included with your product may appear different than the one pictured here depending on where th...

Page 8: ...xpress SEL chassis right side up Figure 2 4 Place your hand on top of the outer case Remove the inner assembly by gently grasping its faceplate by the edges and pulling Figure 3 Set aside the outer case 5 Remove and set aside the screw used to secure a PCIe card from the Echo Express SEL chassis inner assembly Figure 3 Support Note To avoid damaging components due to static electricity discharge w...

Page 9: ...amage and then try inserting the card again Figure 4 9 Secure the card using the screw you removed previously do not overtighten the screw Figure 4 10 Place your hand on top of the outer case and then gently push the inner assembly back into the outer case Figure 5 11 Turn the Echo Express SEL chassis upside down and then secure the outer case to the inner assembly by reattaching the four feet do ...

Page 10: ...ress SEL chassis will not light until the computer and any other Thunderbolt device connected between it and the Echo chassis is powered on Support Note Sonnet s ThunderLok Thunderbolt connector retainer clip secures the included Thunderbolt cable to the Echo chassis to prevent accidental disconnects Although it is compatible with some other copper Thunderbolt cables like Apple s it is not compati...

Page 11: ... Bus and then Echo Express SEL Figure 9 B Verify the Installed Card is Recognized 1 Click PCI Cards under the Hardware header in the left column Figure 10 2 At the top of the right column the installed card is listed By selecting the card detailed information is listed You should see Yes next to Driver Installed and Tunnel Compatible otherwise the card or driver may not be Thunderbolt compatible F...

Page 12: ...Do not operate the Echo Express SEL with its cover off and do not block any of the vents Otherwise the installed card and Echo Express SEL s components may overheat Hot Plugging the Echo Express SEL Mac Users When a certified Thunderbolt compatible card used with Thunderbolt compatible drivers is installed in the Echo Express SEL you may connect and disconnect the chassis while the computer is on ...

Page 13: ... Thunderbolt Power Expansion Slot x8 mechanical x4 electrical PCIe 2 0 PCIe Card Support Low profile PCIe card Compatible PCIe Cards See Sonnet Website www sonnettech com Power Adapter Universal 80W 100 240V AC 50 60 Hz PCIe Card Minimum Guaranteed Power 25W Operating Temperatures 32 F to 95 F 0 C to 35 C Dimensions WxDxH 4 x 8 25 x 2 86 in 10 3 x 21 x 7 28 cm Weight 1 85 lbs 84 kg RoHS Compliant ...

Page 14: ...go MacBook Air MacBook Pro Mac Pro and OS X are trademarks of Apple Inc registered in the United States and other countries Thunderbolt 2 and theThunderbolt logo are trademarks of Intel Corporation in the U S and or other countries Other product names are trademarks of their respective owners Product specifications subject to change without notice Printed in the USA UG ECHO EXP SEL E C 022515 ...

Page 15: ......

Page 16: ......

Reviews: