background image

5

Chapter 3 – PCIe Card Installation and Chassis Setup Steps


10.

 OPTIONAL STEP: If you are installing BNC connectors into the 

chassis’ mounting holes, skip to the appendix at the end of this 
document for instructions. Otherwise, go to the next step.


11.

 Remove a PCIe card from its packaging, handling the card by its edges 

and without touching any components or gold connector pins.


12. 

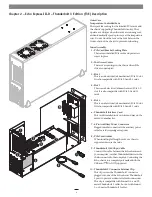
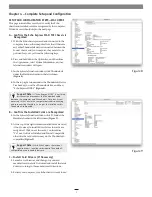
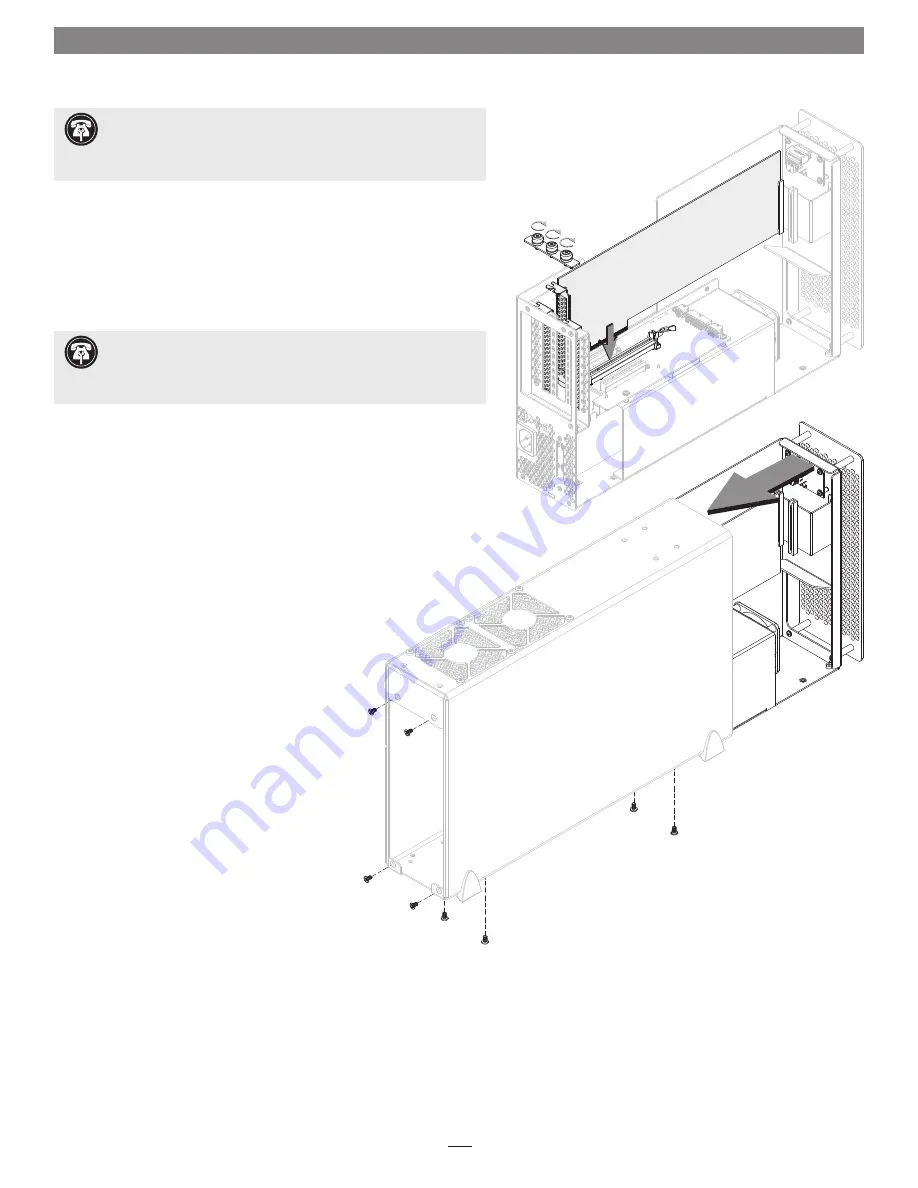
Line up the card’s connector with the slot, and then gently but firmly 
press the card straight into the slot; 

do not rock the card or force the 

card into the slot

. If you encounter excessive resistance, check the 

card’s connector and the slot for damage, and then try inserting the 
card again 

(Figure 4)


13.

 Repeat steps 11 and 12 as necessary with any remaining cards.


14.

 If you installed a card which requires auxiliary power, connect the 

auxiliary power connector to it now. If you installed cables with BNC 
connectors into the chassis, connect them to the card you  
installed.


15.

 If there are any unoccupied slots, install the port  

access covers you removed previously 

(Figure 4)

.


16. 

Secure the cards and port access covers using the  
previously-removed PCIe card bracket locking plate  

(Figure 4)

.


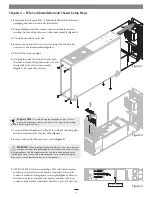
17.

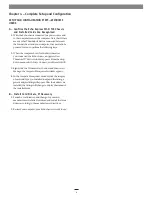
 Grasping the outer case, gently push the inner  

assembly back inside, and then secure the outer case  
to the inner assembly using the eight screws you  
removed previously; 

do not overtighten the screws


(Figure 5)

.

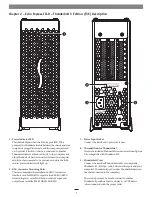
Figure 4

Figure 5


 Support  Note:

 If you are installing an Avid Pro Tools|HDX PCIe 

card, you will need to disconnect the Echo chassis‘ auxiliary power 

wire harness plugged into the 6-pin connector indicated in 

Figure 3

, and 

then replace it with the one included with the Avid card.


 Support  Note:

 If you are installing a x8 PCIe 1.1 card like the 

original RED ROCKET (not RED ROCKET-X) or certain 10 Gigabit 

Ethernet cards, installing it into slot 3 may result in reduced performance. 
We recommend you install it into either slot 1 or 2 for best performance.

Summary of Contents for Echo Express III-D Thunderbolt 3 Edition

Page 1: ...he Sonnet website for the latest documentation 1 Go to www sonnettech com support kb kb php 2 Click the Thunderbolt Product link 3 Click the Echo Express III D Thunderbolt 3 Edition link and then click the Manual link 4 Click the Echo Express III D Thunderbolt 3 Edition User s Guide English link and then check the Document Version information If the version listed is later than this document revis...

Page 2: ...on T3E Description 2 Exterior Outer Case Inner Assembly Thunderbolt 3 40Gbps Cable Thunderbolt 3 Connector Retainer Clip 3 PCIe Card Installation and Chassis Setup Steps 4 4 Complete Setup and Configuration 7 Setup and Configuration Steps Mac Users Setup and Configuration Steps Windows Users 5 Tips General Information and Known Issues 9 Tips General Information Known Issues 6 Precautions FCC Compl...

Page 3: ...install do Thunderbolt compatible drivers to enable them to work properly through the Thunderbolt interface are required More information on which cards are compatible with the Echo Express III D T3E is available at https sonnettech com support Preparing to Use the Echo Express Chassis With a Mac Computer The drivers required to support the Echo Express chassis are installed as part of macOS there...

Page 4: ...sed for HD SDI output for the RED ROCKET X transcoding card or for MADI and word clock input and output from cards like RME s HDSPe MADI FX 3 Power Input Socket Connect the included AC power cable here 4 Threaded Nuts for ThunderLok 3 Attach the included Thunderbolt connector retainer clip here Also compatible with ThunderLok 3L 5 Thunderbolt Ports Connect the included Thunderbolt cable or compara...

Page 5: ...echanical PCIe 3 0 slot It is also compatible with PCIe 2 0 and 1 1 cards 6 Thunderbolt Interface Card This card is installed in its own slot and may not be moved to another slot 7 6 Pin Auxilliary Power Connector Plugged into this connector is the auxiliary power cable for cards requiring extra power 8 PCIe Card Guides When installing full length cards use these to support and secure the cards 9 ...

Page 6: ...ve and set the plate aside Figure 2 8 Remove and set aside the port access covers Figure 2 9 OPTIONAL STEP If you are installing a PCIe card which requires auxiliary power locate the wire harness connected to the 6 pin connector indicated in the graphic to the right Figure 3 Remove the cable twist tie securing the wire harness and move the loose connector aside for later connection Otherwise go to...

Page 7: ...alled cables with BNC connectors into the chassis connect them to the card you installed 15 If there are any unoccupied slots install the port access covers you removed previously Figure 4 16 Secure the cards and port access covers using the previously removed PCIe card bracket locking plate Figure 4 17 Grasping the outer case gently push the inner assembly back inside and then secure the outer ca...

Page 8: ...ary 20 Connect the included power cord between a wall outlet or power strip and the Echo chassis power socket Note that the Echo Express III D T3E s power indicator will not light until the computer and any other Thunderbolt device connected between it and the Echo chassis is powered on Support Note Sonnet s ThunderLok 3 Thunderbolt connector retainer clip secures the included Thunderbolt 3 40Gbps...

Page 9: ... III TB3 Figure 8 B Confirm the Installed Cards are Recognized 1 In the System Information window click PCI under the Hardware header in the left column Figure 9 2 At the top of the right column installed cards are listed if not you may to install drivers before the cards are recognized Click one of the cards you should see Yes next to Driver Installed and Tunnel Compatible otherwise the card or d...

Page 10: ...is an Approve New Thunderbolt Devices window appears From the drop down menu select Always Connect and then click OK 3 Right click the Windows Start button and then select Manage the Computer Management window appears 4 In the Computer Management window click the category of each card type you installed to expand the listing a generic adapter listing will appear After their drivers are installed t...

Page 11: ...troduces latency to a device chain If you expand with additional Thunderbolt expansion chassis you may need to experiment with which cards work better in chassis closer to or farther from the computer in the chain TIPS GENERAL INFORMATION Keeping the Cards Cool With its optimized airflow design and temperature controlled fan providing cooling at all times the Echo Express chassis provides adequate...

Page 12: ...evice thereby helping to prevent injury to you or others and also help you to minimize the risk of damaging the device Warnings Always follow the basic warnings listed here to avoid the risk of serious injury or death from electrical shock short circuiting fire and other hazards These warnings include but are not limited to Do not attempt to modify the enclosure If this device appears to be malfun...

Page 13: ...ts edges rotate the bracket out of the inner assembly and then pull out the card Figure A 2 Set aside the Thunderbolt interface card on flat surface component side down 4 Insert the BNC cables through the BNC connector mounting holes in the inner assembly Figure A 3 Route the cables out over the top of the PCIe slot riser card 5 Slide the connector nuts over the BNC cables and then secure the conn...

Page 14: ...nto the slot do not rock the card or force the card into the slot If you encounter excessive resistance check the card s connector and the slot for damage and then try inserting the card again Figure A 5 8 Using the two screws you removed previously secure the Thunderbolt interface card to the inner assembly do not overtighten the screws Figure A 5 9 Return to step 11 on page 5 to complete the PCI...

Reviews: