background image

SonicWALL CDP 6080 / 6080B Getting Started Guide  

Page 13

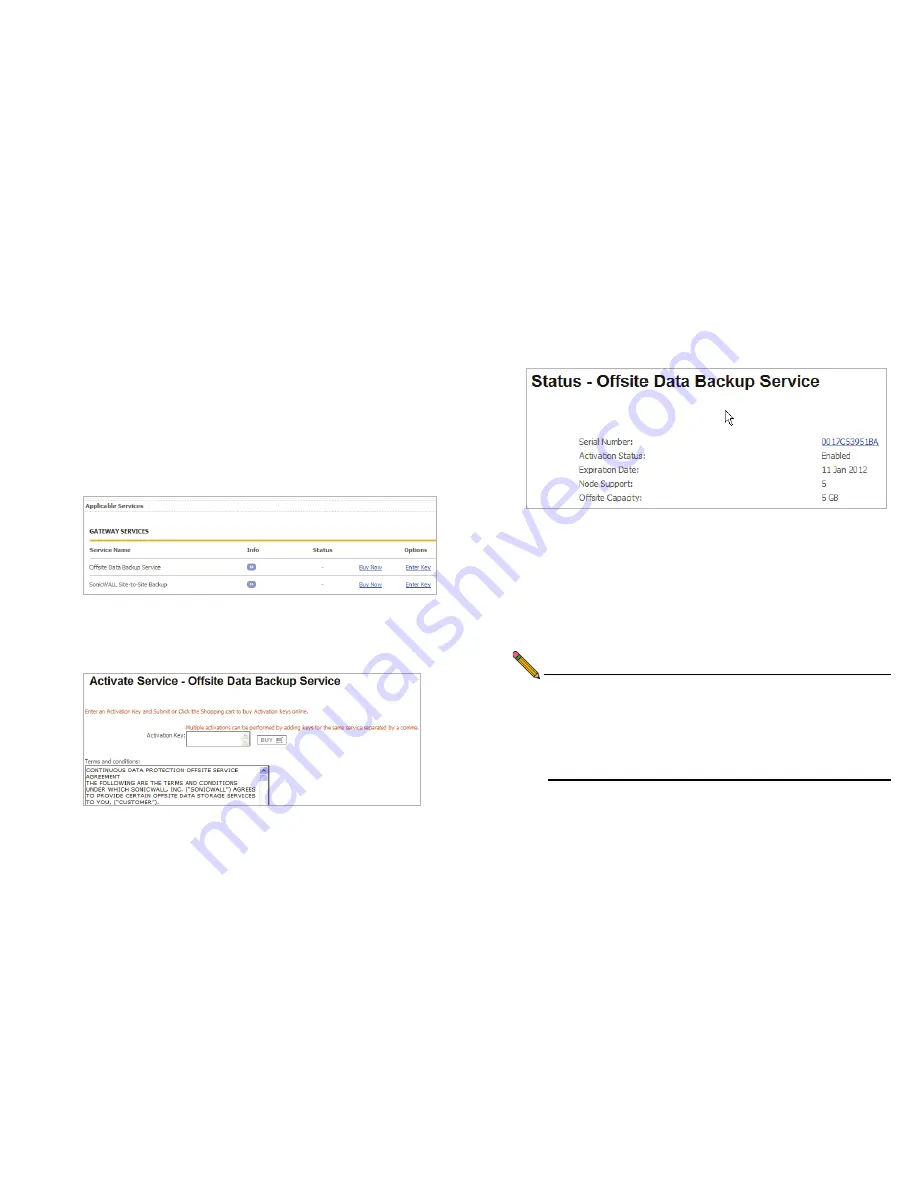
Activating Offsite Data Backup Service

The SonicWALL CDP Offsite Data Backup Service is an 
optional offsite backup and recovery solution. Perform the 
following steps to activate your Offsite Data Backup Service:
1.

On the Service Management page in MySonicWALL, scroll 

down to 

Applicable Services

. If you do not have an Offsite 

Data Backup Service activation key, click 

Buy Now 

or 

contact your SonicWALL vendor. 
If you have a license key, click 

Enter Key

.

2.

Type your key into the 

Activation Key

 field, select the 

have read and agreed to all of the terms and conditions 

mentioned above

 checkbox, and then click 

Submit

.

The activation status displays with the expiration date and 
offsite capacity.

3.

To access the 

SonicWALL Site-to-Site Backup

 service, 

return to the Service Management page by clicking the 

Friendly Name of your SonicWALL CDP appliance on the 

My Products page.

4.

To activate the 

SonicWALL Site-to-Site Backup

 service, 

click 

Buy Now

 or 

Enter Key

5.

To enter an existing license key, use the same method as 

described above for the Offsite Data Backup Service.

Note:

Bare Metal Recovery and other services can also be 

activated on the Service Management page. For 
information about using Bare Metal Recovery, refer to 
the SonicWALL Bare Metal Recovery Administrator’s 
Guide, available on MySonicWALL or at: 

http://www.sonicwall.com/us/Support.html

Summary of Contents for CDP 6080

Page 1: ...Getting Started Guide SonicWALL Backup and Recovery Solutions BACKUP RECOVERY CDP 6080 CDP 6080B DYNAMIC SECURITY FOR THE GLOBAL NETWORK...

Page 2: ...f local disk based backup fast recovery with offsite backup the SonicWALL CDP appliance is the first solution to eliminate not just mitigate exposure to threats of data loss Please read this entire Ge...

Page 3: ...Page ii...

Page 4: ...nd related components and provides a guide to the configuration information you will need for initial setup Review this section before setting up your SonicWALL CDP 6080 appliance Checking CDP 6080 Pa...

Page 5: ...r Cords Front Bezel Keys Rack Mounting Kit 5 6 7 Any Items Missing If any items are missing from your package please contact SonicWALL support A listing of the most current support documents are avail...

Page 6: ...powered on or off LCD Display Provides access to basic system information settings and features using the D Pad controls Front Bezel Release Allows access to drive bays under the front bezel for addi...

Page 7: ...hernet Port 1 Ethernet Port 0 Management LAN Not authorized for use Provides con gurable Gigabit capable Ethernet connection to your local network Provides access to a command line interface CLI with...

Page 8: ...options Use the Up and Down buttons to select the menu you wish to enter Click the Right button to enter it Status The Status menu allows you to view specific aspects of the appliance Once selected t...

Page 9: ...e incrementally from 0 to 9 Press the Right button to confirm your PIN and enter the Configuration Menu The appliance allows the user to navigate in and out of the Configuration Menu without having to...

Page 10: ...ay device such as your perimeter firewall router DNS Server 1 _____________________ DNS Server 2 optional _____________________ Record your DNS Server information Server Name _____________________ Sel...

Page 11: ...Page 8 Record Configuration Information...

Page 12: ...ons What You Need to Begin page 10 Registering Your SonicWALL CDP Appliance on MySonicWALL page 10 Powering On and Connecting to the Appliance page 14 Configuring a Static IP Address on Windows page 1...

Page 13: ...08 Server 2003 For the latest list of supported Windows operating systems and service packs refer to the SonicWALL CDP Release Notes and the following webpage http www sonicwall com us products backup...

Page 14: ...select Register Product 4 Complete the fields as described in the table below Field Description Serial Number Enter the serial number found on the bottom of your SonicWALL CDP appliance Friendly Name...

Page 15: ...urope Alert If you change the offsite data backup location the data that was saved in the previous location is lost 7 Click the Submit button A confirmation message is displayed such as Are you sure y...

Page 16: ...terms and conditions mentioned above checkbox and then click Submit The activation status displays with the expiration date and offsite capacity 3 To access the SonicWALL Site to Site Backup service r...

Page 17: ...e LAN port of computer to the LAN port on the back of your SonicWALL CDP appliance 4 Securely attach each provided power adaptor to a provided power cord 5 Connect the power adaptors to the back of th...

Page 18: ...w changes to the Control Panel All Control Panel Items Network Connections folder 3 In the Network Connections window double click Local Area Connection 4 If the Local Area Connection Status window op...

Page 19: ...ose or OK in the Local Area Connection Properties window for the settings to take effect Configuring Appliance Settings After registering your SonicWALL CDP on MySonicWALL and connecting a management...

Page 20: ...ust be able to resolve external Internet names For your records enter the DNS server IP address below 1 In the Web management interface click Network in the navigation pane and then click Settings 2 O...

Page 21: ...SonicWALL CDP appliance in the space provided below 1 In the Web management interface click Network in the navigation pane and then click Settings 2 On the Interfaces tab click the Configure icon for...

Page 22: ...eb management interface again 7 Disconnect the crossover cable from your computer and from the SonicWALL CDP appliance 8 Reset your computer to use the Obtain an IP address automatically option if usi...

Page 23: ...ly connect your SonicWALL CDP appliance to your network 1 Plug one end of the provided Ethernet cable into the LAN port on the back of your SonicWALL CDP appliance 2 Plug the other end of the cable in...

Page 24: ...he SonicWALL CDP appliance IP address and log in to the Web management interface Type admin for the username and type in the current password for the admin account 2 Click the Register button in the t...

Page 25: ...Page 22 Activating Your SonicWALL CDP Appliance...

Page 26: ...ides instructions for installing the SonicWALL CDP Agent software and testing backup functionality with your SonicWALL CDP appliance SonicWALL CDP User Interfaces page 24 Downloading and Installing So...

Page 27: ...ws you to copy data from a SonicWALL CDP appliance onto a USB drive and to restore the data from the USB drive to an individual computer or server The data can be encrypted on the USB drive and you ca...

Page 28: ...u are running Windows or using a third party firewall you may receive a warning during installation of the SonicWALL CDP software For more information on configuring your firewall to work with the Son...

Page 29: ...Interface and Agent Service A Typical installation uses less disk space than a Complete installation The Local Archive Manager is not installed with a Typical installation Complete installation will i...

Page 30: ...ion of the Agent User Interface Click Install to continue the Agent software installation 7 In the Ready to Install SonicWALL CDP screen click Install to begin the actual installation 8 Once the softw...

Page 31: ...SonicWALL CDP software Accept the certificate to continue 2 In the CDP Agent User Interface click the Change Appliance icon at the bottom of the left pane to show available appliances 3 Select the re...

Page 32: ...rmation on configuring your SonicWALL CDP appliance refer to the SonicWALL CDP Administrator s Guide and the SonicWALL CDP Agent User s Guide at http www sonicwall com us Support html Congratulations...

Page 33: ...AutoUpdate exe 4 If you are running Microsoft Windows XP SP2 or Windows Server 2003 verify that Data Execution Prevention DEP is configured to allow SonicWALL CDP Under Windows Services stop the CDPAg...

Page 34: ...ides overviews of customer support and training options for the SonicWALL CDP 6080 Customer Support page 32 SonicWALL Live Product Demos page 32 Knowledge Portal page 33 SonicWALL User Forums page 34...

Page 35: ...of work based services For further information visit http www sonicwall com us support contact html SonicWALL Live Product Demos The SonicWALL Live Demo site provides free test drives of SonicWALL se...

Page 36: ...e Portal The Knowledge Portal allows users to search for SonicWALL documents based on the following types of search tools Browse Search for keywords Full text search For further information navigate t...

Page 37: ...lowing categories Firewall topics SSL VPN topics Continuous Data Protection topics Email Security topics Content Security Manager topics Network Anti Virus topics Security Services and Content Filteri...

Page 38: ...ALL Medallion Partners who want to enhance their knowledge and maximize their investment in SonicWALL Products and Security Applications SonicWALL Training provides the following resources for its cus...

Page 39: ...onicWALL CDP Administrator s Guide SonicWALL CDP Agent User s Guide SonicWALL CDP MS Exchange InfoStore Backup and Restore Guide SonicWALL CDP MS Exchange User Mailbox Backup and Restore Guide SonicWA...

Page 40: ...LL Secure Wireless Network Integrated Solutions Guide The official guide to SonicWALL s market leading wireless networking and security devices This 512 page book is available in hardcopy Order the bo...

Page 41: ...Page 38...

Page 42: ...pyright information Safety and Regulatory Information page 40 Mounting the SonicWALL CDP 6080 page 41 Mounting Instructions in German page 42 Lithium Battery Warning page 44 Cable Connections page 44...

Page 43: ...mation Unauthorized Ports Do not plug devices into any ports other than those indicated unless explicitly instructed to do so by a SonicWALL technical support representative Doing so may void your war...

Page 44: ...cord is not included Ensure that no water or excessive moisture can enter the unit Allow unrestricted airflow around the unit and through the vents on the side of the unit A minimum of 1 inch 25 44mm...

Page 45: ...ords must be removed To disconnect DC power an external properly rated disconnect device must be provided by building or rack installation Mounting Instructions in German Das SonicWALL Modell ist f r...

Page 46: ...orgung zur erh hten Verf gbarkeit ausgeliefert Ein Umbaukit in Gleichstromversorgung ist verf gbar Die Wechselstrom Konfiguration verwendet standardisierte Kaltger tekabel Sie k nnen einem Umbaukit f...

Page 47: ...g or other wiring that exits the building where the SonicWALL is located Hinweis zur Lithiumbatterie Die in der Internet Security appliance von SonicWALL verwendete Lithiumbatterie darf nicht vom Benu...

Page 48: ...onicWALL page 45 Activating the Expansion Pack License on the SonicWALL CDP Appliance page 46 Inserting the Expansion Pack Drives page 47 Adding the Expansion Pack License Key to MySonicWALL To add th...

Page 49: ...the license on the appliance itself in the Web management interface To activate the Expansion Pack license on the SonicWALL CDP appliance perform the following steps 1 Log into the Web management int...

Page 50: ...zel then remove the front bezel to expose the hard drive arrays 3 Press the square buttons to pop out the handles and then remove the place holder inserts from slots D4 D5 D6 and D7 of the top array T...

Page 51: ...and the Add Expansion Pack button appears Note If the Expansion Pack license has not been added to the SonicWALL CDP on both MySonicWALL and in the Web management interface the Add Expansion Pack but...

Page 52: ...ly line up the LCD connectors The best practice is to align and seat the right side of the bezel as you are facing the front of the SonicWALL CDP appliance then view the connectors from above as you c...

Page 53: ...ective drive from the SonicWALL CDP appliance perform the following steps 1 On your SonicWALL CDP appliance use the front bezel key to unlock the front bezel then remove the front bezel to expose the...

Page 54: ...ing other than the SonicWALL approved hard drive into the SonicWALL CDP appliance To view the hard drive array and insert the replacement drive into the SonicWALL CDP appliance perform the following s...

Page 55: ...uilds the array with the new drive The rebuilding process requires at least six hours and could take several times longer depending on the amount of data contained in the array Warning There is a noti...

Page 56: ...manual the device may cause harmful interference to radio communications Operation of this equipment in a residential area is likely to cause harmful interference in which case the user is required to...

Page 57: ...All products with country code blank and A are made in the USA All products with country code B are made in China All products with country code C or D are made in Taiwan R O C Declaration of Conformi...

Page 58: ...whether or not sold but all of the material purchased with all backup copies can be sold given or loaned to another person Under the law copying includes translating into another language or format Sp...

Page 59: ...Page 56 Notes...

Page 60: ...rademarks and or registered trademarks of their respective companies Speci cations and descriptions subject to change without notice SonicWALL Inc 2001 Logic Drive T 1 408 745 9600 www sonicwall com S...

Reviews: