background image

3

SONANCE CINEMA

®

SELECT

SPEAKER PLACEMENT

Your local authorized Sonance dealer is an expert in audio/video system planning and installation. We strongly recommend that you work with your dealer

to ensure that your system is properly planned, assembled and installed.

Left, Center & Right Speakers

N

OTE

: C

INEMA

S

ELECT

LCR 

SPEAKERS MUST BE ORIENTED

VERTICALLY

.

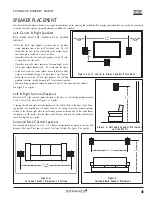
• Place the left & right speakers on either side of the video

screen, anywhere from 6 feet to 10 feet apart and  38 – 42

inches from the floor (which corresponds to the height of your

ears when you’re seated on a couch or chair).

• If possible, locate the left and right speakers at least 18 inch-

es away from the side walls.

• If possible, locate the center speaker at the same height as the

left & right channel speakers (38 – 42 inches from the floor).

• If you must place the center speaker above or below a video

screen, we recommend placing it no more than 2 feet above or

below the center of the left and right speakers. This will help

maintain consistent tonality between all 3 front channel speakers.

• The main listening position should be between 8 and 12 feet away from the speakers.
Use 

Figure 2 as a guide.

Left & Right Surround Speakers

Place the left & right surround speakers directly to the sides of  the listening position, between

5 and 7 feet off the floor. Use 

Figure 3 as a guide.

If placing the left and right surround speakers on the walls directly to the sides of the listen-

ing position isn’t possible, you can mount them on the ceiling. Locate the surround speakers

directly to the left and right sides of the listening position, between 6 and 10 feet apart. Mount

the speakers so the tweeters face the video screen and rear wall, with the woofers towards each

other. Use 

Figure 4 as a guide.

Surround Back Channel Speakers

The surround back speakers in a 6.1- or 7.1-channel system should be placed in the rear wall

between 4 feet and 8 feet apart, at least 5 feet from the floor. Use 

Figure 5 as a guide.

2'

(max.)

18" (min.)

From Side

Wall

6' – 10'

Apart

18" (min.)

From Side

Wall

F i g u r e   2   L e f t , C e n t e r   &   R i g h t   S p e a k e r   P l a c e m e n t

5' – 7'

F i g u r e   3 : S u r r o u n d   S p e a k e r   P l a c e m e n t

o n   S i d e   W a l l s

F i g u re   4 :

S u r ro u n d   S p e a k e r   P l a c e m e n t   o n   C e i l i n g

6' – 10'

apart

F i g u re   5 :

S u r ro u n d   B a c k   S p e a k e r   P l a c e m e n t

5' – 7'

4' – 8'

Summary of Contents for HOME THEATER SPEAKERS

Page 1: ...INSTRUCTION MANUAL SONANCE CINEMA SELECT HOME THEATER SPEAKERS ...

Page 2: ...ng clarity and detail The RotoLock mounting system makes installation quick and easy BOX CONTENTS Your Sonance Cinema Select speaker box should contain the following items Cinema Select LCR Cinema Select SUR OPTIONAL ACCESSORIES Symphony FlexBracket part 92336 Plastic template to reserve a mounting hole for Cinema Select speakers in new construction Designed to be used with the RotoLock mounting s...

Page 3: ...The main listening position should be between 8 and 12 feet away from the speakers Use Figure 2 as a guide Left Right Surround Speakers Place the left right surround speakers directly to the sides of the listening position between 5 and 7 feet off the floor Use Figure 3 as a guide If placing the left and right surround speakers on the walls directly to the sides of the listen ing position isn t po...

Page 4: ... be installed in new construction only To reduce sound transmission into adjacent rooms in installations where it isn t possible to install a SymphonyT Acoustic Enclosure such as when you re retrofitting the speakers into an existing wall you can fit the speakers with optional SymphonyT Retrofit Enclosures part 92342 This enclosure will noticeably reduce sound spillover from the rears of the speak...

Page 5: ...lation Sonance Cinema Select speakers feature exclusive FastMount tabs and an integral RotoLock mounting system for quick mounting directly into existing walls WARNING THE EDGES OF FASTMOUNT TABS ARE VERY SHARP USE CAUTION WHEN HANDLING THE SPEAKER 1 Remove the paint plug from the speaker 2 Run speaker wire from each speaker to the amplifier location 3 Strip of insulation from each speaker lead Tw...

Page 6: ...tely from the speaker Before painting carefully remove the under grille cloth It is held in place with a light tacking glue that makes it easy to remove Spray the grille with thinned paint 5 parts thinner to 1 part paint being careful not to plug the holes Too heavy a coat of paint on the grille will adversely affect the sound of the speaker Once the grille and flange are painted and dry replace t...

Page 7: ...ill at its option repair or replace this product at no additional charge except as set forth below If this model is no longer available and can not be repaired effectively Sonance at is sole option may replace the unit with a current model of equal or grater value In some cases where a new model is substituted a modification to the mounting surface may be required If mounting surface modification ...

Page 8: ...emarks or registered trademarks of THX LTD Due to continuous product improvement all features and specifications are subject to change without notice For the latest Sonance product specification information visit www sonance com 212 Avenida Fabricante San Clemente CA 92672 7531 USA 800 582 7777 or 949 492 7777 FAX 949 361 5151 Technical Support 800 582 0772 www sonance com ...

Reviews: