


5
21. Unwind the power cable completely!
22. Do not lead the power cable over the appliance!
23. Do not lead the power cable under carpets, doormats, etc.!
24. The appliance should be located so as to allow easy access and remove of the power plug!
25. Lead the power cable so as to prevent it from being pulled out accidentally or tripped over!
26. The unit is intended for household use. No industrial use is permitted!
27. Due to continuous improvements the design and specifications may change without any
prior notice.
28. The actual instruction manual can be downloaded from www.somogyi.hu.
29. We don’t take the responsibility for printing errors and apologize if there’s any.
CAUTION: RISK OF ELECTRIC SHOCK!
Do not attempt to disassemble of modify the unit or its accessories. In case any part is
damaged, immediately power off the unit and seek the assistance of a specialist.
In the event that the power cable should become damaged, it should only be replaced by
the manufacturer, its service facility or similarly qualified personnel.
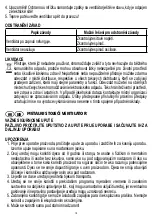
ASSEMBLY OF THE STAND
1. Fasten the stand (16) and the weight (17) with washer (18) and screw (19) to the bottom of
the stand (14) according to Figure 1.
2. Loosen the height fixing screw (15), pull out the upper part of the stand up to the target height,
and fasten it with the screw.
ASSEMBLY OF THE DEVICE
It is very important to comply with the sequence!
1. Put the head dip angle mechanics onto the top of the stand, so that the smaller threaded hole
is facing toward the dip angle limiter groove (22).
2. Plug in first the (24) screw to its place.
3. Now the dip angle limiter screw (21) has to be screwed in to the smaller threaded hole, and
screw has to protrude to the dip angle limiter groove.
4. Fixing the (23) nut tightly to its place can be the next step after only that.
5. Screw into place the (20) screw, with this you can fix the head dip angle.
6. Fix the rear part of grill (7) onto the engine with 4 screws, and get the handle (8) on the top.
7. Attach the fan blade (4) to the end of the axle (9), and fasten it with screw (5).
8. Fasten the decoration plate (1) on the front part of grill, and fold down the metal tabs of it.
9. Put the front part of the grill together with the back part and fasten in with the clamps (3).
CLEANING
In order to ensure optimum functioning, the unit may require cleaning at least once a month,
depending on the manner of use and degree of contamination.
1. Prior to cleaning switch off and power off the unit by unplugging it from the electric outlet!
2. Attention! Remove the front part of grid when the fan is not under power!


