


14
SEMI-AUTOMATIQUE
AUTOMATIQUE
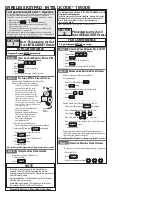
1ère étape
Brancher les cellules
photoélectriques.
(voir
chapitre “Accesoires”)
2 ème étape
Le portail est en position fermée. B1 est sur ON, V1 est
allumé. Appuyer sur B4 puis relâcher. V4 clignote.
3 ème étape
Appuyer sur la touche de la télécommande destinée à
l’ouverture totale : le portail part en ouverture en petite
vitesse, sans ralentissement jusqu’à la butée d’ouverture.
* La première touche de la première télécommande que
vous utilisez pour l’auto apprentissage aura la fonction
ouverture totale. Sur toutes les autres télécommandes
mémorisées, cette même touche aura la fonction ouverture
totale.
Les autres canaux (ex. touche CH-C) que vous mémorisez
auront la fonction ouverture piétonne.
4 ème étape
Sur la télécommande,
appuyer de nouveau sur la
touche destinée à l’ouverture
totale: le portail part en
fermeture, en grande vitesse
avec ralentissement avant la
butée de fermeture.
Ne pas toucher à la
télécommande.
Effectuer un appui maintenu
sur B4.
- Pendant les 5 premières
secondes, V4 reste fixe
puis clignote, ce qui
annonce le passage en
mode automatique.
- Le temps entre le début de
l’appui sur B4 et l’instant
où vous allez le relâcher
correspond au temps où
votre portail restera ouvert
(temps minimum de 5
secondes).
- Au relâchement de B4, le
portail part en fermeture à
grande vitesse, avec
ralentissement avant la
butée de fermeture.
L’auto-apprentissage est terminé
SEMI-AUTOMATIC
AUTOMATIC
First step
Connect the photocells (see
chapter Accessories )
Second step
The gate is closed B1 is ON, V1 is lit.Press B4 then release
it. V4 will flash.
Third step
Press the remote control key designed to control total
opening:
The gate will open slowly and not slow down further until
reaching the opening stop.
* The first key (Channel) of the first remote control that you
are going to use for self-learning will control the total
opening of the gate.
Any other memorised keys (Channel) will control pedestrian
opening.
The other channels (for instance, key CH-C) that you
memorise (except for the channel used for total opening) will
be for the pedestrian opening feature.
Fourth step
On the remote control, press
the key designed to control
total opening: the gate will
move toward the closed
position at high speed and
slow down before reaching
the closing stop.
Self-learning in the semi-
automatic mode is
terminated.
Do not touch the remote
control.
Hold down B4.
- for the first five seconds, V4
will stay steadily lighted then
begin to flash, announcing the
change to the automatic
mode.
- the time between the
beginning of pressure on B4
and the moment of release
will correspond to the time
during which your gate will
remain open (the minimum
time is 5 seconds).
- when B4 is released, the
gate will begin to close at high
speed, slowing down before
reaching the closing stop.
Self-learning is complete
SEMI-AUTOMATISCHE
AUTOMATISCHE
1e etappe
Sluit de fotocellen (Zie
toebehoren) aan
2e etappe
Het hek is gesloten. B1 staat op de stand On, V1 brandt. Druk
op B4 en laat deze los, V4 knippert
3e etappe
Druk op de toets van de afstandsbediening die bestemd is
voor de totale opening: de tuinpoort gaat langzaam openen
zonder vertraging tot op de openingsaanslag.
* De eerste toets van de eerste afstandsbediening die u zal
gebruiken voor de leerprores (code + kanaal) zal de functie
totale opening hebben (bijv. toets CH-A). Op alle andere
geregistreerde afstandsbedieningen zal deze zelfde toets de
functie totale opening hebben.
De andere kanalen ( bijv toets CH-C) die u registreert (behal-
ve het kanaal gebruikt voor de totale opening) zullen de func-
tie voetgangersopening hebben.
4e etappe
Druk op de toets van de
afstandsbediening bestemd
voor de totale opening: de
tuinpoort sluit snel en
vertraagt vóór de
sluitingsaanshag
Maak geen gebruik van de
afstandsbediening
Druk op B4 en hou deze
ingedrukt.
- V4 blijft de eerste 5
seconden branden om
vervolgens te knipperen,
hetgeen de overgang op de
automatische werking
aangeeft.
- De tijd tussen het indrukken
en loslaten van B4 komt
overeen met de tijd dat uw
tuinpoort open zal blijven
staan.
(Minimale tijd 5
seconden).
- Bij het loslaten van B4, gaat
het drasihek op hoge snelheid
dicht en vertraagt vóór de
sluitingsaanslag.
Het leerproces is voltooid.
SEMIAUTOMATICO
AUTOMATICO
1a. Etapa
(Conecte el kit de células
fotoeléctricas).
2a. Etapa
La cancela está en posición cerrada. B1 está en ON, V1 está
encendido. Pulsar B4, V4 parpadea.
3a Etapa
Pulsar la tecla seleccionada para la apertura total en uno de
los emisores. La cancela inicia la apertura a baja velocidad,
sin disminuirla hasta los topes de apertura.
* La primera tecla (canal) del primer emisor que utilice para el
autoaprendizaje será la de apertura total (ej. CH-A). Para el
resto de emisores, esta misma tecla tendrá la función de
apertura total.
El resto de teclas (canal) (ej. CH-C) memorizadas serán para
la apertura peatonal.
4a Etapa
Pulsar de nuevo la tecla del
emisor. La cancela inicia el
cierre a alta velocidad, con
disminución antes del tope de
cierre. Se ha finalizado el
autoaprendizaje en modo
semiautomático.
No tocar el emisor .
Pulsar de forma mantenida
B4.
- Durante los 5 primeros
segundos V4 permanece
encendido, seguidamente
parpadea, indicando que se
ha cambiado a modo
automático.
- El tiempo que transcurre desde
que presiona el botón B4
hasta que lo suelta, determina
el tiempo que la cancela
permanece abierta (tiempo
mínimo 5 segundos).
- Al soltar B4, la cancela inicia
el cierre a velocidad
rápida, con disminución
antes del tope de cierre.
El autoaprendizaje está terminado.
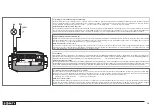
• 2/ Programmation de l’electronique
• 2/ Programming the control box
• 2/ Instellingen van de elektronica
• 2/ Programación de la eléctronica