Solt GGSHPD70 User Manual Download Page 4

4

1. Conditions of use

This appliance is intended to be used in household and 
similar applications such as farm houses or by clients 
in serviced apartments, holiday apartments and other 
residential type environments.

2. Safety instructions


Before the installation and use of the appliance, carefully 
read the supplied instructions.
The manufacturer is not responsible if an incorrect 
installation and use causes injuries and damages. Always 
keep the instructions with your appliance for future 
reference.

Warning!

  To prevent any damages to your and others’ life 

or property, you have to follow the safety notes.

Warning!

 Caution, risk of fire!

2.1 Children & vulnerable people safety

Warning!

 Risk of suffocation, injury or permanent 

disability.

—  This appliance can be used by children aged from 8 

years and above and persons with reduced physical, 
sensory or mental capabilities or lack of experience 
and knowledge if they have been given supervision 
or instruction for the operation of the appliance by a 
person who is responsible for their safety.

— Do not let children play with the appliance.
— Keep all packaging away from children.
— Keep all detergents away from children.
—  Keep children and pets away from the appliance door 

when it is open.

—  Cleaning and user maintenance shall not be made by 

children without supervision.

2.2 Installation

— Remove all the packaging.
— Do not install or use a damaged appliance.
—  Obey the installation instruction supplied with the 

appliance.

—  Make sure that the floor where you install the appliance 

is flat, stable, heat resistant and clean.

—  Do not install or use the appliance where the 

temperature is less than 5°C or higher than 35°C, or a 
humid environment.

—  Do not install the appliance behind a lockable door, a 

sliding door or a door with a hinge on the opposite side, 
where the appliance door can not be fully opened.

—  Always be careful when you move the appliance 

because it is heavy. Always wear safety gloves.

— Always move the appliance vertically.
—  The rear surface of the appliance must be put against 

the wall.

—  Make sure that there is air circulation between the 

appliance and the floor.

—  Make sure the carpet does not obstruct the ventilation 

openings in the base of the appliance (if applicable).

—  Exhaust air must not be discharged into a flue which is 

used for exhausting fumes from appliances burning gas 
or other fuels.

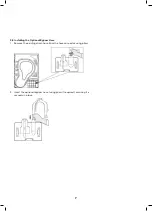
  —  If the tumble dryer is put on top of a washing machine, 

use the stacking kit. The stacking kit, available from 
your authorized vendor, can be used only with the 
appliance specified in the instructions, supplied with the 
accessory. Read it carefully before installation (Refer to 
the Installation leaflet).

—  Ensure you have good ventilation in the installation 

room to avoid the back flow of gases into the room 
from appliances burning other fuels, including open 
fires.

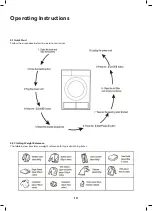
—  The appliance can be installed as freestanding or below 

the kitchen counter with correct space (Refer to the 
Installation leaflet).

—  When the appliance is put in its permanent position, 

check if it is fully level with the aid of a spirit level. If it is 
not, adjust the feet until it is.

Safety Instructions

Summary of Contents for GGSHPD70

Page 1: ...E S S E N T I A L S F O R L I F E User Manual MODEL GGSHPD70 7 0kg Heat Pump Dryer...

Page 2: ...res and importantly taking care of your appliance when cleaning our Support Team are here to help You can use our online Support Centre at anytime by visiting http support residentiagroup com au or yo...

Page 3: ...2 Welcome 4 Safety Instructions 8 Your Heat Pump Dryer 10 Operating Instructions 13 Cleaning Maintenance 14 Troubleshooting 15 Technical Data 16 Attach Your Receipt 17 Purchase Details 18 Warranty Inf...

Page 4: ...ance Make sure that the floor where you install the appliance is flat stable heat resistant and clean Do not install or use the appliance where the temperature is less than 5 C or higher than 35 C or...

Page 5: ...m shower caps waterproof textiles rubber backed articles and clothes or pillows fitted with foam rubber pads Before drying items that have been in contact with substances such as cooking oil acetone a...

Page 6: ...ble and discard it Remove the door catch to prevent children and pets to get closed in the appliance 2 6 Transport Always move the appliance cautiously Do not use the machine door or the handle of the...

Page 7: ...2 8 Installing the Optional Bypass Hose 1 Remove the existing drain hose from the hose connector using pliers 2 Insert the optional bypass hose using pliers if required ensuring it is securely in plac...

Page 8: ...8 3 Product Components Your Heat Pump Dryer...

Page 9: ...9 4 Control Panel 1 Program selection dial 2 Display 3 Specialty function buttons 4 Start Pause button 5 On Off button Display Icons 1 2 3 4 5...

Page 10: ...10 5 1 Quick Start Follow the procedure below to operate your dryer 5 2 Clothing Weight Reference The table below provides a weight reference for typical clothing items Operating Instructions...

Page 11: ...hin the washing machine Y N Mix 3 5kg Designed for use when you cannot determine your clothing mate rial Y N Sports 3 0kg To dry sportswear thin fabrics and polyester items which are not to be ironed...

Page 12: ...select your required program and select any other drying functions Press and hold the Intensity button for 3 seconds until the display flashes indicating that your desired program has been saved To u...

Page 13: ...the base filter using the same method as described in 8 1 Reinsert the base filter and re screw the locking levers in place Close the base filter flap until it locks in position Warning Never operate...

Page 14: ...manual indicator is flashing Clean lint filter Dryer doesn t start Check the start button has selected Check the appliance door has closed Check that the program has been set Water is running out of t...

Page 15: ...covered by the Kyoto Protocol Hermetically sealed The rated capacity is the maximum capacity of dry clothes Refer to the Program table for maximum loadings specific to each program Do not install the...

Page 16: ...16 Attach your receipt to this page...

Page 17: ...he following information which can be found on the rating plate and the date of purchase which can be found on your sales invoice STORE DETAILS STORE NAME ADDRESS TELEPHONE PURCHASE DATE PRODUCT DETAI...

Page 18: ...ir an Appliance during the Warranty Period g Warranty Period means i where the Appliance is used for personal domestic or household use i e normal single family use as set out in the instruction manua...

Page 19: ...nce was serviced or repaired by anyone other than Residentia Group an authorised repairer or ASR 8 This warranty the contract to which it relates and the relationship between you and Residentia Group...

Page 20: ...T 1300 11 4357 E support residentiagroup com au E S S E N T I A L S F O R L I F E An initiative by Residentia Group www solt house...

Reviews: