


1
SLS-ENVR4_RQ
12/13/12
The front panel of SLS-ENVR4 NVR includes four LED:
•
The
Network
LED indicates the activity of the network adapter.
•
The
Storage
LED blinks green if the hard disk is active, it lights red if the disk fails.
•
The blue
Power
LED and red
Info
LED function as follows:
Status
Power LED
Info LED
Service mode is active
–
On
Normal mode is active
On
–
Found by Discover
On
Blinking
NVR is starting
Blinking
–
NVR is switching off
Blinking
–
•
Power ON / OFF
button:
—
If pressed for less than 3 seconds, disables an audible alarm signal (see
Acoustic Signals
below).
—
If pressed for more than 5 seconds accompanied by a beep, will power off the device normally.
Acoustic signals
Acoustic signals indicate the following:
•
A brief sound
: When the device is switched on or off by pressing the ON/OFF button.
•
A continuous sound
for one of these reasons:
—
If there is a problem with the hard disk (can be switched off by briefly pressing the front ON/OFF
button).
—
If the temperature of the device exceeds 140 °F (60 °C). The acoustic signal is accompanied by the
blinking of a red light on the lightstrip. The sound can be switched off by briefly pressing the front
ON/OFF button. Solstice will make an entry in the log, and can e-mail information if the SMTP is
setup.
—
If the temperature of the device exceeds 158 °F (70 °C). The acoustic signal is accompanied by
the blinking of a red light on the lightstrip. The device will make an entry in the log, send an
information e-mail if the SMTP is set up and will be automatically switched off.
•
Retaining
screw
Retaining
screw
Reset button / Power LED (blue)
Storage LED
(red-green)
Info / Reset
LED
(red-green)
Network
connector
USB port
(not used)
Power
connector
Back panel
The back panel buttons / indicators function as:
•
Reset button / Power
LED
(blue):
To use the
Reset
button:
—
Press for less than 3 seconds to restart the device from Normal mode to the Service mode. If in
Service mode, it will return to the Normal mode if Reset is pressed again.
—
Press and hold for 15 seconds to restart the device.
NOTE
: Recordings may become damaged.
—
Press and hold for 25 seconds while connecting the power cable to restore factory settings. All
settings and recordings will be lost.
Power LED
: Indication is identical to the front panel Power LED.
•
Info / Reset LED
(red-green): When red, it is identical to the Info LED on the front panel. It is lit green
when the Reset button was pressed for less than 5 seconds; blinks when the Reset button has been
pressed for a moderately long time; blinks fast when the reset button has been pressed for longer than
15 seconds.
The SLS-ENVR4 series NVR is an intelligent and compact appliance that provides a network interface to
monitor, record and playback video from up to 4 IP cameras, with up to 3TB of data storage. It is very easy
to install and use.
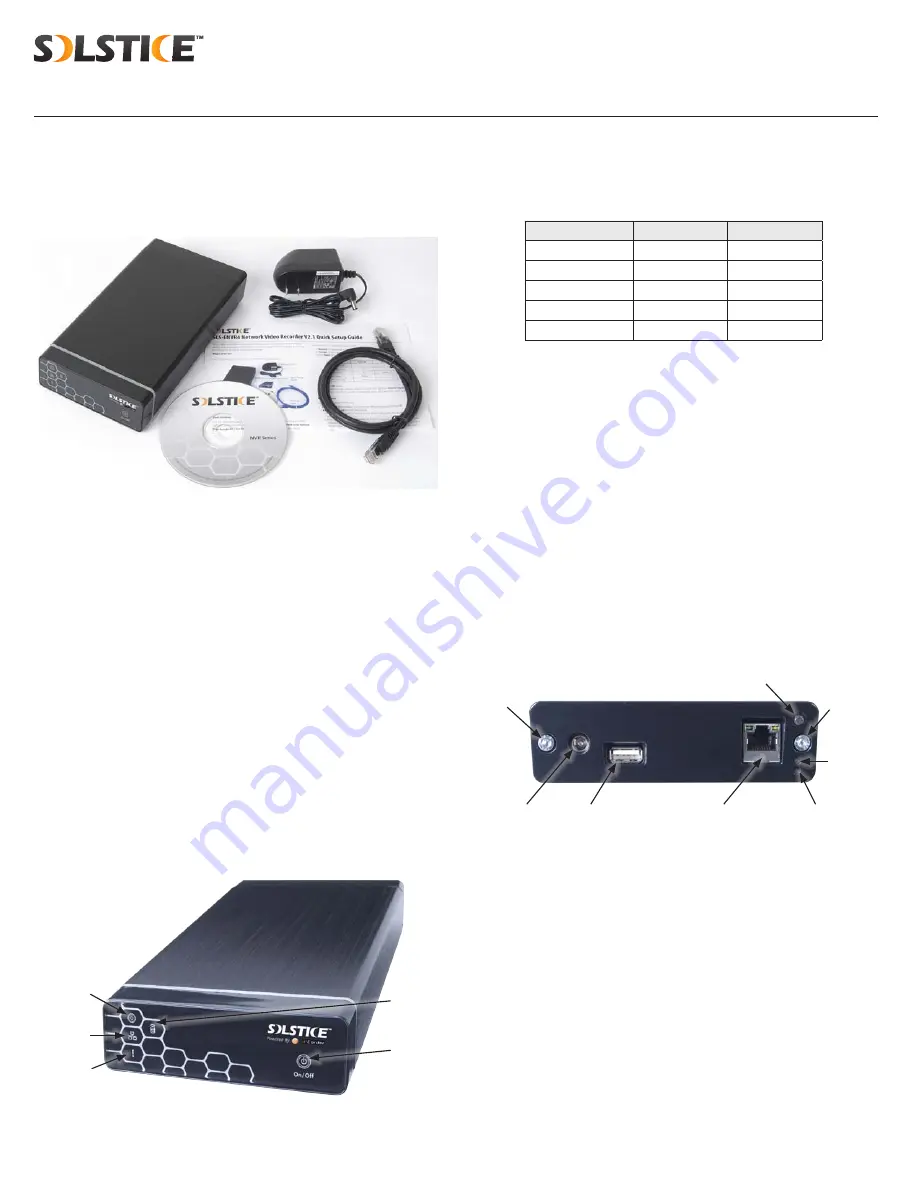
What’s in the box
Your SLS-ENVR4 product includes components shown in the picture below.
Software CD
SLS-ENVR4 NVR
Ethernet
cable
Quick Setup
Guide
Power adapter
What you need
Your SLS-ENVR4 NVR hardware is preconfigured with an HDD. If you want to change the HDD or configure
it differently, refer to the document
SLS-ENVR Series Network Video Recorder V2.1 User Manual
provided on the Software CD for specific instructions.
A PC is required to access and control your NVR. It must meet the following requirements:
•
Operating system
: Microsoft® Windows® 2003, 2008, XP, Vista, 7 (32- and 64-bit versions);
Apple® OS X® 10.5 (Intel x86 only), 10.6, 10.7; Linux with 2.6 kernel or newer
•
Internet browser
: Mozilla® Firefox® 10 ESR and newer (recommended); Internet Explorer® 8 and 9
(32-bit version); Google Chrome® 21 and newer; Apple Safari® 5 (only on Mac OS X). Enable JavaScript
and cookies (check the settings of your internet browser).
•
Java
™: Oracle® Java 6.0 or newer (32-bit version only), Oracle Java 7 (recommended). Download Java
at:
http://www.java.com
.
•
Hardware configuration
: 2 GHz processor with 1GB RAM minimum; dependant on the NVR type
and number of monitored cameras.
The SLS-ENVR4 allows the user to download videos and pictures from videos saved on a hard disk. The
pictures are in standard JPEG format and can be displayed in every standard picture browser. To play video,
install an FFDShow CODEC (download from
http://www.freecodecs.com/download/FFDshow.htm
) or similar
filter. Also, VLC player contains the CODEC necessary to play SLS-ENVR4 videos (download at
http://www.
videolan.org
).
Power
LED
Storage
LED
Power
On/Off
button
Network
LED
Info
LED
SLS-ENVR4 front panel
SLS-ENVR4 Network Video Recorder V2.1 Quick Setup Guide


