Solmeta GMAX-EOS2 Instruction Manual Download Page 24

When the receiver is custom setting accessed, press      or     is to 
access next setting or change the option. Press        is to activate 
current setting or complete the setting.

Note
To exit the current setting and return to the main menu display, 
press       .

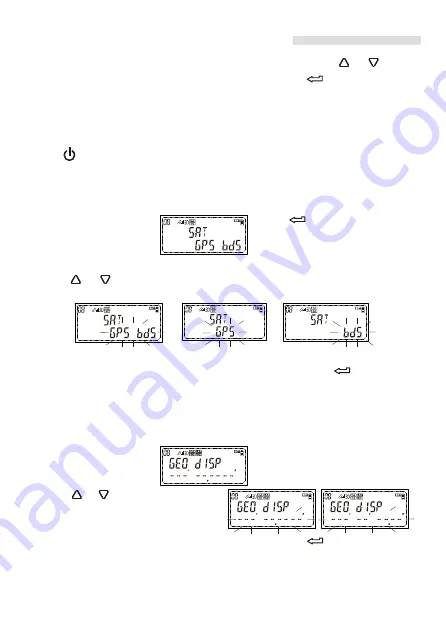
Set the positioning system

1.While the LCD shows                               press       and the option 
   menu will flash.

2.Press     or      to change the option                                          

3.While your preferred positioning system appears, press      to confirm 
your selection.

Set the display format of latitude and longitude

1.While the LCD shows

press and the option menu 

will flash.

2.Press     or     to change the option

3.While your preferred display format appears, press      to confirm your 
   selection.

How to do the custom setting?

21

Summary of Contents for GMAX-EOS2

Page 1: ...CTION MANUAL Version 1 0 Camera Geotagger For Nikon or Canon GPS plus Beidou Barometric altimeter Position Tracing Logger Shutter Release Remoter LCD display Bluetooth technology GPS GMAX EOS2 GPS Geo...

Page 2: ......

Page 3: ...ist 5 Part Names 6 Turning the Receiver On 8 GPS BDS logger 12 The main menu display 13 Custom setting 14 Access the custom setting 16 How to do the custom setting 21 Other applications 34 Specificati...

Page 4: ...the Bluetooth equipped User can enable the Bluetooth to establish wireless connections to smart phone which can then be used to control the camera and take pictures remotely 1 Note To meet the requir...

Page 5: ...card and it supports more than 170 days continuous log record at the interval of 1 sec User no longer worry about the size of the storage space Serving as a digital compass The direction pith and roll...

Page 6: ...ment precision of the heading angle pitching angle and roll angel Build in Barometric Altimeter The receiver provides two kinds of altitude data one is from GPS the other is from barometric altimeter...

Page 7: ...to working mode the receiver is on off following the connected camera s on off This is very convenient for photographer to use camera and GMAX EOS2 together In auto working mode the receiver is always...

Page 8: ...the package contains the following items GMAX Storage bag Manual USB cable for charging downloading logging data Connecting cable Data cable Cable GEOS Packing list 5 RC 1 Sold separately Wireless Re...

Page 9: ...art Names Power Home Key Digital Terminal Mounting foot locking lever Contacts Mounting foot locking pin Release button 6 Down Key Enter Key Up Key Bluetooth Log indicator GPS BDS acquisition indicato...

Page 10: ...ge supports more than 18 hours of continuous work The receiver can be charged by using any USB port that provides standard 5 volts Note 3 4 hours for a full charge The battery icon in the LCD shows th...

Page 11: ...ver can be forced off by pressing and together Acquiring GPS BDS signals To acquire GPS BDS signals bring the receiver outdoors where the sky is unobstructed and aim it up Turn on the receiver to star...

Page 12: ...ing Image as you shoot Note Most of the EOS DSLR cameras support two connections Some camera such as EOS 7D EOS1300D Rebel T6 and EOS1200D Rebel T5 they only support digital terminal connection Be sur...

Page 13: ...displayed when the receiver is communicating with the camera Take picture and the images are geotagged When the receiver attached or connected to a camera and the GPS icon is also constant simply sho...

Page 14: ...ion also is recorded in the log file and the data is marked a Flash to indicate Auto working mode You can choose Auto working mode in your photography day When choosing Auto working mode the receiver...

Page 15: ...the positioning interval via the custom setting The default is every 10 seconds For how to set the interval see page 32 The GMAX EOS2 supports more than 170 days continuous log record at the interval...

Page 16: ...esent the pitch and roll The char in the up indicate the current speed The char on the bottom represent the altitude The char in the up indicate the current speed The char on the bottom represent the...

Page 17: ...ass function or disable it 9 Compass calibration 10 Which direction data to be displayed the data is based on true north or magnetic north 11 Level calibration 12 Select the speed unit Mile Kilometer...

Page 18: ...ersion Custom setting 20 The available memory for logging Set the logging interval or turn off logging The interval can be set as 1s 5s 10s 15s 30s 1min 2min 5min 10min 20min or 30min 10 seconds is th...

Page 19: ...play press Custom setting introduction Menu Item Option Item Description Which positioning system to be used GPS Beidou GPS or Beidou GPS BDS GPS plus Beidou double position system GPS Global Postion...

Page 20: ...ected low light middle light or high light When choosing delay off the time can be set as 1min 2min 3min 4min or 5min The indicators of the GPS BDS signal acquisition and the Blue tooth Log are on or...

Page 21: ...The speed unit Mile Kilometer or Knots The altitude unit meter or feet Which altitude data to be shown the data from GPS BDS or atmospheric pressure The altitude data can be calibrated when choosing...

Page 22: ...or 5min can be selected GPS BDS working frequency and the working time of each time in Clock mode FRE is the frequency 1H 2H 4H 8H 24H 48H or 96H can be selected CON is the working time 1min 3min or...

Page 23: ...g The interval can be set as 1sec 5sec 10sec 15sec 30sec 1min 2min 5min 10min 20min and 30min Disable means turn off the logging 10 sec is the default Turn on the Bluetooth connection or turn it off C...

Page 24: ...e positioning system 1 While the LCD shows press and the option menu will flash 2 Press or to change the option 3 While your preferred positioning system appears press to confirm your selection Set th...

Page 25: ...and the secondary option will flash Press or to change the option While your preferred brightness appears press to confirm your selection 3 2 If you prefer Delay Off press while a flashing displayed a...

Page 26: ...ars press to confirm your selection How to do the custom setting 3 3 If you prefer OFF press while a flashing displayed and the backlight will be always off Set the indicators of the GPS signal acquis...

Page 27: ...agnetic objects that could cause measuring error To compensate for this error it is sometime necessary to perform a calibration If the compass is accurate there is no need to perform the calibration E...

Page 28: ...peration Hold the receiver and rotate it slowly around the X axis Y axis and Z axis each axis done twice Please do try to keep a constant speed of rotation and each rotation takes almost 10 seconds 3...

Page 29: ...d Set the speed unit 1 While the LCD shows press and the option menu will flash 2 Press or to change the option 3 While your preferred unit appears press to confirm your selection Select your preferre...

Page 30: ...le a flashing displayed and the LCD will show press again to complete the setting 4 2 If you prefer the altitude from atmospheric pressure while a flashing displayed press and the LCD will show Press...

Page 31: ...reference to do the calibration while the LCD shows press and the value on the bottom will flash Press or and to adjust the value While the value is adjusted to the sea level pressure issued by the lo...

Page 32: ...be changed accordingly While the local time is adjusted to the current local time press again to complete the setting and the LCD will show the local time Set the date display format 1 While the LCD s...

Page 33: ...the LCD will show it means the calibration mode is activated To do the calibration press or to adjust the value While the value is adjusted to the reference value of your location press to complete t...

Page 34: ...Press again and the option will flash 3 Press or to change the option the option is the GPS working frequency 1hr 2hr 4hr 8hr 24hr 48hr or 96hr can be selected 4 Press while your preferred frequency a...

Page 35: ...travel routes 1 While the LCD shows press and the LCD will show 2 Press again and the option menu will flash 3 Press or to change the option the option is the interval 1sec 5sec 10sec 15sec 30sec 1mi...

Page 36: ...3 04 05 06 07 08 09 10 11 12 13 14 and 15 While your preferred name appears press to confirm your selection 3 2 To turn off the bluetooth press while the LCD shows The default is turn off Restore the...

Page 37: ...he receiver is on press and the LCD shows a flashing 2 Press or until a flashing Shown and then press The clock mode is activated and the LCD only shows the time information 3 To exit the clock mode p...

Page 38: ...oid user please go to www solmeta com to download the GMAX Remoter APP 2 Ensure that the Bluetooth of your GMAX EOS2 and your smartphone are on and the GMAX EOS2 has been connected to the camera prope...

Page 39: ...shooting direction Internal memory 4 GB Reception frequency L1 1575 42 MHz B1 1561 098MHz Data format NMEA 0813 Data update rate One time per second Time adjustment Camera time can be set from GPS tim...

Page 40: ...ntee is not valid if defect is due to damage caused by incorrect use poor maintenance or if persons not authorized by Solmeta Technology have carried out alterations or repairs For the device to be us...

Page 41: ...o change without notice Solmeta Technology reserves the right to change or improve their products and to make changes in the content without obligation to notify any person or organization of such cha...

Page 42: ......

Page 43: ......

Page 44: ...INA Shenzhen Solmeta Technology Company Add Room 327 Building 5 Zhong Xing Industrial Town Chuang Ye Road Nan Shan district Shenzhen 518054 China Tel 86 755 26969187 E Mail service solmeta com Web www...

Reviews: