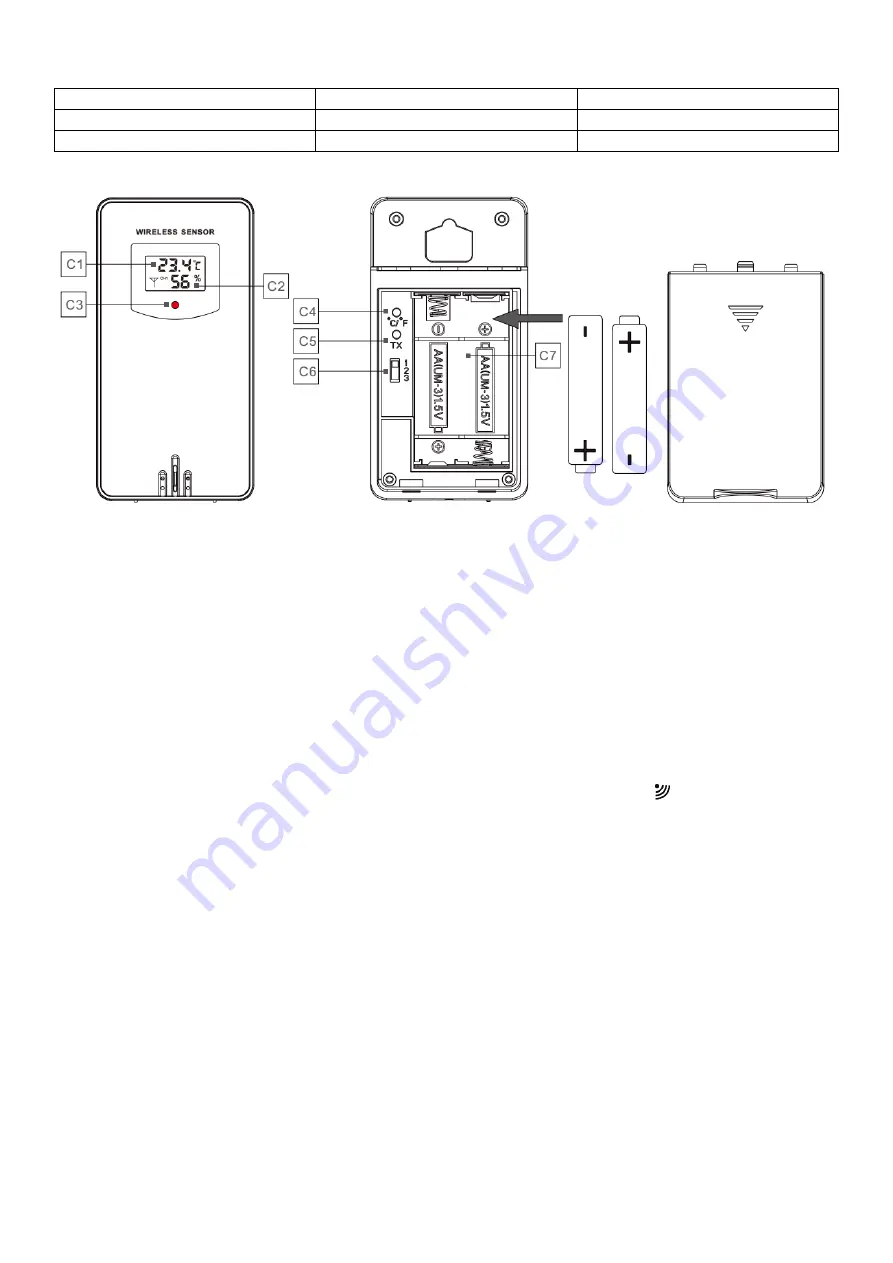
Part C - Wireless sensor
C1: Temperature indicator
C2: Humidity indicator
C3: RF signal transmitting diode
C4: Switching units °C/°F
C5: TX button - start transmitter
C6: Channel switching
C7: Battery compartment
Initial switching on
Remove the battery cover of the wireless outdoor sensor, press the channel selector switch in the battery
compartment of the wireless outdoor sensor, set the desired channel, insert 2 x AA batteries - observe the polarity
["+" and "-" marks].
When the batteries are inserted, all icons on the LCD display will light up briefly for 3 seconds, and the wireless
outdoor sensor will activate into normal working mode to detect the temperature and humidity in the
environment. At this time, the sensor will transmit temperature and humidity status information once per minute,
the red LED will flash once.
When the power adapter is connected to the weather station, all symbols on the display screen will be displayed
for about 3 seconds, the weather station will activate to normal working mode to detect temperature, humidity
and air pressure.
The weather station will now start establishing a connection with the outdoor sensor. This operation takes
approximately 3 minutes and is indicated by the flashing RF antenna reception symbol " " in the "OUTDOOR"
display field on the station. At the same time, the weather station starts to establish a WIFI connection (see the
following description of the WIFI connection for details).
When the weather station is in operation, open the weather station battery compartment cover and insert 2 AA
batteries, observing the polarity of the ["+" and "-" marks]. The batteries are a backup power source for the
weather station to ensure normal operation of the weather station in the event of an unexpected power adapter
disconnection or power interruption.
Note: when the power adapter is disconnected, the WIFI connection of the weather station is automatically
terminated.
Weather station and application connection
When the weather station is first connected to the power adapter and switched on, after the display goes to normal
display, the 01 AP and WIFI icons appear on the time bar. The AP symbol will flash in AP mode (01, 02), the WIFI
indicator will flash in WIFI pairing mode. First connect your mobile phone to a WiFi network (2.4GHz), then open the
Smart Life / TUYA app on your mobile phone and follow the diagram below.
Summary of Contents for TE81WiFi
Page 2: ...Description...


