background image

06

Chapter One: Important Precautions for Using Elfin

Welcome to use Elfin

Printer. In order to protect your personal safety and user rights, ensure 

correct installation and operation, and full play of the machine, it is important that you read the 
precautions carefully.


       1.1 Important Setup Precautions

1.1.1 Use exclusive power supply for the equipment. Do not share same power supply with other 
equipment. Besides, Installation of an additional UPS is recommended.
1.1.2 Mount the support in sound and stable place. Do not choose the location that will be easily 
affected by shock or sway. 
1.1.3 Choose well-working conveyor belt for high print quality.
1.1.4 Add deflector to the printer for production line setup in order to prevent any printing object 
hitting the nozzle plate to cause damage.
1.1.5 Make sure the printer is well grounded.
1.1.6 Maintain the distance between deflector and printing object at 0.5-2.5mm as recommended. 
1.1.7 Make sure to insert and remove the ink cartridge by an angle of 15 degree so as not to cause 
damage to the cartridge.
1.1.8 Make sure the setup environment is tidy and clean. Clean the dust on printer from time to time 
when dusty environment is unavoidable.

       1.2 Important Operation Precautions

1.2.1 Do not poke or impact the touch screen sharply. 
1.2.2 Do not cover up the built-in photocell. Otherwise the printer doesn’t print.
1.2.3 Use Non-woven to wipe the nozzle plate when the print is not clear or dots are missing.
1.2.4 Set print delay value for best print result when print position changes (see Section 5.2.3).
1.2.5 Do not insert or remove ink cartridge while the machine is in printing process so as not to cause 
damage to the cartridge.
1.2.6 Do not use compressed air for cleaning the touch screen. High pressure of the compressed air 
will damage the touch screen.
1.2.7 Do not use compressed air for direct or indirect cleaning of the ink cartridge. High pressure of 
the compressed air will damage the nozzle plate.
1.2.8 Read Chapter Seven for troubleshooting when there’s failure occurs. If you cannot solve the 
problem encountered, contact your local dealer or our after-sale service. 

Note:

 Depending on properties, some ink cartridge may require to be removed from printer after 

use. Turn off the machine and remove the cartridge from printer. Wipe the printhead clean with Non-
woven; cap the printhead with the designed cap for prevention of the nozzles from clogging. 
(Contact our after-sale service for information of ink properties.) 

Summary of Contents for Elfin I

Page 1: ...Edition C20140715A High Resolution Inkjet Printer User Manual XiaMen Sojet Electronics Co Ltd ...

Page 2: ... grounding will result in machine failure that the machine cannot work normally Do not expose ink to direct sunlight or high temperature 35 above The heat of direct sun light or high temperature will affect ink s storage life and print quality If you get ink spill on the eyes or skin during use please clean your eyes or skin by clean water Ink leakage inside printer can result in burnout damage to...

Page 3: ... 2 1 5 Bracket Installation Chapter Three ElfinⅡIntroduction 3 1 Elfin Ⅱ Printer 3 2 Technical Specifications Chapter Four How to Use the Printer and the Check Work before after Use 4 1 How to Use the Printer 4 2 Check Work before Use 4 3 Check Work after Use Chapter Five Printer Operation Instructions 5 1 Main Interface 5 2 Printing Management 5 2 1 Find Preview Data 5 2 2 Start Printing Printing...

Page 4: ... 4 5 Special Features 5 4 6 Screen Touch Correction 5 5 Tools Management 5 5 1 Image Management 5 5 2 System Upgrade 5 5 3 System Backup 5 5 4 System Record 5 5 5 About Equipment 5 5 6 System Reset 5 6 Edit Input Method Options 5 7 Status Bar Chapter Six Care and Maintenance 6 1 Printer Care and Maintenance 6 2 Ink Cartridge Care and Maintenance Chapter Seven Troubleshooting 7 1 Troubleshooting fo...

Page 5: ...dit data for printing and how to adjust printer settings Care and Maintenance Care and maintenance for printer and cartridge Troubleshooting Common failures occurred and solutions Appendix 1 Terms and Definitions Definitions for terms used in this document Please read this user manual carefully before first use of the printer for full understanding and atten tion of important information so that y...

Page 6: ...from time to time when dusty environment is unavoidable 1 2 Important Operation Precautions 1 2 1 Do not poke or impact the touch screen sharply 1 2 2 Do not cover up the built in photocell Otherwise the printer doesn t print 1 2 3 Use Non woven to wipe the nozzle plate when the print is not clear or dots are missing 1 2 4 Set print delay value for best print result when print position changes see...

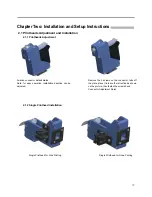
Page 7: ...ting Single Printhead for Down Printing 2 1 Printheads Adjustment and Installation Aviation connector default status Note for easy operation installation direction can be adjusted Remove the 3 screws on the connector take off the plate place it into another direction as shown on the picture then fasten the screws back Connector Adjustment Finish ...

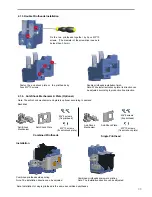
Page 8: ...ism Plate Optional Part List Installation Single Printhead Combined Printheads Note Installation for single printhead is the same as combined printheads Note The installation direction can be adjusted Note The anti shock mechanism and plate is optional according to demand Combined printheads side printing Note The installation direction can be adjusted Combined printheads downward printing Anti Sh...

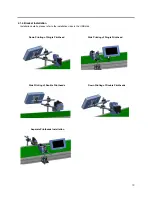
Page 9: ...ation details please refer to the installation video in the USB disk Down Printing of Single Printhead Side Printing of Single Printhead Side Printing of Double Printheads Separate Printheads Installation Down Printing of Double Printheads ...

Page 10: ...rt On Off Switch Port of Printhead 1 Port of Printhead 2 Note 1 DB15 port can connect with external photocell encoder alarm kit or external data source 2 Ethernet port can connect with Ethernet cable or external data source 3 USB port can connect with USB or external data source ...

Page 11: ...1 While using build in photocell user can choose which one to use the one on Printhead 1 or on Printhead 2 settings refer to Section 5 4 3 Printing Options D Build in Photocell Setting or 3 While using double printheads separately settings refer to Section 5 4 3 Printing Options A Nozzle Maintenance Printheads Selection Double Printheads Separately Note 1 While using build in photocell user can ch...

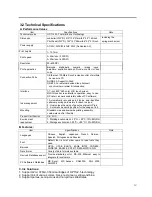
Page 12: ...te formats available Device s Database suport PC Software s Database C Ink Solutions 1 Support 42ml 370ml 350ml cartridges of HP TIJ2 5 technology 2 Support ink of various colors black red green yellow and blue 3 Support porous semi porous and non porous substrates 1 Working environment 10 C 55 C 10 85 RH 2 Storage environment 25 C 80 C 10 90 RH AC 90V 240V 50 60HZ 90W Dedicated AC Power supply 1 ...

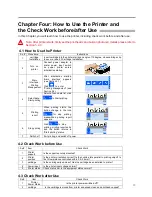
Page 13: ... change to the icon for stop printing meanwhile a printing report appears 6 Stop printing Click to stop printing printing report exits and the button returns to Start printing status 7 Switch off Exit printing and switch off power 4 2 Check Work before Use Sq Item Check Work 1 Printer support Is the support securely mounted 2 Printer position Is the printer orientation correct Is the nozzle plate ...

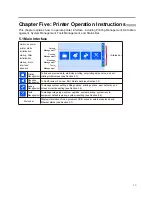
Page 14: ...nter starts initialization startup After initialization startup main interface appears To find and preview data start stop printing set printing delay value and set printing initial values see Section 5 2 To manage system setting editing options printing options user authority and screen correction setting see Section 5 4 To manage image logo system upgrade system backup system record equipment de...

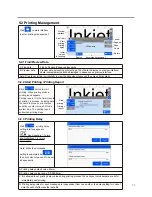
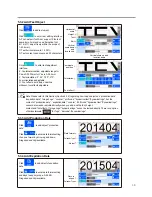
Page 15: ...g report Click button to start printing When printing starts a printing report appears Printing report It is the timely record of printing in process including data file name in process print output quantity counter value shift code system time The printing report exits when printing stops Click printing delay setting interface appears See Appendix 1 Terms and Definitions 1 for more information No...

Page 16: ...ng appears 36 Base System select the regulation when setting is input is 0 Z not including I O Default setting is decimal from 0 9 See Appendix 1 Terms and Definitions 2 for more information Counter Synchronizing when multi counter included in the same file click then all counters current value will be synchronized to counter 1 s current value After confirmed a dialog box will display the counters...

Page 17: ... expiration date image logo barcode B Edit data in printing process cannot be edited C File name maximum 15 characters empty file name or repeated file name not allowed Click to save data when finish editing a check box appears to ask Are you sure you want to save the message Cancel Yes No If you click the machine will remain on editing interface Note MSG001 is default data in system not editable ...

Page 18: ...ect Click to enter text editing interface A Font default font Arial support 2 fonts at same time Arial and one alternative font B 16 417 adjust freely within the scope of 1 25 4mm C Text horizontal scale 1 300 D Text content cannot exceed 25 characters Click to enter text adjustment interface E Coordinate location adjustable range for X axis 0 3000mm for Y axis 0 25 4mm F Text orientation 0 90 180...

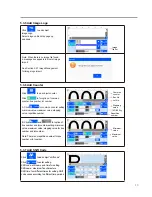
Page 19: ...logo on file list by page up and down Note When there is no image file found a message box appears to prompt image import See Section 5 5 1 Image Management for image logo import B Click and for option of box number and lot number setting minimum value maximum value stepping value for box number and lot number Note There is no repetition number for box number or lot number Click to add object shif...

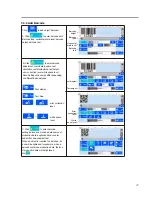
Page 20: ...de text B Click to enter barcode adjustment coordinate location text orientation text display hide text height error correction level white space level Note Setting options may differ depending on different barcode types C Click to enter barcode setting barcode can include data source of production date expiration date counter and shift code dynamical text When an object is inserted to a barcode i...

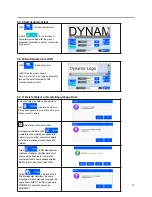
Page 21: ...e interface of dynamical text setting with the way of dynamical transmission path or communica tion protocol 5 3 10 Add dynamical LOGO Click to add dynamical LOGO See the picture beside Note pls refer to 5 3 9 of adding dynamical text set the data transmission path communication protocol Click in File Management interface it will import all files saved in U disk under defined route User will be pr...

Page 22: ...very country as default language Switch between mm and inch language in delivery country as default language Three modes for setting OFF European summer time US summer time F Calendar Type two modes available Gregorian and Hijri Default setting is Gregorian System time will be changed according to the calendar setting Manufacture time as default time can be set by user see Appendix 1 Terms and Def...

Page 23: ...rms and Definitions 4 5 1 Date transition time setting system default normal zero o clock as date transition time to next date users can set different time as date transition time 2 Pre zero in date time four options OFF empty preposition empty postposition centered without zero e g 2012 05 09 2012 _5 _2 2012 5_ 2_ 2012 5 2 C Click to enter counter setting 1 Production counter setting extent 0 999...

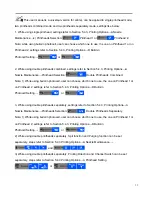
Page 24: ...rintheads combined double printheads separately Printhead 1 Printhead 2 Double printheads combined Double printheads separately see Appendix 1 Terms and Definitions 6 7 24 5 4 3 Printing Options Click on system management interface to enter printing option setting Printhead Setting Printhead Setting Channel switch Printing Recovery Click to enter nozzle maintenance setting Nozzle Maintenance Selec...

Page 25: ...test and click or to save or give up test result 25 Line Setting Speed Run speed test Stop speed test Build in photocell switch Save Cancle Test object length Line speed DPI Line speed setting While the printheads work separately can do single setting for printhead 1 or printhead 2 see Appendix 1 Terms and Definitions 8 Click to enter production line Setting Line speed system default 30m min Adjus...

Page 26: ...ogue box requests user name and password for access to operation of the printer when machine power is switched on User name different names for different access permission Administrator is of best authority with access to all settings including password modification Engineer is with access to data management and printing management and operator is with access to printing management only Password a...

Page 27: ...al system default OFF adjustable scope 0 999mm Continuous output times UV LED Setting UV Delay Distance D Press entering UV setting interface Note Can set the UV delay distance Adjustable scope 0 3000mm C Click to do Alarm settings User can choose Alarm Light or Production Line Control Alarm Light operation please refer to above picture Production Line Control Stop Printing Device Abnormal Ink Use...

Page 28: ...age from USB or Ethernet Image format Solid color BMP Image height 0 300 pixel point Image length 0 10000 pixel point 5 5 2 System Upgrade A Software upgrade B Language upgrade C Font upgrade Software upgrade Upgrade document list Language upgrade Font upgrade Execute upgrade Click to enter upgrade management interface Users can upgrade the software add or change languages and fonts by USB System ...

Page 29: ...ngs images system record excluding software fonts languages status and user management Note Please check USB connection status and disk space is normal when execute backup import and export Backup document route USB Disk InkJet Backup Click to enter system record viewing interface All operation activities including operator operation and operation time will be shown Click to enter equipment inform...

Page 30: ...n 1 2 3 4 5 6 7 8 9 10 11 12 13 14 15 16 17 18 19 20 21 22 23 Language System time Screen saver time Unit Daylight saving time Customer year Date transition time setting Pre zero in date time Pre zero in counter Counter alarm Counter reset Pre purge Clean printhead Printing direction Channel switch Print Recovery Line speed DPI User permission management Continuous output times Data management Pri...

Page 31: ... keypad to appear see Figure 50 B Lowercase click to change between uppercase and lowercase C Numeric and common symbols Click to change between numeric or common symbols input D More symbols click on numeric common symbols keypad for more symbols Input changeover key Numeric common symbols and alphabetic input changeover key Remove key clear all input Delete delete one character Hide keypad ...

Page 32: ...software normal Warning yellow interaction with PC software wrong connection failure software on PC not activated computer not switched on etc Ink information includes dynamic and static information Static information includes cartridge serial number client code cartridge type Dynamic information 1 Ink volume prospect print output for current data 2 Ink used percentage remainning prospect print ou...

Page 33: ...e cartridge work with best print quality and extend cartridge life Please always follow instructions in Ink Cartridge Care and Maintenance The warranty will not cover damage or failure caused by negligence in following our care and maintenance instructions 6 2 1 Ink volatilizes slowly if the cartridge is decapped Keep new and undecapped cartridge in its original package Decap new cartridge only wh...

Page 34: ...ckage 1 Connectivity problem on printer defect or damage 2 Cartridge dealer code mistake 2 Cartridge not in good contact with printer A See Section 6 2 Ink Cartridge Care and Maintenance wipe and clean nozzle plate with Non woven B See Section 5 4 3 purge the nozzles by the option Clean Printhead Remove the cartridge and re insert A Check status bar if there s alarm of low ink B Send back to our c...

Page 35: ...d ON Contact local dealer or after sale service Pls check firstly if the current status is in printing Select a file and click Start printing button Check if the printing delay value is normal Install a cartridge Check cartridge status according to Section 5 7 is ink used up or cartridge dealer code wrong Cover up the photocell to check according to 5 2 2 to see if there s variation in print outpu...

Page 36: ...ll make the print not clear for half of first character To prevent this phenomenon user can turn this function ON When Pre purge function is turned ON printer will spray a little ink at optioned level during idle period in printing process to keep nozzle plate warm and moist so as to eliminate dried ink phenomenon Customer can use this function to purge nozzles Purge whole nozzle plate make sure n...

Page 37: ...gn Y axis separate Adjust upward scope Y axis 4 4 X axis left dislocation Y axis align Adjust to right scope X axis 10 10 X axis right dislocation Y axis align Adjust to left scope X axis 10 10 Note 1 Adjust scope varies in different case unit dot 2 If mismatch remain after adjustment please check if the printheads is installed vertically with the production line ...

Page 38: ...et Electronics Co Ltd Add Room 402 4 F Hong Ye Building Chuang Ye Park Torch Hi Tech Industrial Development Zone XiaMen Fujian China Tel 86 592 5771357 Fax 86 592 5565048 E mail partner sojet tech com Website www sojet tech com Zip code 361006 ...

Reviews: