

3
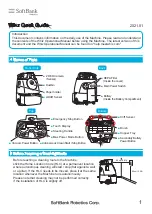
1.Open the dustbin
2.Remove the dustbag
3.Hook it to the dustbin pin
4.Push it in firmly
5.Check the dustbin pin is afloat
Hold the dustbin access handle
down and remove the dustbin
cover toward you.
Pull out the attachment sheet
and remove the used dustbag
from the Machine.
Ensure that the illustration side
of the dustbag is facing upwards
and attach it to the machine.
Align the suction port and the
attachment sheet with the opening
and push in the attachment sheet
onto the right side.
If the dustbag is installed correctly,
the dustbin pin will float. Check that
it is afloat and close the dustbin cover.
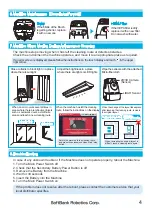
Dustbag
If the error message is displayed when the dustbag is full, replace it with a new dustbag.
The recommended replacement period is approximately every 9 hours (3 hours a day, 3 days a week).
Replace every 9 hours approx
Sensor
If the sensors are dirty,
gently wipe the surface
with the Micro-fiber cloth.
Secondary Battery
Power Button
Check that the Secondary
Battery Power Button is off.
Hopper Tray
Discard any dirt
in the hopper tray.
Brush
Remove any dirt or hair
caught in it as necessary.
2D/3D Camera
(Sensor)
LIDAR Sensor
Cliff Sensor
*It is possible to wash the Tray
with water. Make sure the Tray is
completely dry before putting it
back into the Machine.
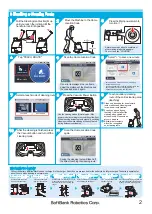
Select a cleaning route to carry out autonomous cleaning. Operate in a time when there are few
passerby and objects around the cleaning area. For safety, the Machine will operate slightly away
from the wall. When cleaning areas close to the wall, operate manually.
Stow the Steering Handle
・
Remove the Notification Pager from the Machine and
carry it with you during autonomous cleaning.
・
As for a cleaning route created automatically, its
autonomous cleaning is performed in the cleaning mode
used when teaching the route automatically.
・
Once cleaning is complete, the Machine will return to
the Home Location Code and the Pager will notify the
operator of the completion of cleaning.
3
1
2
3
4
5
6
Tap "RUN ROUTE"
Scan the Home Location
Code
If an error is displayed in a red frame, adjust
the distance of the Machine and the code
and scan it again.
Select a cleaning route/ area
to carry out the cleaning
Press the Autonomous Clean
Start / Stop Button
Check “CLEANING COMPLETE”
,
and tap “HOME”
Cleaning status of cleaning route/area is displayed.
[Teach route] cleaning complete area: blue,
incomplete area: white
[Teach boundary] cleaning complete area: blue,
incomplete area: “- - - ”
Hold the handle with both hands, and raise it
forward at an angle. Then, push it back in to
its original position.
・
The background color of dates is displayed
in gray for teach route and in blue for teach boundary.
・
A screen appears for checking whether there are any
escalators or other moving platforms. Check the
cleaning area and tap "NO".
4.Carrying Out Autonomous Cleaning
5.Machine Maintenance
【
Every day ~ every week
】