background image

1-

3

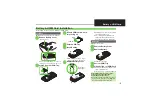
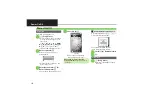
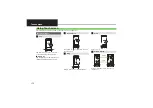
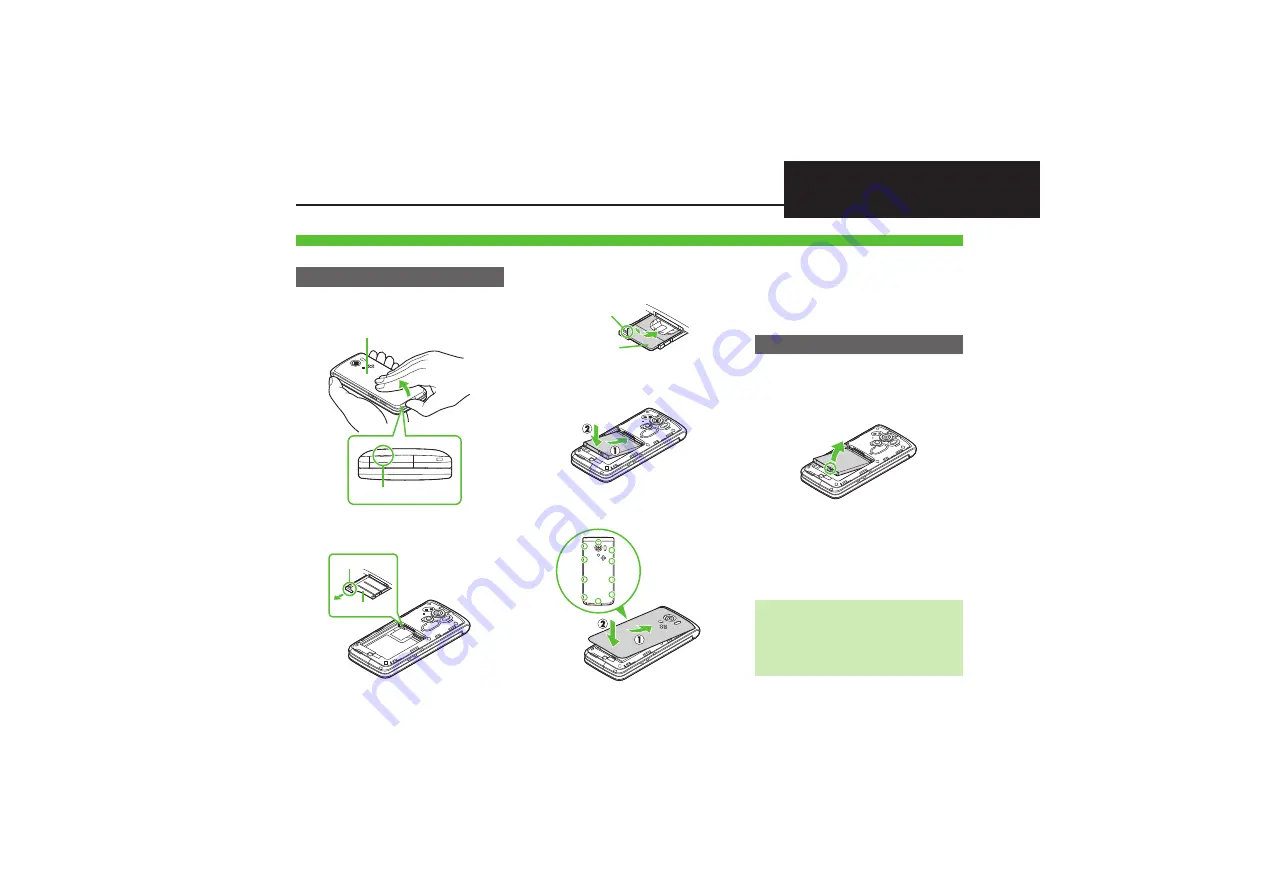
Battery & USIM Card

Do not apply excessive force to Battery or USIM Card.

USIM Card must be inserted to use handset.

1

Remove Battery Cover

.

Use notch to lift Battery Cover. Push up 
Battery Cover along edges to remove it.

2

Use tab to pull out USIM Tray

3

Slide in USIM Card with IC 
chip facing up

4

Secure USIM Tray

5

Insert Battery

.

With logo side facing up, align 
Battery terminals with contacts.

6

Replace Battery Cover

.

Fit Battery Cover into slot, then firmly 
press down along edges.

.

Close Battery Cover firmly. Debris 
trapped between gasket and base 
may expose handset to liquid/dust.

Always power off first.

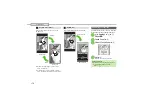
1

Remove Battery Cover

2

Remove Battery

.

Lift Battery as shown.

3

Pull out USIM Tray

4

Lift and slide out USIM Card

.

Secure USIM Tray, insert Battery and 
replace Battery Cover.

.

Take care not to lose removed USIM Card.

Battery & USIM Card Installation

Inserting

Notch

Battery Co

v

er

Ta

b

USIM Tray

Notch

USIM Card

Press firmly
along edges

Removing

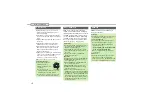
After USIM Card Removal (Contract 
Termination, Handset Upgrade/
Replacement, Repairs, Etc.)

.

Some files on handset and Memory Card may 
be inaccessible. Inserting another USIM Card 
may disable S! Appli and BookSurfing

®

.

Summary of Contents for 109SH

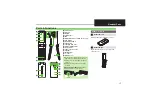
Page 1: ...f Mobile Light g m Logo h Battery Cover Keep handset closed when not in use Open handset to place or answer calls enter text etc Parts Functions 7 8 1 2 4 3 5 6 g b h d c 9 a f e Do not cover or place...

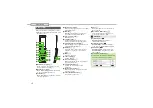
Page 2: ...functions Long Press to open Phone Book a n Key Enter n P and b Camera Key Activate Camera c Yahoo Keitai Key A Open Yahoo Keitai portal Long Press to open Bookmarks list d TV Dictionary Key Activate...

Page 3: ...edges Close Battery Cover firmly Debris trapped between gasket and base may expose handset to liquid dust Always power off first 1 Remove Battery Cover 2 Remove Battery Lift Battery as shown 3 Pull o...

Page 4: ...ol To avoid fire or electric shock do not short circuit or disassemble Battery About USIM Card Precautions Do not insert USIM Card into any other IC card device SoftBank Mobile is not liable for resul...

Page 5: ...out when Battery is full 4 Remove handset from Desktop Holder 5 Unplug AC Charger 6 Disconnect Charger connector from Desktop Holder Squeeze release tabs and pull straight out Charging Battery Desktop...

Page 6: ...ails setup starts 3 Enter last name S S Enter first name S Change Menu display option appears 4 Yes or No S Standby Choose No to enter Standby immediately after powering on A prompt appears when a d B...

Page 7: ...Tap indicator to access corresponding function e g Battery Meter window from battery strength indicator may be unavailable for some indicators Opens at the bottom for missed calls new mail etc Informa...

Page 8: ...it Orientation Landscape Orientation Some key assignments may vary with window content Display goes completely dark after set Display Saving time elapses Press any key except during a call to cancel D...

Page 9: ...ayback TV Recording handset TV Recording Memory Card 2 Memory Card Inserted Accessing Memory Card Reading Memory Card Formatting Memory Card TV Timer TV Recording Timer Set 3 Compass Indicator 4 Music...

Page 10: ...Active Bluetooth Transmission Active for multiple connections Bluetooth Talk Active IC Transmission Active S Addressbook Back up Transmission Active PC Site Browser in Use 8 Infrared Active 5 6 1 7 8...

Page 11: ...d Call Answer Phone Message Recorded Missed Call Notification New Voicemail Unread Mail Unread Delivery Report Contents Key Received Unread S Information Channel info Weather Indicator Update Location...

Page 12: ...tion operation Double Tap Tap Display twice in rapid succession within approximately 0 6 seconds Touch item for 1 seconds to move icon open menu etc Drag to move item or scribble sketch Flick to scrol...

Page 13: ...or stickers over Display Calibrate Touchscreen P 1 14 to improve response Tap item to open or execute corresponding function operation Tap Data Folder The result is the same as selecting an item with...

Page 14: ...isplay to open menu Calibrate Touchscreen to improve response Hold handset normally during calibration 1 S Settings S S f Phone G 2 Touch Panel S 3 Correct Touch Panel S 4 Yes S Follow onscreen instru...

Page 15: ...der Widget TV Phone Settings Open create messages etc Access the Internet Use S Appli including games Read e Books receive news updates etc Shoot photos or videos Play download media files Manage sche...

Page 16: ...s Use g to select Tools and Press Use f to select Clock Gauge tab Use e to select World Clock and Press Tap MENU Tap World Clock Tap Clock Gauge tab Tap Tools Example After opening World Clock Escape...

Page 17: ...l BookSurfing e Book Viewer Camera Easy Auto Camera Pro Auto Camera Quick Camera Rapid Shooting Camera Best Select Photo Fish eye Camera Miniaturize Camera HD Video Camera Pro Auto Video Camera Album...

Page 18: ...ory Mail Groups Rakutomo Link Speed Dial Mail Touch Tone Signal List Settings Manage Settings Mode Settings Display Customized Screen Sounds Alerts Date Time Language Ringer Output Earpiece Volume Cha...

Page 19: ...e Required for Reset Settings Reset All etc Center Access Code Network Password Four digit code in contract change contract details access Optional Services from landlines or set Call Barring If Secur...

Page 20: ...d security set Need UnNeed Setting to Need then Handset Code will be required to delete all files entries etc 1 In Locks menu Handset Code Settings S 2 Need UnNeed Setting S 3 Need S S Enter Handset C...

Page 21: ...ong Press Manner mode activates Suspend signal transmission and reception Handset will be unable to place receive calls send receive messages access the Internet etc 1 S Settings S S f Network 2 Offli...

Page 22: ...Date Time S 2 Set Date Time S 3 Enter the year S Enter the month S Enter the day S Enter the time S If confirmation appears choose Yes and Press 1 S Settings S S In Sound Display menu Language or S 2...

Page 23: ...2 Set Time Zone Window 3 f Select city S 4 S Standby returns 1 S Settings S S In Sound Display menu Display S 2 Standby Display S 3 Clock Calendar S 4 World Clock L etc S 5 S Standby returns Using Wo...

Page 24: ...ot insert Memory Card into USIM Card Slot Using Memory Card About Memory Card Memory Card Cautions Do not force Memory Card into or out of handset Keep Memory Card out of infants reach may cause choki...

Page 25: ...ttings S S f Phone G S Memory Card S 2 Format Card S S Yes S Offline Mode activates signal transmission and reception are suspended until formatting is complete 3 Yes S To cancel choose No and Press I...

Reviews: