Page 58
The NUC that limits spatial noise depends on the thermal conditions around the pixels. These conditions include
not only camera ambient temperature, but also effects such as the self heating generated by bias current applied
during the integration time as well as the cooling that takes place in the interval between integration cycles. While
NUC operations compensate for ambient temperature changes, this self heating and cooling is directly influenced
by variations in frame rate and is not automatically compensated for in NUC adjustments. As a result, the
External Sync control operated at rates below the specification will produce an image, but with increasing gain
and offset errors. Offset error can be compensated by 1NUC operations when performed specifically at the Frame
Rate driven by the External Sync signal. Failure to 1NUC at the current Frame Rate will result in poor imaging
when operated outside the limits.
During a 1NUC operation, the camera accumulates video frames for each pixel’s offset computation. When
performed at reduced Frame Rate, this operation takes proportionally longer to complete and may look like a non-
responsive system at really low (e.g. < 0.5HZ) external clock rates.
In applications that require minimal system delay, note that enabling the Digital Zoom function adds one Frame
delay between Detector and output Video.
10.3.3
Select Image Zoom
From the Video tab, click the bullet next to desired Zoom (1X, 2X, 3X, or 4X). The default value is 1X Zoom.
10.3.4
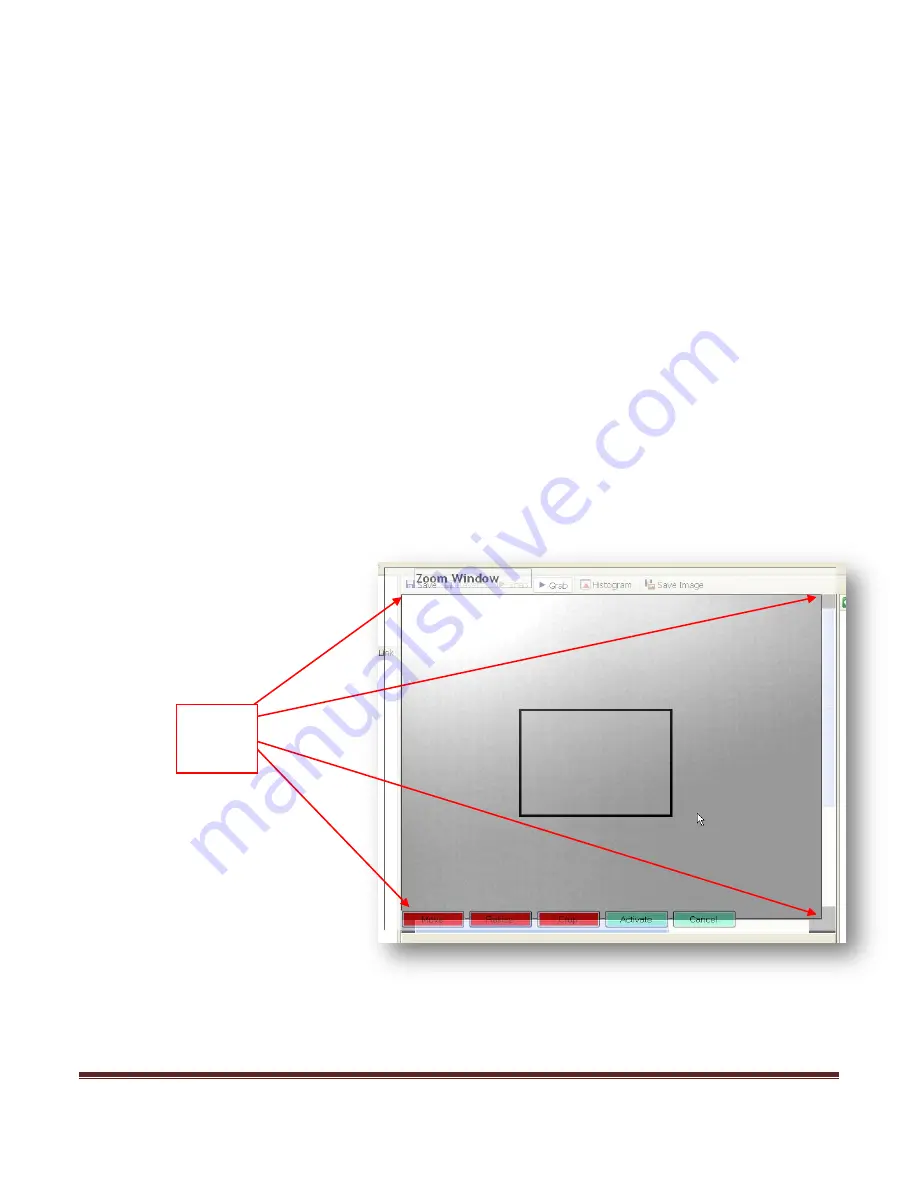
Zoom Window
The Zoom Window is, by default,
turned off. To begin using the Zoom
Window, you must align all the edges
of the Zoom Window frame to all four
corners of the live image (as displayed
by the four arrows). Aligning the
corners will ensure the accuracy of
your crop box.
First, click
Move
and drag the Zoom
frame to align the top left corner of the
box. Click
Resize
, then click and drag
the frame box to align the bottom right
corner with the live image. Once your
box is set, click
Crop
to select the area
you would like to zoom to. To adjust the
crop area, simply click
Crop
again and re-select the area. Once you are satisfied, click
Activate
to initiate the
zoom. If you would like to cancel what you have done with the Zoom Window open, click
Cancel
.
All four
corners
aligned
Summary of Contents for 1024-20C
Page 1: ...Page 1 ATOMTM 1024 User Manual TM ATOM is a trademark of Sofradir EC Inc...
Page 30: ...Page 30 Click on the Finish button when completed...
Page 45: ...Page 45 5 Select the Gig E interface...
Page 46: ...Page 46 6 Select the Set IP Address button...
Page 47: ...Page 47 7 Enter a two as the last digit of the IP address and click OK...
Page 48: ...Page 48 8 Verify the IP Configuration is Valid now...
Page 67: ...Page 67 11 1 2 13mm f1 1 Manual Focus Lens Dimensions...
Page 68: ...Page 68 11 1 3 25mm f1 2 Athermal Fixed Focus Lens Dimensions...
Page 69: ...Page 69 11 1 4 50mm f1 2 Athermal Fixed Focus Lens Dimensions...
Page 70: ...Page 70 11 1 5 50mm f1 0 Manual Focus Lens Dimensions...
Page 74: ...Page 74 11 5 ATOM 1024 G CZ 25 225mm Model Interface Physical Dimensions...
Page 75: ...Page 75 11 6 ATOM 1024 G CZ 25 150mm Model Interface Physical Dimensions...
Page 76: ...Page 76 11 7 ATOM 1024 G CZ 15 100mm Model Interface Physical Dimensions...


