background image

11

St Stopping

The variable speed trigger switch delivers higher speed with 

increased trigger pressure and lower speed with decreased 

trigger pressure.

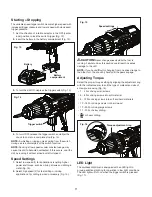
1.  Set the direction of rotation selector in the OFF (center 

lock) position to lock the switch trigger (Fig. 12).

2.  Insert the battery in the battery compartment (Fig. 13).

3.  To turn the drill ON, depress the trigger switch (Fig. 14). 

4.  To turn it OFF, release the trigger switch and allow the 

chuck to come to a complete stop (Fig. 15).

NOTE: A whistling or ringing noise coming from the switch 

during use is a normal part of the switch function.
NOTE: Running at low speeds under constant usage may 

cause the drill to become overheated. If this occurs, cool the 

drill by running it without a load and at full speed.

Speed Settings

1.  Select low speed (1) for applications requiring higher 

power and torque, such as driving screws and drilling in 

metal (Fig. 16).

2.  Select high speed (2) for fast drilling or driving 

applications, for drilling in wood or masonry (Fig. 15).

m

CAUTION! 

Never change speeds while the tool is 

running. Failure to obey this caution could result in serious 

damage to the drill.
NOTE: If you have difficulty changing from one speed range to 

the other, turn the chuck by hand until the gears engage.

Adjusting Torque

Select the proper torque setting by aligning the adjustment ring 

with the indicator arrow to suit the type of material and size of 

screw you are using (Fig. 16).

•  1 - 4 For driving small screws
•  5 - 8 For driving screws into soft material
•  9 - 12 For driving screws into soft and hard materials
•  13 - 16 For driving screws into hard wood
•  17 - 20 For driving large screws
•  21 - 23 For heavy drilling
•   For heavy drilling

LED Light

The cordless drill/driver is equipped with an LED light to 

provide additional lighting for operation in low light conditions. 

The LED light will turn on when the trigger switch is pressed 

(Fig. 17).

Fig. 13

Battery 

compartment

Battery

Fig. 14

Trigger switch

Fig. 15

Speed settings

2

1

Fig. 16

Torque adjustment ring

Summary of Contents for Sunjoe 24V-DD-CT-RM

Page 1: ...LC All rights reserved Original instructions SAVE THESE INSTRUCTIONS A Division of Snow Joe LLC Model 24V DD CT RM Form No SJ 24V DD CT RM 880E M V1 R OPERATOR S MANUAL CORDLESS DRILL DRIVER TOOL ONLY 24 VOLT MAX 2 SPEED ...

Page 2: ...reduces the risk of electric shock Personal Safety 1 Stay alert Watch what you are doing Use common sense Do not operate the drill driver when you are tired or under the influence of alcohol or drugs 2 Dress properly Do not wear loose clothing or jewelry They can get caught in moving parts Loose clothes jewelry or long hair can be caught in moving parts 3 Avoid unintentional starting Do not carry ...

Page 3: ... screws while using the tool 4 Protect your lungs Wear a face or dust mask if the operation is dusty Following this rule will reduce the risk of serious personal injury 5 Protect your hearing Wear hearing protection during extended periods of operation Following this rule will reduce the risk of serious personal injury 6 Battery tools do not have to be plugged into an electrical outlet therefore t...

Page 4: ...e to toxic battery chemicals If the battery or charger are damaged contact an authorized Snow Joe Sun Joe dealer or call the Snow Joe Sun Joe customer service center at 1 866 SNOWJOE 1 866 766 9563 for assistance Battery chemicals cause serious burns Never let a damaged battery pack contact the skin eyes or mouth If a damaged battery pack leaks battery chemicals use rubber or neoprene gloves to sa...

Page 5: ...imes only apply to discharged batteries Frequent insertion of a charged or partially charged battery pack will result in overcharging and cell damage Do not leave batteries in the charger for days on end 8 Never use or charge batteries if you suspect that it has been more than 12 months since the last time they were charged There is a high probability that the battery pack has already suffered dan...

Page 6: ...T Indicates a precaution a warning or a danger WEAR EYE PROTECTION For protection against injury wear safety goggles WARNING Do not expose the unit to rain or wet conditions Keep dry Symbols Symbols Descriptions Descriptions DISPOSAL Waste produced by electrical machine items should not be handled like normal household rubbish Please recycle where recycle facilities exist Check with your local aut...

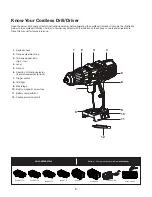
Page 7: ...ave this manual for future reference 1 Keyless chuck 2 Torque adjustment ring 3 Two speed gear train high low 4 Level 5 Air vent 6 Direction of rotation selector forward reverse center lock 7 Trigger switch 8 LED light 9 Bit storage 10 Built in magnetic screw tray 11 Battery compartment 12 Double ended driver bit 4 2 1 7 9 8 11 10 12 6 5 3 SOLD SEPARATELY Battery Charger options available at sunjo...
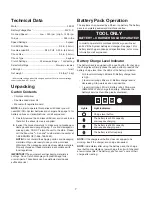
Page 8: ...TANT The equipment and packaging material are not toys Do not let children play with plastic bags foils or small parts These items can be swallowed and pose a suffocation risk Battery Pack Operation The equipment is powered by a lithium ion battery The battery pack is completely sealed and maintenance free Battery Charge Level Indicator The battery pack is equipped with a push button for checking ...

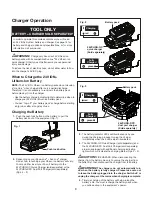
Page 9: ...r LEDs will illuminate one by one during the charging process Unplug the charger immediately when the 3 LEDs are all illuminated 4 The 24VCHRG QC Quick Charger sold separately and the 24VCHRG DPC Dual Port Charger sold separately are also equipped with additional charging indicating lights which will indicate the charging status Figs 2 3 mCAUTION FIRE HAZARD When disconnecting the charger from the...

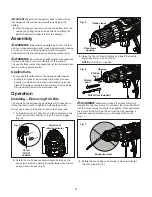
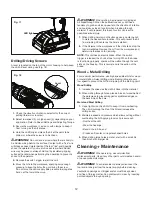
Page 10: ... Installing Removing Drill Bits The arrows on the keyless chuck indicate which direction to rotate the chuck sleeve to tighten or release the drill bit Do not use a wrench to tighten or loosen the chuck jaws 1 To install bits set the direction of rotation selector in the LOCK center lock position to lock the switch trigger Fig 4 2 Rotate the chuck sleeve counterclockwise to open the chuck jaws unt...

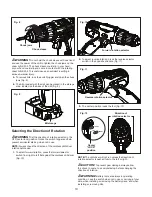
Page 11: ...the cordless drill driver rotation before use 1 To select forward rotation press the forward selector switch from right to left flat against the cordless drill driver Fig 10 2 To select reverse rotation press the reverse selector switch in the opposite direction Fig 11 3 The center position locks the tool Fig 12 NOTE The drill driver will not run unless the direction of rotation selector is pushed...

Page 12: ...g 16 2 Select high speed 2 for fast drilling or driving applications for drilling in wood or masonry Fig 15 mCAUTION Never change speeds while the tool is running Failure to obey this caution could result in serious damage to the drill NOTE If you have difficulty changing from one speed range to the other turn the chuck by hand until the gears engage Adjusting Torque Select the proper torque setti...

Page 13: ...lipping off center as the hole is started 8 If the bit jams in the workpiece or if the drill stalls stop the tool immediately Remove the bit from the workpiece and determine the reason for jamming NOTE This drill has an electric brake When the switch trigger is released the chuck stops turning When the brake is functioning properly sparks will be visible through the vent slots on the housing This ...

Page 14: ...ormation 2 Install only new batteries of the same type in your product where applicable 3 Failure to insert batteries in the correct polarity as indicated in the battery compartment or manual may shorten the life of the batteries or cause batteries to leak 4 Do not mix old and new batteries 5 Do not mix Alkaline Standard Carbon Zinc or Rechargeable Nickel Cadmium Nickel Metal Hydride or Lithium Io...

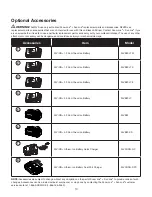
Page 15: ... are subject to change without any obligation on the part of Snow Joe Sun Joe to provide notice of such changes Accessories can be ordered online at sunjoe com or via phone by contacting the Snow Joe Sun Joe customer service center at 1 866 SNOWJOE 1 866 766 9563 Accessories Item Model 1 24V iON 1 3 Ah Lithium Ion Battery 24VBAT LTW 2 24V iON 1 5 Ah Lithium Ion Battery 24VBAT LTX 3 24V iON 2 0 Ah ...

Page 16: ...hall be construed as obligating Snow Joe Sun Joe to incorporate such design changes into previously manufactured products nor shall such changes be construed as an admission that previous designs were defective This warranty is intended to cover product defects only Snow Joe LLC is not liable for indirect incidental or consequential damages in connection with the use or misuse of the Snow Joe Sun ...

Page 17: ...16 ...

Page 18: ...17 ...

Page 19: ...18 ...

Page 20: ...sunjoe com ...

Reviews: