background image

13

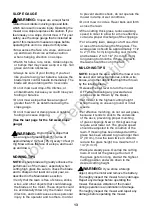
SLOPE GAUGE

WARNING:

 Slopes are a major factor 

related to accidents involving slips and falls, 

which can result in severe injury. Operating the 

mower on a slope requires extra caution. If you 

feel uneasy on a slope, do not mow it. For your 

safety, use the slope gauge that is included as 

part of this manual to measure slopes before 

operating this unit on a sloped or hilly area. 
• Mow across the face of a slope, and never 

up and down. Exercise extreme caution 

when changing direction on a slope.

• Watch for holes, ruts, rocks, hidden objects, 

or bumps that may cause a slip or a trip. Tall 

grass can hide obstacles.

• Always be sure of your footing. If you feel 

like you are losing your balance, release the 

blade/motor control handle immediately. The 

blade will stop rotating within 3 seconds.

• Do not mow near drop-offs, ditches, or 

embankments, because you could lose your 

footing or balance.

• Do not mow a slope that has an angle of 

greater than 15°, as determined using the 

slope gauge.

• Do not mow wet or damp grass. Unstable 

footing can cause slipping.

(See the last page for the full sized slope 

gauge)

WARNING:

 Do not mow a slope that 

has an angle of greater than 15° (a rise of 

approximately 2 1/2 feet [.75 m] every 10 feet [3 

m]). Mow across the face of a slope, and never 

up and down.  


MOWING TIPS

NOTE:

 A sharp blade will greatly enhance the 

performance of the mower, especially when 

cutting high grass. Be sure to check the blade 

and to sharpen it at least once per year, as 

described in the Maintenance section.
• Verify that the lawn is free of stones, sticks, 

wires, and other objects that could damage 

the blades or the motor. These objects could 

be accidentally thrown by the mower in any 

direction, and could cause serious personal 

injury to the operator and to others. In order 

to prevent electric shock, do not operate the 

mower in damp or wet conditions.

• Do not mow in circles. Travel back and forth 

across the lawn.

• When cutting thick grass, reduce walking 

speed in order to allow for a more effective 

cut and a proper discharge of the clippings.

• For a healthy lawn, always cut off one-third 

or less of the total length of the grass. The 

average lawn should be approximately 1 1/2 

to 2” (3.8 to 5 cm) long during cool months, 

and between 2" to 3 1/4" (5 cm to 8.3 cm) 

long during hot months. If there is growth, 

the lawn should be cut in the fall.

MULCHING TIPS

NOTE: 

Inspect the area where the mower is to 

be used, and remove all stones, sticks, wire, 

bones, and other debris that might be thrown 

by the rotating blade.
• Release the bail lever to turn the mower 

OFF when crossing any graveled area 

(stones can be thrown by the blade).

• Set mower to the highest cutting height 

when mowing on uneven ground or in tall 

weeds.

• For effective mulching, do not cut wet grass, 

because it tends to stick to the underside 

of the deck, preventing proper mulching 

of grass clippings. New or thick grass may 

require a narrower cut. The ground speed 

should be adjusted to the condition of the 

lawn. If mowing has been delayed and the 

grass has been allowed to grow longer than 

4" (10 cm), mow the lawn twice in order to 

reduce the grass height to a maximum of 3 

1/4” (8.3 cm).

• Walk at a steady pace. Overlap the cutting 

rows. Do not let the grass get too tall. If 

the grass gets too long, start at the highest 

cutting position and work down to the 

desired cutting height.

WARNING:

 If you strike a foreign 

object, stop the motor and remove the battery. 

Thoroughly inspect the mower for any damage. 

Repair any damage before operating the 

mower. Excessive vibration of the mower 

during operation is an indication of damage. 

Thoroughly inspect the mower and repair any 

damage before operating the mower.  

Not 

for 

Reproduction

Summary of Contents for SP60V

Page 1: ...21 60V Lawn Mower Model SP60V Rev 01 11 20 15 SNAPPER IS A TRADEMARK OF BRIGGS STRATTON POWER PRODUCTS GROUP LLC AND IS USED UNDER LICENSE N o t f o r R e p r o d u c t i o n...

Page 2: ...rrent Type or a characteristic of current No Load Speed Rational speed at no load Double Insulation Double insulated appliance min Per Minute Revolutions strokes surface speed orbits etc per minute We...

Page 3: ...perty damage SYMBOL SIGNAL MEANING SPECIFICATIONS Motor 60V Brushless No load speed 2800 RPM Height adjustments 1 3 8 3 3 4 3 5 9 5 cm Functions 3 in 1 Mulch side discharge or rear bag Weight with 4Ah...

Page 4: ...o not wear loose clothing or jewelry that can get caught in moving parts The wearing of protective gloves and safety footwear is recommended Many injuries occur as a result of the mower being pulled o...

Page 5: ...rs of age and older must read and understand the operating instructions and safety rules in this manual and must be trained and supervised by a parent Stay alert and turn the mower off if a child or a...

Page 6: ...isk of electric shock use only the charger that is provided by the manufacturer to charge the battery DO NOT ABUSE THE CHARGE CORD Never carry the charger by the cord Do not disconnect the charger fro...

Page 7: ...RT NO Lawn Mower 1 Mulching Plug 1 Side Discharge Chute 1 Grass Catcher Bag 1 Handle Knob 4 Handle Bolt 4 60V Battery Model SBA460V 1 60V Charger Model SCH60V 1 Owner s Manual 1 Quick Start Guide 1 N...

Page 8: ...omplete and you are ready to mow Failure to comply could result in accidental starting and possible serious personal injury WARNING Never operate the mower without the proper safety devices in place a...

Page 9: ...rectly the hooks on the grass catcher will extend through the openings on the rear discharge door NOTE When using the grass catcher do not install either the side discharge deflector or the mulching p...

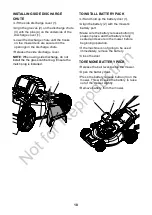
Page 10: ...alled TO INSTALL BATTERY PACK Lift and hold up the battery door 1 Align the battery 2 with the mower s battery port Make sure the battery release button 3 snaps in place and that battery is fully seat...

Page 11: ...oduct familiarize yourself with all operating features and safety rules OPERATION Height adjustment lever Bail lever Grass catcher bag Lower handle Side discharge chute Rear chute cover Handle knobs F...

Page 12: ...in foreign objects being thrown into the eyes which can cause severe eye damage Always wear safety glasses while operating the mower and while performing any adjustments or repairs WARNING Ensure tha...

Page 13: ...r and to others In order to prevent electric shock do not operate the mower in damp or wet conditions Do not mow in circles Travel back and forth across the lawn When cutting thick grass reduce walkin...

Page 14: ...and remove the battery Lift the rear discharge cover Lift the grass catcher bag by its handle to remove from mower Empty grass clippings Lift the rear discharge cover and reinstall the grass catcher...

Page 15: ...wn Using a 27 mm socket or wrench turn the blade nut CLOCKWISE in order to secure the blade NOTE Be sure to replace the parts in the exact order in which they were removed When installing the cutting...

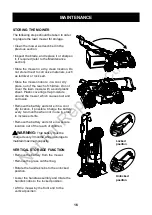
Page 16: ...ound the mower which causes rust and corrosion Remove the battery and store it in a cool dry location if possible Charge the battery every two months when not in use in order to increase its life Remo...

Page 17: ...with care Keep the mower blade sharp and clean Mower blades are sharp and can cut Wrap the blades or wear gloves and use extra caution when servicing Keep all nuts bolts and screws tight in order to...

Page 18: ...it and replace it with a new battery pack DO NOT ATTEMPT TO REPAIR IT Follow these instructions in order to avoid injury and the risk of fire explosion or electric shock and to avoid damage to the env...

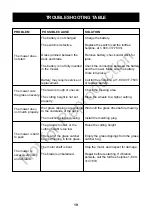
Page 19: ...he cutting height is too low The rear of the grass catcher bag is dragging in thick grass The motor shaft is bent The blade is unbalanced Charge the battery Replace the switch call the tollfree helpli...

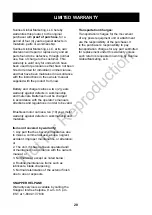
Page 20: ...e valid Brushless motor carries a ten 10 year motor warranty against defects in workmanship and materials Items not covered by warranty 1 Any part that has become inoperative due to misuse commercial...

Page 21: ...VIEW 1 2 7 9 19 10 10 33 14 16 18 11 27 24 8 12 13 3 5 6 17 17 18 18 4 22 24 29 23 32 30 30 30 30 30 34 28 31 31 35 31 21 21 21 20 3 4 25 26 26 37 38 39 40 29 18 18 15 11 36 N o t f o r R e p r o d u...

Page 22: ...justment bracket left 1 17 322011519 Screw 2 18 322021519 Screw 8 19 333051519 Height adjustment bracket right 1 20 3220951 Screw 5 21 32204113 Screw 6 22 311141519 Height adjustment bar assembly 1 23...

Reviews: