Snapper LT145H33GBV Safety Instructions & Operator'S Manual Download Page 31


31 

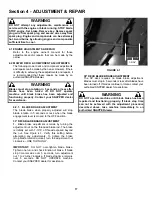
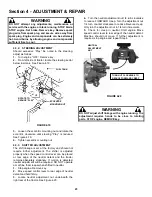
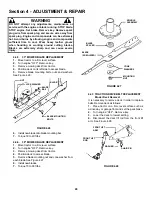
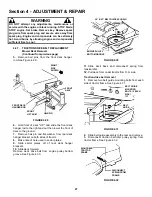
Section 4 - ADJUSTMENT & REPAIR 


WARNING 

DO NOT OVERFILL! DO NOT attempt to service or 
charge the battery while it is installed on the machine. 
DO NOT use “BOOST” chargers on the battery. 
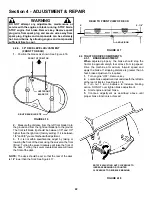
 

4.5.5. BATTERY 

TESTING 

There are two types of battery tests: Unloaded and 
Loaded. The unloaded test is the procedure that will 
be discussed. It’s the simplest and most commonly 
used. An unloaded test is made on a battery without 
discharging current. To perform unloaded testing, 
check charge condition using either a hydrometer or 
voltmeter. 
 
1.  Using a voltmeter, voltage readings appear 
instantly to show the state of charge. Remember to 
hook the positive lead to the battery’s positive 
terminal, and the negative lead to the negative 
terminal. 
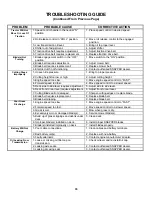
2.  A hydrometer measures the specific gravity of 
each cell. The specific gravity tells the degree of 
charge; generally, a specific gravity of about 1.265 to 
1.280 indicates full charge. A reading of 1.230 to 
1.260 indicates the battery should be charged. The 
chart on the next page shows the charge level as 
measured by syringe float hydrometer, digital 
voltmeter and five ball hydrometer. 
 
4.5.6 

NEW BATTERY PREPARATION 

1.  Remove battery from carton. 
2.  
Place battery in a well ventilated area on a level non-
concrete surface. 
3.  Remove battery cell caps. Fill cells as required 
with electrolyte (purchased separately) to proper level. 
Fill to 3/16” above cell plates. Filling battery with 
electrolyte will bring the battery to 80% charged state. 

4.  With cell caps removed, connect battery charger to 
battery terminals; RED to positive (+) and BLACK to 
negative (-) terminal. 
 

IMPORTANT: 3/16” above cell plates is the recommended 
level. However do not try to measure this dimension.  Never 
place anything in battery other than specified electrolyte. 
 

5.  Slow charge the battery at 1 amp for 2 hours to 
bring the battery to full charge. 
6.  After charging, check level of electrolyte and add 
as needed to bring level to 3/16” above cell plates. 
7.  Reinstall cell caps. 
8.  Slide battery partially into battery housing. 
9. 

Connect positive (+) cable (red) first, from wiring 

harness to the positive terminal (+) on battery using bolt 
and nut provided in hardware bag. Connect negative (-) 
cable (black) last, to negative terminal (-) on battery 
using bolt and nut. Apply a small amount of grease over 
terminals to prevent corrosion. 
10.  Insert battery completely into battery housing. 
11.  Reinstall seat assembly. 


WARNING 

Shield the positive terminal with terminal cover 
located on battery harness. This prevents metal from 
touching the positive terminal, which could cause 
sparks. Cables must be connected to battery 
terminals in the proper position. RED (Positive) cable 
must go to the ( + ) terminal. BLACK (Negative) cable 
must go to the ( - ) terminal. 


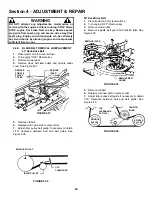
4.5.7.  BATTERY TESTING 


Battery Condition Chart 

State of Charge 

Syringe Hydrometer 

Digital Voltmeter 

Five Ball Hydrometer 

100% Charged w/ Sulfate Stop 

1.280 

12.80v 

Five Balls Floating 

100% Charged 

1.265 

12.60v 

Four Balls Floating 

75% Charged 

1.210 

12.40v 

Three Balls Floating 

50% Charged 

1.160 

12.10v 

Two Balls Floating 

25% Charged 

1.120 

11.90v 

One Ball Floating 

0% Charged 

Less than 1.100 

Less than 11.80v 

Zero Balls Floating 


Summary of Contents for LT145H33GBV

Page 1: ...ation H Hydrostatic Transmission B Briggs Stratton K Kohler Engine 33 33 Cutting Width Mower V Over Head Valve Type Engine Thank you for buying a SNAPPER product Before operating the Lawn Tractor read...

Page 2: ...DO NOT operate machine on slopes exceeding 15 degrees 27 grade 2 Exercise EXTREME CAUTION on slopes above 10 degrees 18 grade Turn blades OFF when traveling uphill Use a slow speed and avoid sudden o...

Page 3: ...light 13 Move joystick if equipped SLOWLY to maintain control during speed and directional changes OPERATION Continued From Previous Column 14 Exercise CAUTION when pulling loads Limit loads to those...

Page 4: ...Spark Plug 16 Hydrostatic Transmission Oil 16 SECTION 4 ADJUSTMENTS REPAIR 17 32 Engine Adjustments Repair 17 Mower Deck Component Adjustments 17 Blade Brake Adjustment 17 33 Deck Blade Brake Adjustme...

Page 5: ...wner s Manual before operating this machine Keep these manuals available for future reference CONTROLS All operators should be acquainted with the operator s controls before attempting start up or ope...

Page 6: ...engine and tractor of any accumulation of dirt grass oil etc Keep engine air intake screens and cooling fins clean at all times 2 1 6 With engine OFF move the tractor outside and add fuel to the fuel...

Page 7: ...work DO NOT OPERATE the tractor until the interlock has been repaired FIGURE 2 5 5 Choke engine for cold starting by moving engine speed control to CHOKE position Little or no choking will be needed...

Page 8: ...o ON See Figure 2 8 FIGURE 2 8 WARNING DO NOT operate blades in reverse STOP BLADES LOOK and SEE behind and down for children pets and hazards before and while backing 2 4 STOPPING ENGINE BLADE WHEEL...

Page 9: ...Fully depress clutch brake pedal 2 Move park brake lever up into slot See Figure 2 12 FIGURE 2 12 2 4 5 RELEASING PARK BRAKE 1 Fully depress clutch brake pedal Move park brake lever DOWN to release p...

Page 10: ...to engage hydro transmission See Figure 2 15 5 Set park brake NOTE The transmission will not propel the tractor if it is left in the ROLL position WARNING DO NOT disengage the hydro transmission and...

Page 11: ...is an override lever provided This lever can be pushed and held before starting the blades and will allow reverse operation until the blade engagement lever is moved to the OFF position at which time...

Page 12: ...oil has drained push drain body IN and rotate clockwise to close 4 Fill engine with new motor oil as specified in engine owner s manual WARNING The following procedure requires the engine and blades t...

Page 13: ...d replace engine air cleaner See Figure 3 5 Refer to engine owner s manual for service instructions 3 3 2 MOWER COMPONENTS 1 Check deck drive belt for proper tension Refer to Section CHECK DECK DRIVE...

Page 14: ...3 Clutch Brake Pivot The clutch brake pivot is located on the left hand underside of the tractor and is lubricated with one shot of general purpose grease See Figure 3 7 FIGURE 3 7 4 Steering Sector G...

Page 15: ...r oil FIGURE 3 12 10 Deck Lift Mechanism Lubricate all wear and pivot points of the deck lift 3 4 SERVICE ANNUALLY Perform all maintenance as described in Section SERVICE EVERY 25 OPERATING HOURS Also...

Page 16: ...h gasoline Refer to engine owner s manual for fuel specifications 3 4 3 SPARK PLUG Remove and replace engine spark plug Refer to engine owner s manual for correct replacement plug and gap specificatio...

Page 17: ...y adjusted will stop blade rotation in 5 seconds or less when the blade engagement lever is moved to the OFF position 33 DECK BLADE BRAKE ADJUSTMENT 1 Blade brake adjustment is made by turning the adj...

Page 18: ...o adjust tension remove extension rod mounting bolt and nut See Figure 4 4 9 Move extension rod to next hole towards rear of deck and secure with mounting bolt and nut 10 Measure extension spring with...

Page 19: ...EL ADJUSTMENT SIDE TO SIDE NOTE Adjust tire pressure 12 P S I front and rear before adjusting deck 1 Move tractor to a firm level surface 2 Turn engine OFF Remove key 3 Place a piece of angle iron und...

Page 20: ...DECK LEVEL ADJUSTMENT FRONT TO REAR FRONT LIFT ROD If the sector plates are in their lowest setting and proper level cannot be obtained adjust the front lift rod as follows 1 Move deck lift lever to 5...

Page 21: ...istance from each blade tip to the floor The measurements should be within 1 8 of each other Factory setting FIGURE 4 14 9 If the difference is less than 1 8 go to next section Front to rear level If...

Page 22: ...rning the swivel clockwise will raise the front of the deck Turning the swivel counterclockwise will lower the front of the deck NOTE The deck should be set so that the rear of the deck is 1 4 lower t...

Page 23: ...control lever can be placed at rear edge of the neutral detent and the tractor remains absolutely stationary If motion is detected neutral adjustment will be required DO NOT operate a machine that cr...

Page 24: ...uld less tension be required move stationary idler towards right side of tractor See Figure 4 21 6 Secure stationary idler with mounting bolt 7 Place spark plug wire onto spark plug Set park brake Sta...

Page 25: ...e ragged and lawn will usually turn brown Sharpen standard blades as follows 1 Move tractor to a firm level surface 2 Turn engine OFF Remove key 3 Remove mowing deck from tractor 4 Remove mower blade...

Page 26: ...IGURE 4 26 6 Install new blade onto blade mounting bar 7 Torque 30 to 40 ft lbs 4 4 6 38 MOWER BLADE REPLACEMENT 1 Move tractor to a firm level surface 2 Turn engine OFF Remove key 3 Remove mowing dec...

Page 27: ...washer from rear deck hanger bracket on both sides of tractor 8 Make note of hole used in sector plates 9 Slide sector plates off of rear deck hanger brackets 10 Slide deck forward Remove deck drive...

Page 28: ...de 7 Pull belt until it can be removed from transmission pulley Traction drive belt replacement 1 Place new traction drive belt over transmission pulley and span to engine pulley 2 Place belt into top...

Page 29: ...ee Figure 4 37 FIGURE 4 37 5 Remove old belt 6 Replace with new belt in reverse order 7 Adjust idler pulley belt guide if necessary to obtain 1 16 clearance between belt and belt guide See Figure 4 38...

Page 30: ...acid Battery acid is corrosive Rinse empty acid containers with water and mutilate before discarding If acid is spilled on battery bench or clothing etc Flush with clear water and neutralize with bak...

Page 31: ...With cell caps removed connect battery charger to battery terminals RED to positive and BLACK to negative terminal IMPORTANT 3 16 above cell plates is the recommended level However do not try to measu...

Page 32: ...6 1916 Lawn Roller 6 1915 6 1915 42 Snow Blade 6 1352 6 1352 44 Dozer Blade Spring Trip 6 1881 6 1881 Dozer Blade Support Kit 6 1370 6 1370 40 Snow Thrower 6 1880 6 1880 Debris Blower 6 1883 6 1883 R...

Page 33: ...33 SECTION 5 ELECTRICAL SYSTEM SCHEMATIC WIRING HARNESS P N 2 6616 LT145H33GBV LT145H38 GBV SCHEMATIC WIRING HARNESS P N 2 4815 LT15OHGKV...

Page 34: ...position 2 Move engine speed control to FAST 3 Fuel tank empty 3 Fill with fuel to proper level 4 Engine air pre cleaner and or air cleaner dirty 4 Clean free of all debris 5 Spark plug defective or...

Page 35: ...too fast 4 Move speed control to a slower speed 5 Deck side to side level requires adjustment 5 Adjust side to side level 6 Deck front to rear level requires adjustment 6 Adjust front to rear level 7...

Page 36: ...k Pressures Page 6 X X Drive Belts Check For Wear And Tension Pages 26 28 X X Mower Blades Check Wear Damage And Blade Brake Pages 13 25 26 X Mower Deck Clean Debris Accumulation Page 6 X X X Mower De...

Page 37: ...ginal purchase date SNAPPER will not be responsible for any installation cost incurred The battery warranty only covers original equipment batteries and does not cover damage to the battery or machine...

Page 38: ...38 PRIMARY MAINTENANCE...

Page 39: ...39 PRIMARY MAINTENANCE...

Page 40: ...40 PRIMARY MAINTENANCE...

Page 41: ...41 PRIMARY MAINTENANCE...

Page 42: ...________________________________________ ___________________________________________________________________ ___________________________________________________________________ _______________________...

Page 43: ...________________________________________ ___________________________________________________________________ ___________________________________________________________________ _______________________...

Page 44: ...you have any questions about your Snapper product contact your local authorized Snapper dealer or contact Snapper Customer Service at Snapper McDonough GA 30253 Phone 1 800 935 2967 COPYRIGHT 2000 SNA...

Reviews: