background image


10 

INSTALLATION


Make sure that the supply voltage is 230 volt and a minimum 
of 30 amp service.   When mounting a plug, make sure it has 
an adequate capacity, and that the 

"yellow/green 

conductor"

  of the power supply cable is connected to the 

ground or “earth”  terminal. The blue and brown wires need 
to be connected to the “hot leg” terminals 

 
           WARNING 

Only skilled personnel should install the machine.  All 
connections must be carried out according to current 
regulations. 
See complete listing of safety messages at the beginning of 
this manual. 


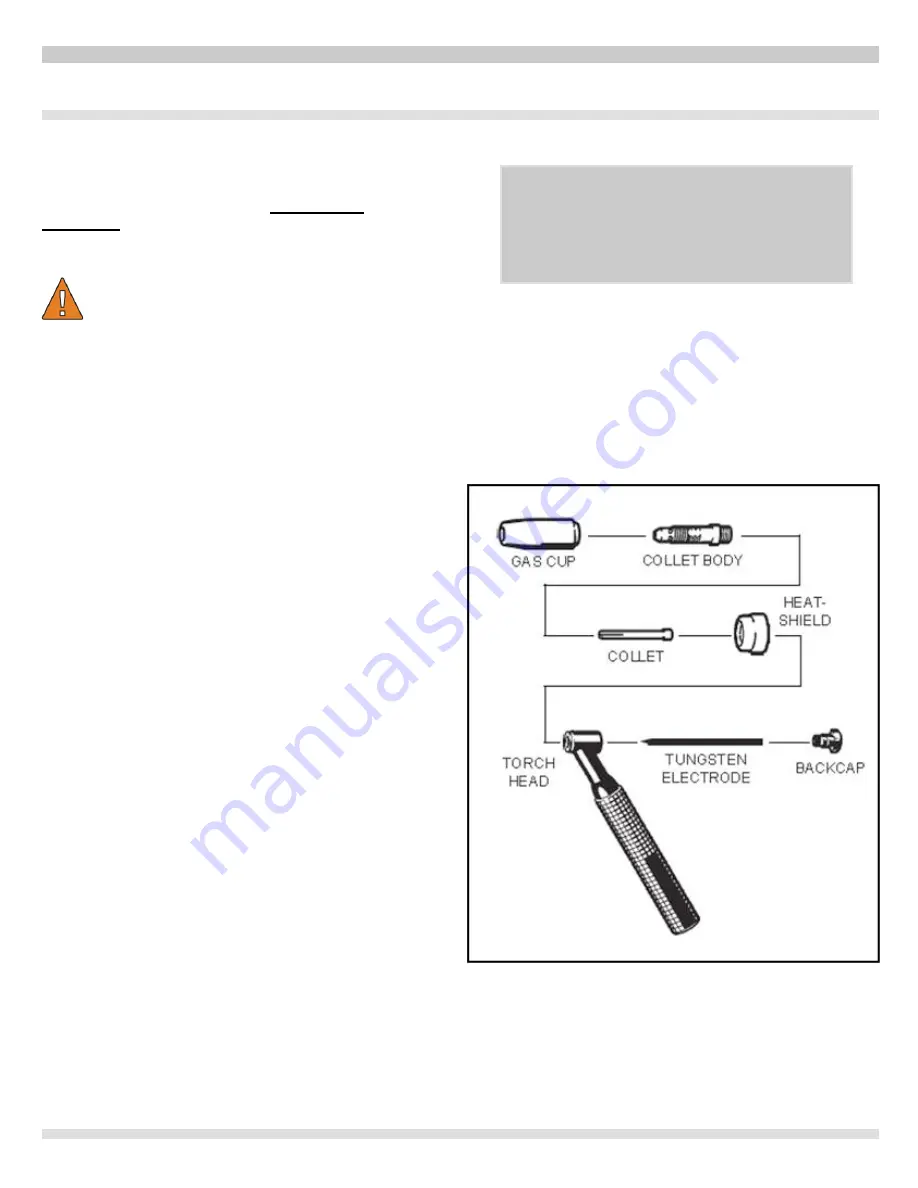
TORCH HEAD ASSEMBLY 


1.  Select the size tungsten electrode to be used  

– see table A 

 
2.  Make sure the Teflon heat shield is in place. 
 
3.  Locate the matching size Collet and Collet body. 
 
4.  Drop the Collet, slit-end down, into the Collet body. 
 
5.  Screw assembly into the torch head, heat shield side, 

and tighten firmly. 

 
6.  Install a Gas cap, screw into place seating the cup 

against the Teflon heat shield.   

 
7.  Insert tungsten electrode, prepped end first, thru the 

torch head, Collet and center hole of the Collet body. 

 
8.  Allow tungsten electrode to extend past  the cup ~ 3 

times the electrode diameter. 

 
9.  Screw Backcap into torch head and tighten firmly.  

Review the exploded view on the next page.    


ASSEMBLING THE UNIT/START UP GUIDE 


For detailed machine start up see  

“SETTING UP YOUR NEW  

TIG WELDING SYSTEM”

.


Summary of Contents for TIG 150i

Page 1: ...needed or can also be placed onto a cart for traditional use around the shop Welding capabilities range from extremely thin up to 1 4 on multiple passes The welder features ease of use for quick start up in addition to multiple features such as upslope downslope pulse and frequency adjustment or the most experienced welder Applications include automotive repair collision repair motorsports manufac...

Page 2: ...ing the Unit Start up Guide 10 TIG Welding Introduction 11 12 DC TIG Welding 13 AC TIG Welding 14 15 Optional Foot Remote Amperage Control 16 Stick Arc Welding 17 Troubleshooting Maintenance 18 Replacement Parts 19 20 Parts List 19 Standard and Optional Accessories 20 Wiring Diagram 21 Warranty Service and Repair 22 TABLE OF CONTENTS ...

Page 3: ... this section contain three different type styles Normal type states the hazard Bold type states how to avoid the hazard Italic type states the possible consequences of not avoiding the hazard An icon when present gives a graphical description of the potential hazard Arc Welding DANGER Electric welding or plasma cutting cause ultra violet rays and weld spatter Bystanders will be exposed to ultravi...

Page 4: ...ock flames and explosion can cause serious injury Electrical and Magnetic Fields WARNING Welding may cause localized Electrical and Magnetic Fields around cables and power sources The magnetic fields created by high currents may affect the operation of medical equipment Route the electrode and work cables together Do not place your body between the electrode torch and work cables Never coil the el...

Page 5: ...I1 eff This is the maximum value of the actual current absorbed considering the duty cycle This value usually corresponds to the capacity of the fuse delayed type to be used as a protection for the equipment IP23S Protection rating for the housing Grade 3 as the second digit means that this machine may be stored but it is not suitable for use out doors in the rain unless it is protected S Suitable...

Page 6: ...stable post gas prevents air from getting to material before it cools Pulsed arc for working even on thin sheets where the heat transferred must be kept to a minimum Tunnel design construction allowing an exceptional cooling efficiency keeping those components that suffer in dusty environments such as electronic circuits out of the cooling flow AC balance adjustment or penetration and tungsten con...

Page 7: ...6 The LEDs light alongside the various symbols to display your choice F N M L Z Y J AA G B C D AE H T A V P X E W Q U R S O AC AB AD DESCRIPTION OF EQUIPMENT ...

Page 8: ...ic This program differs from the previous one in that the arc is both started and shut off by pressing and releasing the torch trigger The Pulsed welding feature varies the weld current from the main welding current Peak Amperage high heat and the second level of welding or base current Background Amperage low heat levels The TIG150i has two 2 different weld settings for the pulse features 2 stage...

Page 9: ...the half cycles of the square wave when working in TIG AC when welding aluminum alloys The point where the two half waves meet is zero The TIG150i offers 3 positions Balanced Cleaning and Penetration Penetration electrode negative is when the Wave Balance R is set clockwise from the 0 position with non flashing numbers between 1 8 on the display Z This is set to produce the more time at electrode ...

Page 10: ...ile welding materials that are crack sensitive and or to eliminate the crater at the end of the weld X LED Post gas Adjusts the time gas flows after welding ends 0 30 sec Post Gas is required to cool the tungsten rod and weld puddle and to prevent contamination of tungsten and weld Increase post gas time if tungsten or welds have a dark appearance Note only those LEDs that refer to the chosen weld...

Page 11: ...Select the size tungsten electrode to be used see table A 2 Make sure the Teflon heat shield is in place 3 Locate the matching size Collet and Collet body 4 Drop the Collet slit end down into the Collet body 5 Screw assembly into the torch head heat shield side and tighten firmly 6 Install a Gas cap screw into place seating the cup against the Teflon heat shield 7 Insert tungsten electrode prepped...

Page 12: ...d Read complete listing of safety messages at the beginning of this manual 1 The first time the machine is turned on select the process and mode using the push buttons A and E and the welding parameters by means of the key P and the knob AA 2 The type and diameter of the electrode to be used must be selected according to table A TABLE A Inches mm DC AC frequency 50 60Hz Pos Max Penetration Pos Bal...

Page 13: ... set to a value of 20 25 CFH If you are using gas lens type accessories the gas throughput may be reduced 4 The diameter of the ceramic nozzle must be 4 to 6 times the diameter of the electrode 5 Use D I N 10 protective glasses for up to 75A and D I N 11 from 75 A up ...

Page 14: ... AA Knob Adjusts the slope up time while watching the Z display Z Display Displays the settings selected Set the slope up to 0 seconds Push the P Selector Right Arrow until the T LED main welding current display lights 10 130A in MMA and 5 150A in TIG Turn the AA knob while watching the Z display Z DISPLAY Adjust the display to the required main welding amperage Rule of Thumb 1 amp per 001 of plat...

Page 15: ...he current frequency to 60 Hz Push the P Selector Right Arrow until the R LED wave balance display lights R LED settings balance 0 Cleaning from 1 8 Penetration from 1 8 Turn the AA Knob watching the Z Display Set the wave balance to the 0 position Push the P Selector Right Arrow until the O LED electrode diameter display lights Displays the electrode diameter The choice of electrode diameter rang...

Page 16: ... guide for setting up the amperage May require multiple passes Push the P Selector Right Arrow until the W LED slope down display lights W LED Slope down This is the time in which the current reaches the minimum and the arc shuts off 0 10 seconds Turn the AA Knob watching the Z Display Set the slope down to 0 seconds Push the P Selector Right Arrow until the X LED post gas display lights Post Gas ...

Page 17: ...D L LED TIG welding with arc started with high frequency NOT AVAILABLE IN THE MMA MODE G LED Continuous 2 stage TIG welding manual Push the P Selector Right Arrow until the T LED main welding current display lights 10 130A in MMA and 5 150A in TIG Activate the foot pedal or RAD to the maximum pedal or slider fully depressed position While holding down the pedal to maximum turn the AA knob while wa...

Page 18: ...ble making sure that there is good electrical contact WARNING Do NOT touch the electrode clamp simultaneously with the earth clamp Read complete listing of safety messages at the beginning of this manual 1 Turn the machine on to l using the switch AF 2 Select the MMA procedure by pressing the button A LED B lit 3 Adjust the current based on the diameter of the electrode the welding position and th...

Page 19: ...t the supply voltage is above 280V 5 During welding that the voltage exceeds 300V switch wait 5 seconds and switch it on again If the problem has been corrected the welding machine will begin operating again NOTE If the supply voltage is below 170V at start up no LED will light and the fan is powered If the message E2 appears on the display the machine requires technical service 800 ABC WELD TIG W...

Page 20: ...19 REPLACEMENT PARTS PARTS LIST WHEN ORDERING SPARE PARTS PLEASE STATE THE MODEL NUMBER AND SERIAL NUMBER AND PART NUMBER NEEDED ...

Page 21: ...20 REPLACEMENT PARTS STANDARD AND OPTIONAL ACCESSORIES 41 42 43 44 46 47 49 50 51 52 45 48 ...

Page 22: ...21 WIRING DIAGRAM ...

Page 23: ...r than Seller s authorized representatives e installation repair or maintenance other than specified operator maintenance of the Equipment or related equipment attachments peripherals or optional features by other than Seller s authorized representatives D improper or negligent use application operation care cleaning storage or handling E fire water wind lightning or other natural causes F adverse...

Reviews: