8
DEFROSTING, CLEANING AND CARE
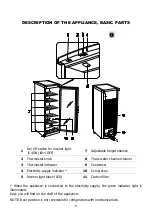
THE APPLIANCE COMPARTMENT DEFROSTS AUTOMATICALLY. Drops of ice that form on
the back wall of the refrigerator compartment thaw during the time the compressor is not
working and the thaw water runs down the thaw water runoff channel to the tray on top
of the compressor, where it evaporates.
REGULARLY CLEAN THE APPLIANCE.
Remember that before cleaning the back part of the appliance body you
must disconnect the appliance from the electrical energy supply socket by
pulling the plug out of the electricity outlet.
•
Protect the appliance inner surfaces and plastic parts from fats, acids
and sauces. In case of accidental spills – immediately clean. Clean the
appliance inner surfaces.
•
Regularly clean the hermetic gaskets of the doors. Wipe dry.
•
◄
REGULARLY CLEAN THE THAW WATER CHANNEL SPACE WITH A
SPECIAL CLEANER 8 FOR THAT PURPOSE (see fig. 1).
•
At least once a year clean dust away from the back part of the
appliance body and the compressor. A soft brush, electrostatic cloth
or vacuum cleaner may be used for cleaning.
•
DO NOT use detergents containing abrasive particles, acid, alcohol or benzene for
cleaning the appliance inner and outer surfaces. Outer of the doors – glass – clean with
agents intended for glass cleaning. DO NOT use for cleaning cloths or sponges that have
coarse surfaces intended for scrubbing.
•
If the refrigerating appliance is left empty for long periods, switch off, defrost, clean,
dry, and leave the door open to prevent mould developing within the appliance.
OPERATION PROBLEMS AND THEIR SOLUTIONS. What if …
•
The appliance is plugged in to the mains but it does not work and the
electricity supply voltage indicator is not illuminated. Check that your house
electricity supply installations are in order. Check that the plug is correctly inserted into
the electricity supply socket.
•
The noise has become louder. Check that the appliance is standing stable, on a level
place. To make it level, regulate the front feet. Check if the appliance is not touching
any furniture, and that no part of the refrigeration system at the back part of the
appliance body is touching the wall. Pull the appliance away from any furniture or walls.
Check that the cause of increased noise isn’t due to bottles, cans in the appliance that
might be touching each other.
•
Water has appeared at the bottom of the refrigerator compartment. Check
whether a thaw water channel space isn’t blocked. Clean the thaw water channel space
with a cleaner intended for that purpose.
•
Water has appeared under the appliance. The thaw water collection tray has
slipped off the compressor. Place the tray on top of the compressor.
•
When the appliance door is opened, the rubber sealing gasket pulls out. The
gasket is smeared with sticky foodstuffs (fat, syrup). Clean the sealing gasket and the
groove for it with warm water containing soap or dishwashing detergent and wipe dry.
Put the rubber sealing gasket back into the place.
Summary of Contents for WD35SM
Page 1: ...WD35SM Instruction for Use...


