background image

www.smoothfitness.com

33 


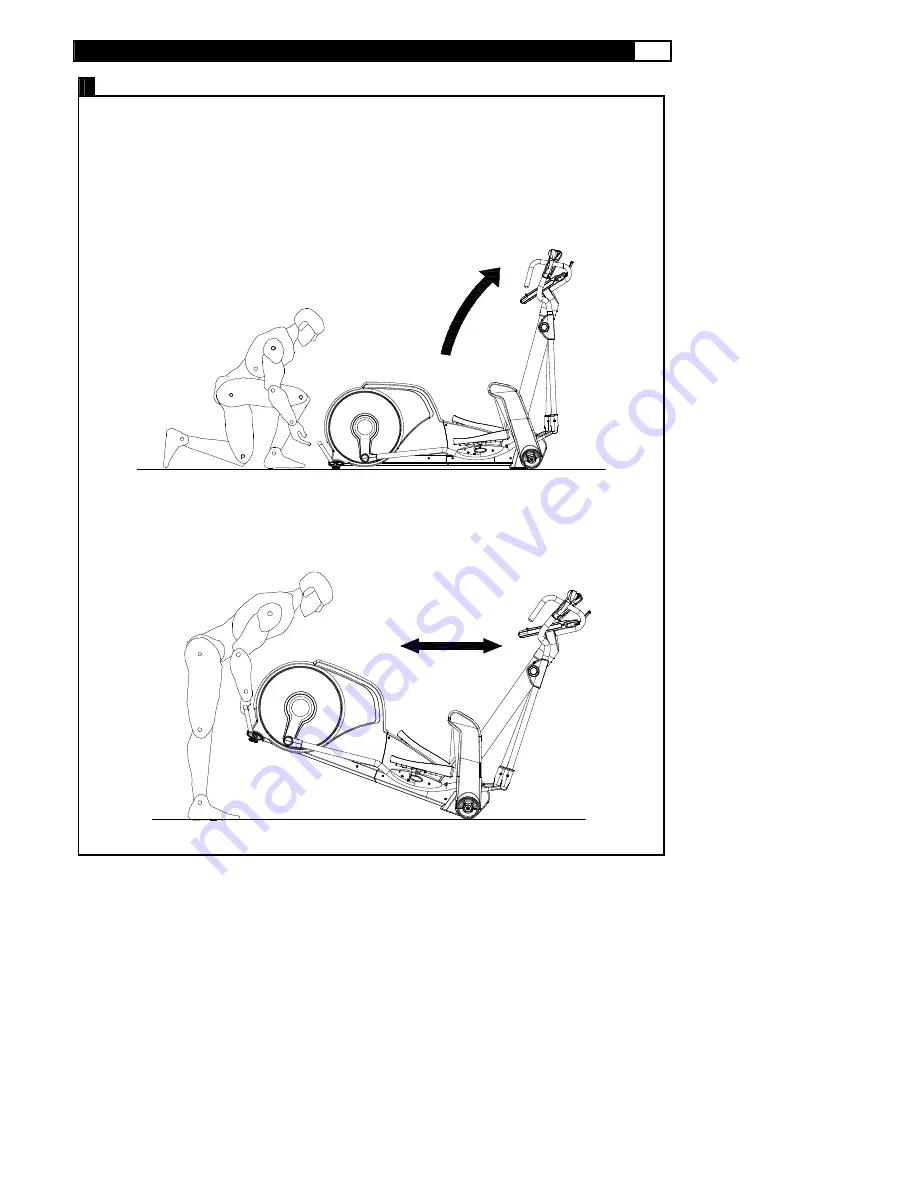
TRANSPORT INSTRUCTION 


TRANSPORT INSTRUCTIONS: 
 

To transport your 

AGILE Dynamic Motion Trainer

 simply lift the back end and roll it away to the desired location, as 

shown. 


Summary of Contents for AGILE DMT X2

Page 1: ...USER S MANUAL SMOOTH AGILE DMT X2 USER WEIGHT LIMITATION 350lbs 160kgs SERIAL NUMBER found on frame ST MNL X2 SMUS 01 ...

Page 2: ...thered all the necessary tools you may require to assemble the unit properly Having all of the necessary equipment at hand will save time and make the assembly quick and hassle free Clear your work area Make sure that you have cleared away a large enough space to properly assemble the unit Make sure the space is free from anything that may cause injury during assembly After the unit is fully assem...

Page 3: ...s The manufacturer recommends a single outlet surge protector with a UL 1449 rating as a Transient Voltage Surge Suppressor TVSS with a UL suppressed voltage rating of 400V or less and an electrical rating 110VAC 15 amps This AGILE Trainer must be grounded to reduce the risk of electrical shock Grounding provides a path of least resistance for electric current should the AGILE Trainer malfunction ...

Page 4: ...e Frame Assembly 1 A6 Computer Assembly 1 701 Action Handlebar Lower Cover 4 702 Pedal Arm Front Pivot Cover 2 703 Incline Frame Cover 1 704 Undercarriage Cover Left 1 705 Undercarriage Cover Right 1 706 Nylon Bushing 2 707 Action Handlebar Cap 2 708 Incline Frame Holder Front 2 709 Console Support Tube Cover Rear 1 710 Console Support Tube Cover Front 1 F Chest Belt optional 1 G Power Cord 1 A1 A...

Page 5: ... Head CAP Bolt 4 505 20 x 78 M14 x 35mm Bolt 2 506 4 x 12mm Screw Flat Point 4 507 M10 x 56mm Allen Head Bolt 1 508 M10 Nylon Nut 1 509 4x 19mm Screw 3 510 4 5 x 15mm Screw 6 511 M10 x 40mm Allen Head CAP Bolt 4 513 8 x 27 x 2mm Washer 2 514 8mm Spring Washer 2 515 M8 x 20mm Allen Head Bolt 2 516 M5 x 6mm Screw 2 517 10 x 16 x T2 0mm Spring Washer 4 518 M5 x 12mm Screw 2 519 4 x 12mm Screw Plat Po...

Page 6: ...2 114 115 Tension Wheel Bracket 1 X2 115 116 Pedal Support Base 2 X2 116 117 Pedal Buffer Set 2 X2 117 200 201 Handlebar Foam Grip 2 X2 201 202 Handlebar Cap 2 X2 202 203 Hand Pulse Sensor Back Cover 2 X2 203 204 Hand Pulse Sensor Cover 2 X2 204 206 Incline Frame Holder Rear 2 X2 206 210 Bearing 6004 4 X2 210 211 Bearing 2201 2 X2 211 212 Bearing 608zz 8 X2 212 213 Moving Linkage Bushing 4 X2 213 ...

Page 7: ...an Cover Bottom 1 X2 304 305 Blade 1 X2 305 306 Fan Holder Ring 2 X2 306 307 Console Housing Bottom 1 X2 307 310 Console Top Cover 1 X2 310 311 Pivot Cap 2 X2 311 312 Pivot Arm Bottom Cover Left 1 X2 312 313 Pivot Arm Bottom Cover Right 1 X2 313 314 Dock Cover Top 1 X2 314 315 Action Handlebar Cover LL 1 X2 315 316 Action Handlebar Cover LR 1 X2 316 317 Action Handlebar Cover RL 1 X2 317 318 Actio...

Page 8: ... X2 344 345 Speaker Cover 2 X2 345 346 Pad 1 X2 346 347 iPod Bracket 1 X2 347 348 Speaker Bracket Cover 1 X2 348 349 Dock Cover Bottom 1 X2 349 400 401 4 x 12mm Screw 6 X2 401 402 3 x 10mm Screw 6 X2 402 403 Taper Fixing Insert 27 X2 403 404 M8 x 16mm Allen Head CAP Bolt 4 X2 404 405 8 x 14 x T2 0mm Spring Washer 9 X2 405 406 M10 x 20mm Allen Head Cap Bolt 4 X2 406 407 4 x 19mm Screw 13 X2 407 408...

Page 9: ...10 x 40mm Allen Head Bolt Thread 10mm 1 X2 436 437 M6 x 12mm Screw 6 X2 437 438 17 x 22 x T1 5mm Plastic Washer 3 X2 438 439 M8 x 50mm Allen Head CAP Bolt 2 X2 439 441 Bearing Bushing 10 2 x 16 x 8mm 1 X2 441 442 M10 x 45mm Bolt Thread 15mm 1 X2 442 443 M10 x 95mm Allen Head CAP Bolt 1 X2 443 444 M12 x 20mm Allen Head Bolt 2 X2 444 445 Pedal Arm Pivot 2 X2 445 446 3 4 Nut 2 X2 446 447 M10 x 30mm A...

Page 10: ...40mm Allen Head CAP Bolt 4 X2 511 513 8 x 27 x 2mm Washer 2 X2 513 514 8 x 14 x T2 0mm Spring Washer 2 X2 514 515 M8 x 20mm Allen Head Bolt 2 X2 515 516 M5 x 6mm Screw 2 X2 516 517 10 x 16 x T2 0mm Spring Washer 4 X2 517 518 M5 X 12mm Screw 2 X2 518 519 4 x 12mm Screw Flat Point 2 X2 519 600 601 8Pin Power Wire Upper 1 X2 601 602 8Pin Power Wire Middle 1 X2 602 603 8Pin Power Wire Middle 1 X2 603 ...

Page 11: ... Board 1 X2 628 629 iPod dock connect 6pins wire 1 X2 629 630 Amplifier volume control 3pins wire 1 X2 630 631 Amplifier power connect 2pin wire 1 X2 631 632 iPod dock PC board 1 X2 632 633 Speaker 2 X2 633 634 Amplifier PC board 1 X2 634 700 701 Action Handlebar Lower Cover 4 X2 701 702 Pedal Arm Front Pivot Cover 2 X2 702 703 Incline Frame Cover 1 X2 703 704 Undercarriage Cover Left 1 X2 704 705...

Page 12: ...GRAM MOST OF THE PARTS SHOWN HERE HAVE BEEN PRE ASSEMBLED 423 613 304 306 614 303 305 302 301 302 423 401 401 518 307 710 519 709 101 519 423 464 314 632 465 464 345 345 348 347 346 465 349 464 463 463 633 466 466 238 633 237 610 461 ...

Page 13: ...OWN HERE HAVE BEEN PRE ASSEMBLED 503 701 501 502 701 412 211 105 413 503 501 701 502 701 412 211 104 504 504 513 210 627 707 315 515 706 407 102 514 402 203 403 204 210 317 407 513 514 402 403 204 706 407 203 627 318 707 202 201 202 201 501 501 413 103 316 515 ...

Page 14: ...6 325 411 414 419 216 417 213 212 417 418 416 212 117 116 416 321 415 320 411 213 422 421 420 324 411 324 702 505 214 107 215 426 427 424 214 419 212 213 505 420 702 213 422 421 212 417 418 416 117 323 415 320 414 116 403 216 324 411 325 428 426 424 215 427 425 326 411 106 324 411 425 321 417 322 322 323 411 ...

Page 15: ...429 404 405 404 405 111 1 111 3 111 2 111 1 111 4 109 220 333 332 331 435 333 435 430 331 429 332 219 438 222 334 425 437 221 230 229 228 447 232 448 230 231 233 229 624 227 226 446 447 445 327 414 459 430 228 411 416 405 223 224 438 416 405 425 437 424 425 222 334 426 446 226 430 442 441 225 433 114 443 417 433 444 433 439 623 616 436 110 618 112 425 425 405 327 432 410 328 414 416 445 328 410 43...

Page 16: ... 408 511 312 113 408 115 451 452 450 617 411 236 456620 234 621 622 234 336 455 335 453 454619 235 411 449 336 319 457 705 510 703 509 506 409 510 407 407 407 457 403 457 704 506 411 403 409 510 337 338 340 339 343 344 403 403 342 341 407 403 403 205 708 206 462 462 509 402 402 517 430 406 430 ...

Page 17: ...SHOWN HERE HAVE BEEN PRE ASSEMBLED 606 603 617 616 618 609 606 605 601 609 602 603 618 617 623 616 619 620 621 622 616 604 602 628 301 204 204 203 203 609 608 603 608 609 101 102 103 614 615 612 601 607 607 610 611 613 301 633 633 632 238 347 629 630 631 634 ...

Page 18: ...18 SMOOTH AGILE DMT X2 ASSEMBLY MOST OF THE PARTS SHOWN HERE HAVE BEEN PRE ASSEMBLED CUT CUT CUT CUT 1 2 3 4 5 6 7 8 ...

Page 19: ...bly Remove the Blue film before you assemble the Incline Frame B Hold the Incline Frame Holder Front 708 to the Incline Frame 109 secure using M10 x 40mm Allen Head CAP Bolts 511 10 x 16 x T2 0mm Spring Washer 517 on the Incline Frame Holder by 8mm Allen Key C Don t completely tighten M10 x40mm Allen Head CAP Bolt 511 until STEP 2 511 X4 517 X4 708 X2 109 112 8 109 C 708 511 517 511 708 ...

Page 20: ... in the Incline Transmission Tube Front 110 B Assemble the Incline Transmission Tube Front 110 to the Incline Frame 109 with M10 x 56mm Allen Head Bolt 507 M10 Nylon Nut 508 and by 8mm Allen Key C and Wrench D C Tight the M10 x40mm Allen Head CAP Bolt 511 by 8mm Allen Key C 507 X1 508 X1 D 109 507 110 109 C 508 D 508 110 C 708 511 C 109 Deleted mating ...

Page 21: ...to the Console Support Tube 101 and secure using two M5 x 12mm Screw 518 by Screwdriver E B Assemble the Console Support Tube Cover Rear 709 and Console Support Tube Cover Front 710 to the Console Support Tube 101 secure using the 4 x 12 Screw Flat Point 519 518 X2 519 X2 709 X1 710 X1 518 710 519 709 101 519 ...

Page 22: ...pport Tube A Assemble the Console Support Tube 101 to the Main Frame and secure using four M8 x 16mm Allen Head CAP Bolts 504 by 6mm Allen Key B B Connect the 8Pin Power Wire Middle 602 to 8Pin Power Wire Lower 603 504 X4 504 112 101 101 112 B 504 602 603 112 101 ...

Page 23: ...rt Tube 101 by M8 x 20mm Allen Head Bolt 515 8 x 14 x T2 0mm Spring Washer 514 and 8 x 27 x 2mm Washer 513 and then press the Action Handlebar Cap 707 into the Handlebar C Connect the Hand Pulse Sensor Wire Middle 608 to the Console Housing Bottom 307 D Repeat the above procedure to assemble the left side 706 X2 513 X2 514 X2 515 X2 707 X2 513 515 707 514 103 706 101 307 103 608 706 ...

Page 24: ...Cover Left 704 to the Main Frame 112 and secure using two 4 x 12mm Screw Flat Point 506 and two 4 5 x 15mm Screws 510 B Repeat above the procedure to assemble the right side C Secure using the 4 x 19mm Screw 509 to integrate the right and left cover 506 X4 510 X4 509 X3 112 510 506 509 705 339 510 506 506 338 704 107 106 509 ...

Page 25: ...www smoothfitness com 25 ASSEMBLY STEP 7 Assemble the Incline Frame Cover A Assemble the Incline Frame Cover 703 to the Incline Frame and secure using two 4 5 x 15mm Screws 510 510 X2 510 703 704 ...

Page 26: ... x 78 M14 x 35mm Bolt 505 through the Pedal Arm Right 107 and Pedal Swing Arm 108 then secure by 8mm Allen Key C B Press the Pedal Arm Front Pivot Cover 702 into the ends of the Pedal Arm Right 107 C Repeat the above procedure to assemble the left side 505 X2 702 X2 702 505 108 107 105 C 505 107 108 ...

Page 27: ...onnect the Action Handlebar Right 103 to the Moving Linkage Right 105 and secure using the 15 x 22 M8 x 10mm Bolt 502 and 15 x 26 M8 x 15mm Bolt 503 by 8mm Allen Key C B Repeat the above procedure to assemble the left side 502 X2 503 X2 105 503 502 C 103 C 502 503 105 103 ...

Page 28: ...Action Handlebar Lower Cover A Assemble the Action Handlebar Lower Cover 701 to the Action Handlebar Right 103 and secure using the 4 x 12mm Screw Cone Point 501 B Repeat the above procedure to assemble the left side 701 X2 501 X4 501 701 103 701 105 501 ...

Page 29: ...www smoothfitness com 29 ASSEMBLY STEP 11 Tighten Set Screws A Secure the M5 x 6mmBolt 516 to the Pedal Swing Arm 108 using the 2 5mm Allen Key A 516 X2 A 108 516 A 108 516 ...

Page 30: ...you will need to tip the AGILE Dynamic Motion Trainer while adjusting the levelers Tip the AGILE Dynamic Motion Trainer to the left right You will then see the LEVEL ADJUSTERS These will need to be screwed either in or out to level the trainer Repeat for the other side It may help to use a bubble level when adjusting the level on your AGILE Dynamic Motion Trainer ...

Page 31: ...roller controls the Intensity Level You can see the corresponding readouts on the console follow this same orientation To use the Lite Touch Controls simply start a program or select START and begin your work out To increase either the Motion Level or the Intensity Level move your thumb to the thumb groove with the indicator If you hold your thumb in the thumb groove the level will continue to inc...

Page 32: ...32 SMOOTH AGILE DMT X2 iPod MOUNTING INSTRUCTION 1 Attach your iPod into the dock 2 Rotate the iPod to lay on the bracket 3 Adjust the intensity of volume on computer buttons while playing music ...

Page 33: ...www smoothfitness com 33 TRANSPORT INSTRUCTION TRANSPORT INSTRUCTIONS To transport your AGILE Dynamic Motion Trainer simply lift the back end and roll it away to the desired location as shown ...

Page 34: ... primarily lower body muscle groups These muscle groups are shown in gray color on the chart below MUSCLE GROUPS A Shoulder muscles Calf muscles G B Pectoral muscles Trapezius muscles H C Bicep muscle Tricep muscles I D Abdominal muscles Back muscles J E Forearm muscles Gluteal muscles K F Quadricep muscles Hamstring muscles L ...

Page 35: ...er Thigh Stretch Sit with the soles of your feet together with your knees pointing outward Pull your feet as close into your groin as possible Gently push your knees towards the floor Hold for 15 counts Hamstring Stretch Sit with your right leg extended Rest the sole of your left foot against your right inner thigh Stretch toward your toe as far as possible Hold for 15 counts Relax and then repeat...

Page 36: ...O P Q R S A B GENDER C AGE INTENSITY LEVEL RPM D WEIGHT E HEIGHT F TIME G RESISTANCE LEVEL H PULSE I DISTANCE PROGRAM J INTENSITY UP DOWN K START L STOP ENTER M MOTION UP DOWN N COOL FAN O CALORIES P WATT Q SPEED R INTENSITY LEVEL DOT MATRIX S RPM DIAGRAM T iPod VOL CONTROLS ...

Page 37: ...STOP button or STOP pedaling for 30 seconds to enter PAUSE status The INTENSITY LEVEL Dot Matrix display will show PAUSE All figures on the console will be frozen Press the START button or start pedaling to resume the program and all the display will continue the performance until the program finishes If you leave the pedal stopped for over 3 minutes or press the STOP button all the data will retu...

Page 38: ...his program the TIME display shows the factory default setting 32 00 Press INTENSITY UP DOWN button to adjust the target time and press STOP ENTER to confirm Press START button to start the target time program Time counts down to 0 Distance and Calories count up Press INTENSITY UP DOWN to adjust the resistance and press MOTION UP DOWN to adjust the motion PROGRAM 2 TARGET DISTANCE After enter this...

Page 39: ...L3 L3 L11 L11 L3 L4 L4 L12 L12 L4 L4 L12 L12 L4 L5 L5 L13 L13 L5 L5 L13 L13 L5 L6 L6 L14 L14 L6 L6 L14 L14 L6 L7 L7 L15 L15 L7 L7 L15 L15 L7 L8 L8 L16 L16 L8 L8 L16 L16 L8 PROGRAM 6 INTERVAL MOTION After enter this program the time display shows L1 This indicates the intensity level for the intervals Use the INTENSITY UP DOWN buttons to change the intensity then press STOP ENTER button to confirm ...

Page 40: ... 6th Seg 7th Seg 8th Seg 9th Seg 10th Seg 11th Seg 12th Seg 13th Seg 14th Seg 15th Seg 16th Seg L1 L1 L1 L3 L3 L4 L4 L5 L5 L6 L6 L7 L7 L9 L9 L1 L1 L2 L2 L2 L4 L4 L5 L5 L6 L6 L7 L7 L8 L8 L10 L10 L2 L2 L3 L3 L3 L5 L5 L6 L6 L7 L7 L8 L8 L9 L9 L11 L11 L3 L3 L4 L4 L4 L6 L6 L7 L7 L8 L8 L9 L9 L10 L10 L12 L12 L4 L4 L5 L5 L5 L7 L7 L8 L8 L9 L9 L10 L10 L11 L11 L13 L13 L5 L5 L6 L6 L6 L8 L8 L9 L9 L10 L10 L11 L1...

Page 41: ...e above step The TARGET HEART RATE 85 MAXIMUM SAFE HEART RATE Press INTENSITY UP DOWN button to adjust the target heart rate then press the STOP ENTER bottom to confirm After adjust the TARGET HEART RATE the TIME display shows factory default setting 32 00 Press INTENSITY UP DOWN button to adjust the target time and press STOP ENTER to confirm Press the START button to start the 3 minute WARM UP T...

Page 42: ...status as the user set it Press INTENSITY UP DOWN to adjust the resistance and press MOTION UP DOWN to adjust the motion The target time of the program will count down from the preset time The DISTANCE CALORIES display will count up from 0 To pause the program while exercising press the STOP ENTER button To quit the program press the STOP ENTER button twice At the end of the program when the targe...

Page 43: ...uld train with the following percentage of your maximum heartrate Health Fat Burning 65 75 of your max heartrate Fitness Bodyshaping 75 85 of your max heartrate Performance 85 95 of your max heartrate Example You are 25 years old and want to train for the target Fitness 220 25 195 75 of 195 146 25 85 of 195 165 75 Your target heartrate should be between 146 and 166 beats per minute This informatio...

Page 44: ...ying to the original product Any technical advice furnished before or after delivery in regard to the use or application of Smooth Fitness products is furnished without charge and on the basis that it represents Smooth Fitness best judgment under the circumstances but that the advice is used at your sole risk Procedure for Obtaining Your Remedy Under This Warranty To obtain service on a Smooth Fit...

Page 45: ...www smoothfitness com 45 Smooth Fitness 780 5th Ave King of Prussia PA 19406 Toll Free Customer Service 1 888 800 1167 Website www smoothfitness com ...

Reviews: