background image

10  |  SmithsEP.co.uk  |  Issue 002 - October 2018

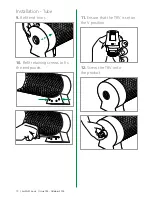
12. 

Screw the TRV onto  

the product

11. 

Ensure that the TRV is set on 

the V position

10. 

Refit retaining screws to fix 

the end panels

9. 

Refit end trims


Installation

 - Tube

Summary of Contents for Kiosk

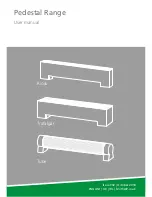
Page 1: ...Issue 002 October 2018 SmithsEP co uk 1 Pedestal Range Installation commissioning and user manual Kiosk Trafalgar Tube Issue 002 October 2018 ENGLISH UK IRL SmithsEP co uk ...

Page 2: ...he property Contents Introduction 2 Declaration of conformity 3 Symbols used in this guide 3 Important safety and installation instructions 4 Application 5 Product Information 5 Installation Kiosk and Trafalgar 6 Commissioning Kiosk and Trafalgar 7 Installation Tube 8 Commissioning Tube 11 Fault finding 12 User Manual Important safety guidance 14 Introduction 15 Operation 15 Fault finding 16 Regis...

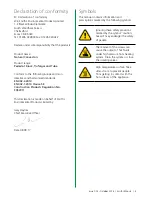
Page 3: ...2014 EN 442 1 2014 Clause 5 3 Construction Products Regulation No 3052011 This Declaration is made on behalf of Smith s Environmental Products Limited by Gary Haynes Chief Executive Officer Date 08 09 17 Symbols This manual contains information and prescriptions marked by the following symbols Ignoring these safety provisions marked by the symbol caution hazard may endanger the safety of people Th...

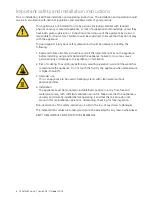
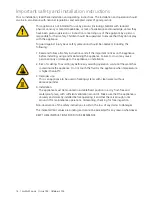
Page 4: ... appliance before installing using and maintaining the appliance Failure to do so may cause personal injury or damage to the appliance or installation 2 Risk of scalding To avoid injury before any servicing operation wait until the water has cooled inside the appliance Do not touch the fluid or the appliance when temperature is higher than 60 C 3 Improper use This is an appliance to be used in hea...

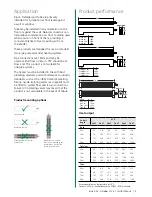
Page 5: ...ure to fit isolating valves may mean that the product is not serviceable in the event of failure Wall mounted horizontal Except Tube Floor mounted Inverted mounted Wall mounted vertical Tube can be installed in the vertical plane but the TRV should be at low level Î Î Î P Product mounting options Product performance Heat output 150 200 Model A Tube 5m 500 Tube 1m 1000 Tube 1 5m 1500 Tube 2m 2000 A...

Page 6: ...ith free air circulation within the area and is not subject to draughts as this will effect the valve s performance 2 The valve must not be installed in a position where the head is likely to be damaged or where the valve is subject to excessive heat either at time of installation or in operating conditions 3 Ensure that the system is clean and free from debris and the installation is in accordanc...

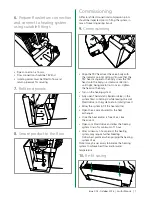
Page 7: ...exchanger Once the heat emitter is free of air close the air vent Open Lock Shield Valve and allow the heating system to run for minimum of 1 hour After minimum 1 hour period the heating system may require further bleeding Follow best practices when purging the heating system of air Note It may be necessary to balance the heating system to achieve best flow and or water temperature 10 Re fit casin...

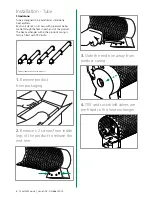
Page 8: ...d to the heat exchanger Installation Tube Standalone Tube is designed to be installed as standalone heat emitters Each unit stands on its own with pipework being made through the feet in each end of the product The heat exchanger within the products casing is factory fitted with TRV LSV 3 Slide the end trim away from product casing 0 5m 1 0m 2 0m 1 5m Product lengths sections in products ...

Page 9: ...tem pipework for connection Check connection is good and undamaged from transit 7 Fix both ends to the floor using suitable fixings 8 Connect system pipework to the TRV and Lockshield valves of each end of the product 5 Position heater where required Pipe entry is through flooring surface ...

Page 10: ... SmithsEP co uk Issue 002 October 2018 12 Screw the TRV onto the product 11 Ensure that the TRV is set on the V position 10 Refit retaining screws to fix the end panels 9 Refit end trims Installation Tube ...

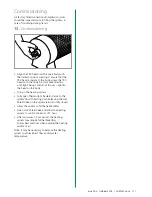
Page 11: ...e system flow to Setting V while leaving the Lock Shield Valve in the system return totally closed Allow the system to fill the heat emitter Open Lock Shield Valve and allow the heating system to run for minimum of 1 hour After minimum 1 hour period the heating system may require further bleeding Follow best practices when purging the heating system of air Note It may be necessary to balance the h...

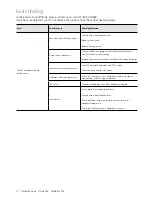
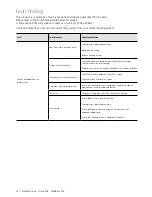
Page 12: ... set Check Thermostatic Radiator Valve TRV is open Check that Lock Shield Valve is open Air present within heating system Ensure that heating system is completely free of air purge air from heating system using best practices TRV Valve Thermostatic Radiator Valve TRV head faulty Replace Heat Source Ensure boiler is on and calling for heat Check pump is operating correctly Ensure both flow and retu...

Page 13: ...Issue 002 October 2018 SmithsEP co uk 13 Kiosk Trafalgar Tube Pedestal Range User manual Issue 002 October 2018 ENGLISH UK IRL SmithsEP co uk ...

Page 14: ...e appliance before installing using and maintaining the appliance Failure to do so may cause personal injury or damage to the appliance or installation 2 Risk of scalding To avoid injury before any servicing operation wait until the water has cooled inside the appliance Do not touch the fluid or the appliance when temperature is higher than 60 C 3 Improper use This is an appliance to be used in he...

Page 15: ... temperature Follow TRV instructions to maximise life expectancy Tamper setting The head can be set to a single non adjustable position Lower the locking mechanism as described previously and rotate the head until the indicator is pointing to the desired setting Rotate the locking mechanism reset mark anti clockwise to the desired setting and push the locking mechanism up against the head until it...

Page 16: ...Shield Valve is open Air present within heating system Ensure that heating system is completely free of air purge air from heating system using best practices TRV Valve Thermostatic Radiator Valve TRV head faulty Replace Heat Source Ensure boiler is on and calling for heat Check pump is operating correctly Ensure both flow and return pipe to heat emitter are of adequate temperature Ensure that hea...

Page 17: ... produce proof of purchase prior to receiving service For more details please visit our website SmithsEP co uk Registering your product Disposal As part of the policy of continuous product improvement Smith s Environmental Products LTD reserves the right to alter specification without prior notice If you are purchasing replacement equipment your retailer may offer a take back scheme or will be abl...

Page 18: ...18 SmithsEP co uk Issue 002 October 2018 Notes ...

Page 19: ...Issue 002 October 2018 SmithsEP co uk 19 Notes ...

Page 20: ...ts All products are available nationally from Builders Merchants Plumbers Merchants Heating Equipment Distributors and Kitchen Equipment Distributors In the event of difficulty please contact us or visit our website SmithsEP co uk for details of your nearest stockist Information and advice Full technical specifications and list prices is available to download from our website or in hard copy from ...

Reviews: