


8
9
smithandnoble.com
800.248.8888
ADD OR REMOVE REMOTE OR CHANNEL
Replace Original Remote, Add Additi onal
Remote or Add Shade to an Additi onal
Channel
1. Press the SETTING butt on on the motor
unti l the shade jogs & beeps. Release the
butt on immediately aft er the fi rst jog &
beep - this should not be more than 3
seconds. Repeat this step for all shades that
will be controlled by a single channel butt on.
2. Select the channel that you want to program
using the CHANNEL selector butt on.
3. Press and hold the CONFIRM butt on unti l
the shade(s) jogs & beeps.
4. Repeat steps 1-4 to program the rest of the
channels on a multi -channel remote.
Remove a Shade from a Remote or
Channel and Pair it to a Diff erent
Remote or Channel
1. Select the channel that you want to unpair.
2. Press and release the CONFIRM butt on on
the back of the remote. Conti nue to press
& release unti l the shade jogs & beeps.
The original remote or channels have been
unpaired.
3. Press the SETTING butt on again on the
motor unti l the shade jogs & beeps. Release
the butt on immediately aft er the fi rst jog
& beep - this should not be more than 3
seconds. Repeat this step for all shades that
will be controlled by a single channel.
4. Select the channel that you want to program
using the CHANNEL selector butt on.
5. Press and hold the CONFIRM butt on unti l
the shade(s) jogs & beeps.
6. Repeat steps 3-5 to program the rest of the
channels on a multi -channel remote.
UNPAIR THE REMOTE
DISABLING UNUSED CHANNELS
To unpair a shade(s) from a selected
channel, press and release the CONFIRM
butt on on the back of the remote.
Conti nue to press & release unti l the
shade jogs & beeps.
Please note: All shades assigned to the
selected channel will be unpaired during
this process.
The 14 channel remote has the opti on
of turning off unused channels, making
channel selecti on easier.
Press and hold both UP and DOWN
butt ons for 3 seconds unti l 00 Channel
displays. Release the butt ons and the 00
will start to fl ash.
Press the UP or DOWN butt on to
select the required number of channels
(between 1-14).
Press and hold the CHANNEL and RAIL
selector butt ons at the same ti me to
confi rm selecti on. The display will go
back to channel 01.
Follow the same process if you need to
re-add channels.
NOTE:
00 will only show the fi rst ti me
you disable unused channels. Aft er that,
the display will fl ash with the number of
acti ve channels set to the remote.
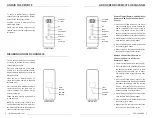
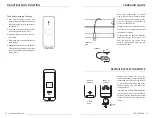
REMOTE BACK
LIMIT
BUTTON
CONFIRM
BUTTON
REMOTE BACK
LIMIT
BUTTON
CONFIRM
BUTTON
CHANNEL
DISPLAY
UP
STOP/
FAVORITES
DOWN
CHANNEL
RAIL
SELECTOR
REMOTE FRONT
CHANNEL
DISPLAY
UP
STOP/
FAVORITES
DOWN
CHANNEL
RAIL
SELECTOR
REMOTE FRONT