


2
3
smithandnoble.com
800.248.8888
PAIRING THE REMOTE
For added protecti on, your remote control
arrived with a protecti ve fi lm on top. Please
remove this fi lm prior to use.
Your shades will need to be paired to the
remote prior to operati ng your shade.
See Pair
the Remote below.
Pair The Remote
This remote control has 14 channels. Before
pairing the remote, determine which shade(s)
you want on which channel. All shades paired to
a remote will also automati cally be programmed
to the “ALL” channel.
It is recommended to only pair one shade per
channel
unless it is absolutely necessary to
group shades other than the “ALL” channel. This
simplifi es adjusti ng limits and setti ng favorites.
If a batt ery is not already installed in the remote,
follow the instructi ons REPLACE BATTERY IN
REMOTE.
The 14 Channel remote may also be used
to operate top down-bottom up honeycomb
shades.
You can not mix a standard bottom up
only shade and a TD/BU shade on the same
channel.
Customer Service Hours
Monday — Friday: 6am — 6pm PT
Saturday — Sunday: 7am — 4pm PT
smithandnoble.com
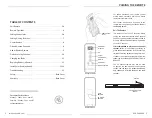
TABLE OF CONTENTS
Pair Remote . . . . . . . . . . . . . . . . . . . . . . . . . . . . . . . . . . . . . . . . . . . . . . . . 3-4
Remote Operati on . . . . . . . . . . . . . . . . . . . . . . . . . . . . . . . . . . . . . . . . . . . . . . 4
Setti ng Shade Limits . . . . . . . . . . . . . . . . . . . . . . . . . . . . . . . . . . . . . . . . . . 5-6
Setti ng & Using Favorites . . . . . . . . . . . . . . . . . . . . . . . . . . . . . . . . . . . . . . . . 7
Unpair Remote . . . . . . . . . . . . . . . . . . . . . . . . . . . . . . . . . . . . . . . . . . . . . . . . . 8
Disable Unused Channels . . . . . . . . . . . . . . . . . . . . . . . . . . . . . . . . . . . . . . . . 8
Add or Remove Remote . . . . . . . . . . . . . . . . . . . . . . . . . . . . . . . . . . . . . . . . . 9
De-Acti vate Jog Functi on . . . . . . . . . . . . . . . . . . . . . . . . . . . . . . . . . . . . . . .10
Charging the Shade . . . . . . . . . . . . . . . . . . . . . . . . . . . . . . . . . . . . . . . . . . . .11
Replacing Batt ery in Remote . . . . . . . . . . . . . . . . . . . . . . . . . . . . . . . . . . . .11
Install Solar Panel (opti onal) . . . . . . . . . . . . . . . . . . . . . . . . . . . . . . . . 12-14
Troubleshooti ng . . . . . . . . . . . . . . . . . . . . . . . . . . . . . . . . . . . . . . . . . . . . . . .15
Safety . . . . . . . . . . . . . . . . . . . . . . . . . . . . . . . . . . . . . . . . . . . . . . . . Back Cover
Warranty . . . . . . . . . . . . . . . . . . . . . . . . . . . . . . . . . . . . . . . . . . . . . Back Cover
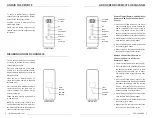
REMOTE BACK
LIMIT
BUTTON
CONFIRM
BUTTON
PROTECTIVE
FILM
SETTING BUTTON
(BACK)
MOTOR
CHANNEL
DISPLAY
UP
STOP/
FAVORITES
DOWN
CHANNEL
RAIL SELECTOR
REMOTE FRONT