Instructions for the installer
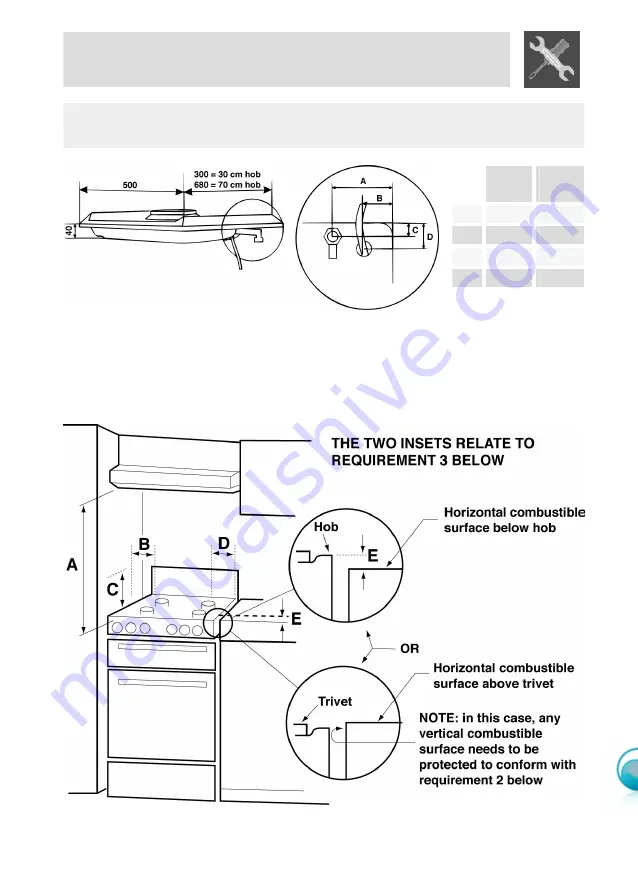
Overall dimensions: location of gas and electrical connection points (all measures in mm).
30 CM
HOB
70 CM
A
60
120
B
90
C
30
D
70
2.2 Clearance above and around domestic appliances
Extract from AS5601
7
Page 1: ...installation and operating instructions SARV532XS cooktop smeg technology with style...
Page 2: ...ANING AND MAINTENANCE _________________________________ 18 9 PROBLEMS AND CAUSES ______________________________________ 20 Thank you for choosing our product We advise you to read this manual carefull...
Page 3: ...UFACTURER DECLINES ALL RESPONSIBILITY FOR IMPROPER USE DO NOT LEAVE THE PACKING IN THE HOME ENVIRONMENT SEPARATE THE VARIOUS WASTE MATERIALS AND TAKE THEM TO THE NEAREST SPECIAL GARBAGE COLLECTION CEN...
Page 4: ...LE PLATES THAT EXTEND BEYOND THE EXTERNAL PERIMETER OF THE HOB THE HOB IS TO BE USED BY ADULTS ONLY DO NOT LET UNSUPERVISED CHILDREN PLAY WITH THE HOB REPLACED APPLIANCES MUST BE TAKEN TO A SPECIAL GA...
Page 5: ...elation to fire hazards and can therefore be mounted against walls higher than the work surface on condition that a certain distance X be kept between the appliance and the wall as shown in the figure...
Page 6: ...nstaller Overall dimensions location of gas and electrical connection points all measures in mm 30 CM HOB 70 CM HOB A 60 120 B 90 90 C 30 30 D 90 70 2 2 Clearance above and around domestic appliances...
Page 7: ...ess than 150 mm above the hob for the full dimension width or depth of the cooking surface area Where the cooking appliance is fitted with a splashback protection of the rear wall is not required 3 Ad...
Page 8: ...hat they cannot be obstructed indoors or outdoors and should preferably be close to the floor on the side opposite to the combustion gas discharge point If it is not possible to make the openings in t...
Page 9: ...to allow the gas to be turned off and disconnected for servicing and removal of the appliance as required from the gas supply Before the appliance is operated make certain all relevant parts are place...
Page 10: ...cessible position near the unit Do not use reducers adapters or shunts If the power cable is replaced the wire section on the new cable must not be less than 1 0 mm 2 3 x 1 0 cable keeping in mind tha...
Page 11: ...ed and the primary air adjusted To replace the nozzles and regulate the burners you have to remove the top as described in the following paragraph 5 1 Removing the hob 1 Remove all the knobs the grids...
Page 12: ...never exceed 3 Nm Reposition support B so that nozzle C is covered perfectly Place the burner on its support and ignite it Move the Venturi tube D to regulate the air flow until the flame is stable a...
Page 13: ...ok 4 15 0 1 70 Wok dual control 5 15 0 Outer 11 5 1 50 Inner 3 5 0 85 For burner reference numbers see page 15 6 FINAL OPERATIONS Having carried out the above adjustments reassemble the appliance foll...
Page 14: ...hob Burners 1 Auxiliary 2 Semi rapid 3 6 Rapid 4 Wok 5 Wok dual control 6 3 Lubrication of gas taps With time it may happen that the gas taps get blocked and hard to turn Clean them inside and re gre...
Page 15: ...ponding to the small inner burner and a short one to the outer burner Double crown burners comprise an auxiliary and a rapid burner controlled by two different knobs which permit to use both burners a...
Page 16: ...e to the hob all recipients or griddle plates must be placed within the perimeter of the hob at a distance of 3 4 cm from the knobs All containers have to have a flat and smooth bottom When using fats...
Page 17: ...ns or residues Do not use metallic sponges or sharp scrapers they will damage the surface Use normal non abrasive products and remove spots or residuals with non scratch sponges or if need be with woo...
Page 18: ...s connection the gas connection must be checked periodically at least every 2 years Each time the cooker is moved the connection may be stressed test it for leakages using special sprays or a solution...
Page 19: ...on the bottom of the pans Defect of comburent air or incorrect injectors Burner dirty or flame ports obstructed Clean the burner Call Service Center if the problem remains The flame is very short and...