background image


www.smartwitness.com 


4.


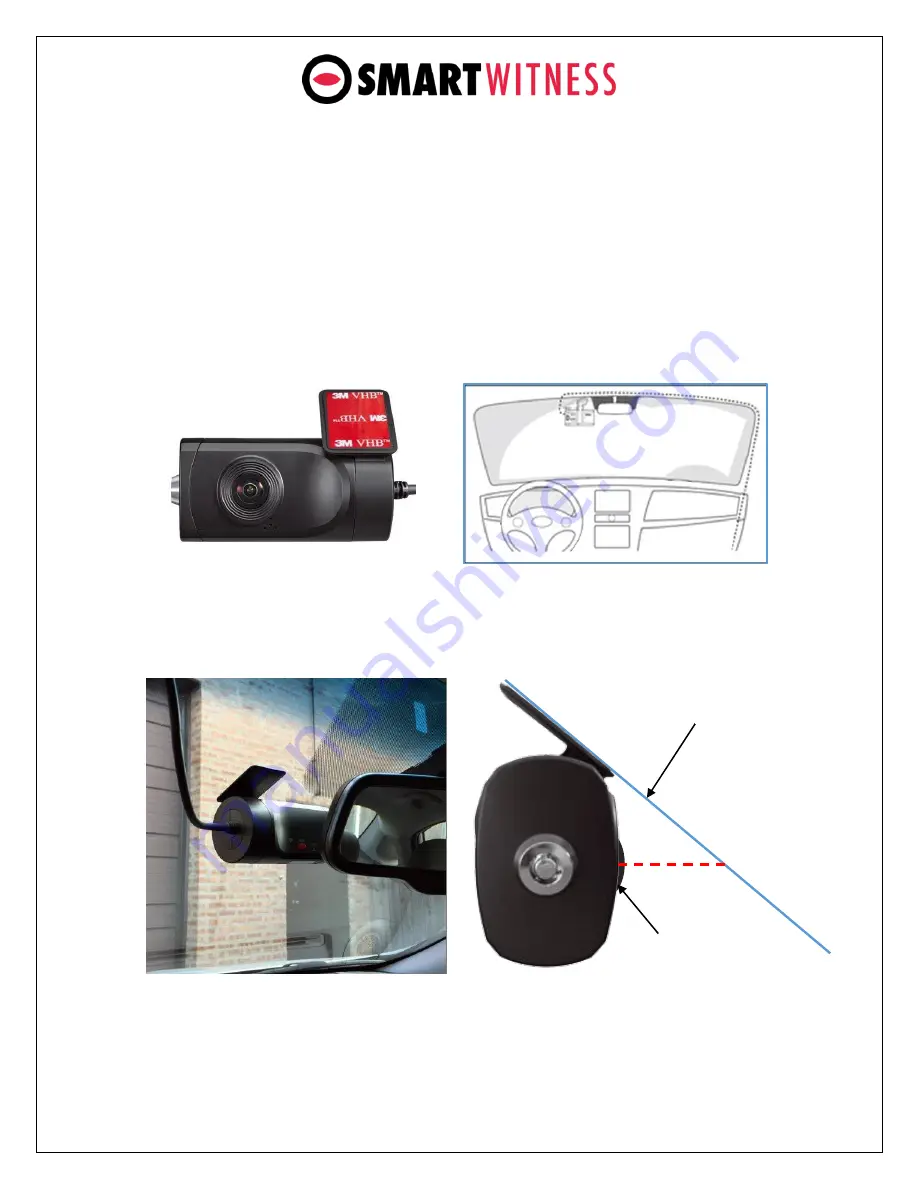
Attach the provided 3M adhesive pad to the SVC1080-LCS bracket and press firmly.  
 

5.


Secure the SVC1080-LCS to the windscreen behind the rear view mirror, below the A1 
line. 

The camera lens should be as high on the windshield as possible, but still within 

the windshield wiper zone.


IMPORTANT: Make sure that the glass is clean and dry before attaching. Hold the camera 
in position with firm pressure for 30 seconds. The glass temperature should not be too 
hot or cold. Please install in moderate temperature (recommended between 50°F ~ 80°F) 


6.


The below pictures demonstrate proper SVC1080-LCS installation on the windshield. 


windshield 

Camera lens 

Summary of Contents for SVC1080-LCS

Page 1: ...should be performed by a qualified individual or installation professional only Working with a vehicle s power system can be dangerous to both you and your vehicle This installation is intended only t...

Page 2: ...alysis software included SVC1080 LCS is the HD successor to the bestselling SVC100GPS SmartWitness flagship product which has sold over 200 000 units to date Package Contents Key for SD Locking Cover...

Page 3: ...ons such as speeding traffic signal violations swerving etc Features Recording Playback Analysis HD 170 wide angle lens Mac PC software included Dual record mode Continuous Event Filter data search by...

Page 4: ...www smartwitness com 2 SVC1080 LCS Overview a Front b Rear Windshield mount Adhesive tape Camera Lens Tamper Resistant Locking Cover Panic Button Status LEDs G sensor calibration button Power Cable...

Page 5: ...the Sd card is inserted all the way and clicks into place 3 Adjust the bracket angle by pulling the bracket away from the camera body and rotating it to the desired angle use the windshield as a guid...

Page 6: ...the windshield as possible but still within the windshield wiper zone IMPORTANT Make sure that the glass is clean and dry before attaching Hold the camera in position with firm pressure for 30 second...

Page 7: ...ecting the white molex connectors as seen below 2 Wiring Diagram Power IGN Ground BAT Remote SW Remote SW Alarm Out 1 Alarm Out 2 3 OPTIONAL remote switch installation your SVC1080 LCS may not include...

Page 8: ...n for more detailed information the LED status indicators 1 After the camera has been booted completely press the G Sensor calibration button once small red button to the left of the panic button Ther...

Page 9: ...SD card is in the UNLOCK position If the above do not work try another SD card If the 2nd SD card works then please contact SmartWitness to repair replace the defective card 6 LED Reference Table SVC...

Reviews: