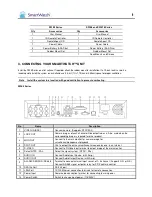
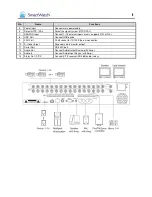
Smartwatch SWE16 Series Quick Installer'S Manual Download Page 10


9999 


No. 

Functions 

17 

SEARCH Button 

18 

BACKUP Button 

19 

EVENT Button 

20 

Fast Playback Backwards Button 

21 

Playback Button 

22 

Fast Playback Forward Button 

23 

Playback Backward Frame by 
Frame 

24 

Pause Button   

25 

Playback Forward Frame by Frame 

26 

OSD Button 

27 

P/T/Z Button 

28 

SEQ Button 


5.  SETUP 

 
Turn on the power of the DVR; watch the indicators on the front light up (the Power LED). When the unit is powered up for 
the first time, no user login password will have been configured. In this case, press the <ENTER> key to access the 
<USER> functions. 
 
To enter the Setup Menu, press the [SETUP] button on the front panel or the IR Remote Controller. Use the arrow buttons 
of the front panel or on the IR Remote Controller to browse the Setup Menu. The entire system configuration is done 
using the System submenu. 
 
In order for the system to record properly after being powered up, the following programming changes will be necessary: 
 

1. 

date and time 

2. 

ID for IR Remote Controller 

3. 

recording picture size 

4. 

number of recorded images per second if the recording is to be continuous or recording by motion only 

5. 

administrator and user ID codes 

 
To enter the Setup Menu, press the [SETUP] button on the front panel of the DVR (Note: the IR Remote Controller will not 
function at this stage as no ID has yet been programmed). You will be prompted to enter an administrator password. If this 
is the first time the unit has been powered up, just press the [ENTER] button. On the SWE4 Series, the [ENTER] button is 
the circular button at the centre of the 1, 2, 3, 4 keys. At this point the System Information will be displayed. Next press 
the [SETUP] button again. 
 
The drop down box will be displayed. Use the left and right buttons to change between the different menus. 
 
1.  Setting the date and time.   
 
Use the left arrow to move to the System programming menu. Use the up or down arrows until the Date and Time option 
is highlighted. Press the [ENTER] button. Press the [ENTER] button again and a line will appear under the date. Use the 
up and down arrows to change this value to the correct value. When this is done use the right arrow to move to the month, 
year, hour, minute and second. Change as required. When this is done press the [ENTER] key.   
 
Now use the down arrow to go to Date Format, Time Format and Daylight Savings. Change where required by using the 
above method. 
 

When all the parameters in the above menu have been changed you must highlight the [SAVE] button and press 
[ENTER]. The done message will appear on the bottom left of the screen. 

Summary of Contents for SWE16 Series

Page 1: ...oducts Ltd Unit 2 3 Cian Park Industrial Estate Drumcondra Dublin 9 Ireland TEL 353 01 8372445 FAX 353 01 8571685 Thank You for purchasing Reliable Security Products Ltd SmartWatch Before operating th...

Page 2: ...1 1 1 1 CATEGORIES 1 INTRODUCTION 2 2 BOX CONTENTS 2 3 CONNECTING YOUR SMARTWATCH UNIT 3 4 YOUR SMART WATCH UNIT 6 4 1 Front Panel 6 4 2 IR Remote Controller 8 5 SETUP 9 6 REMOTE AGENT SOFTWARE 13...

Page 3: ...e installer set up a basic recording system Every installation s functional requirements will be different and therefore this quick setup guide will only go some way towards achieving this 2 BOX CONTE...

Page 4: ...ports NTSC PAL 2 LOOP OUT Camera images of each channel will be outputted as is Also used when the corresponding image is required for other product 3 MON OUT Connect to the main monitor for camera im...

Page 5: ...2 LOOP OUT Camera images of each channel will be outputted as is also used when the corresponding image is required for other product 3 MON OUT Connect to the main monitor for camera image surveillanc...

Page 6: ...nput sensors supports N O or N C 8 USB Port Connect USB device 9 LAN Port RJ 45 socket for 10 100 Ethernet connection 10 S Video Output Secondary main monitor output 11 Serial Port RS 232C port 12 Aud...

Page 7: ...t 7 Remote Controller Receiver Receives input signal from the IR Remote Controller 8 Power Button Used to turn the Power On Off 9 Select Channel 1 4 CH Images of corresponding input channel are displa...

Page 8: ...1 SEARCH Search recorded image 12 Jog Shuttle Jog inner dial playback frame by frame Shuttle outer dial Speed up the playback speed of the image 1 32X 13 USB Port USB interface port to connect externa...

Page 9: ...IRIS Open Iris 6 IRIS Close Iris 7 ZOOM IN Decrease 8 FOCUS FAR 9 FOCUS NEAR 10 ZOOM OUT Increase 11 ENTER 12 SETUP 13 RETURN 14 SWE4 Series Select Number Button Direction Key SWE8 and SWE16 Series S...

Page 10: ...p Menu press the SETUP button on the front panel of the DVR Note the IR Remote Controller will not function at this stage as no ID has yet been programmed You will be prompted to enter an administrato...

Page 11: ...ls in width x length which are used to display an image This has a bearing on the overall recording duration and the quality of the images on playback The option 720x576 is the largest image size and...

Page 12: ...lected on the main monitor IR Remote ID Set IR remote controller ID P T Z Protocol Set the protocol to control the P T Z camera connected to P T Z port on the back panel General Set general operating...

Page 13: ...ness shades of the channel Contrast Adjust the contrast which is the ratio of brightness to darkness of the image Colour Adjust the color density Colour Set the brightness contrast color and tint of t...

Page 14: ...button or right click and chose Open Site File CTRL O The Site File Open dialog box will appear To add and register a new site select ENABLE and then click the Add button You will be asked to enter th...

Page 15: ...how the date and time of the PC operating the RemoteAgent 4 Connect Disconnect Close all Channels Used to connect disconnect or close all channels of registered DVRs 5 Two Way Audio Used for audio com...

Reviews: