SmartPay Pax One-Piece S800 Manual Download Page 3

 Pax One-Piece S800

3

For EFTPOS terminal related enquiries and support, or to report an issue with your EFTPOS terminal, contact Smartpay 
Technical Helpdesk on 

0800 476 278

 or email 

[email protected]

S800 Countertop EFTPOS

Smartpay Pax S800 EFTPOS provides a simple, secure and robust countertop payment terminal that connects to mains 
power. The S800 connects to the Internet to process transactions via your Broadband/Fibre or Dial-up connection.

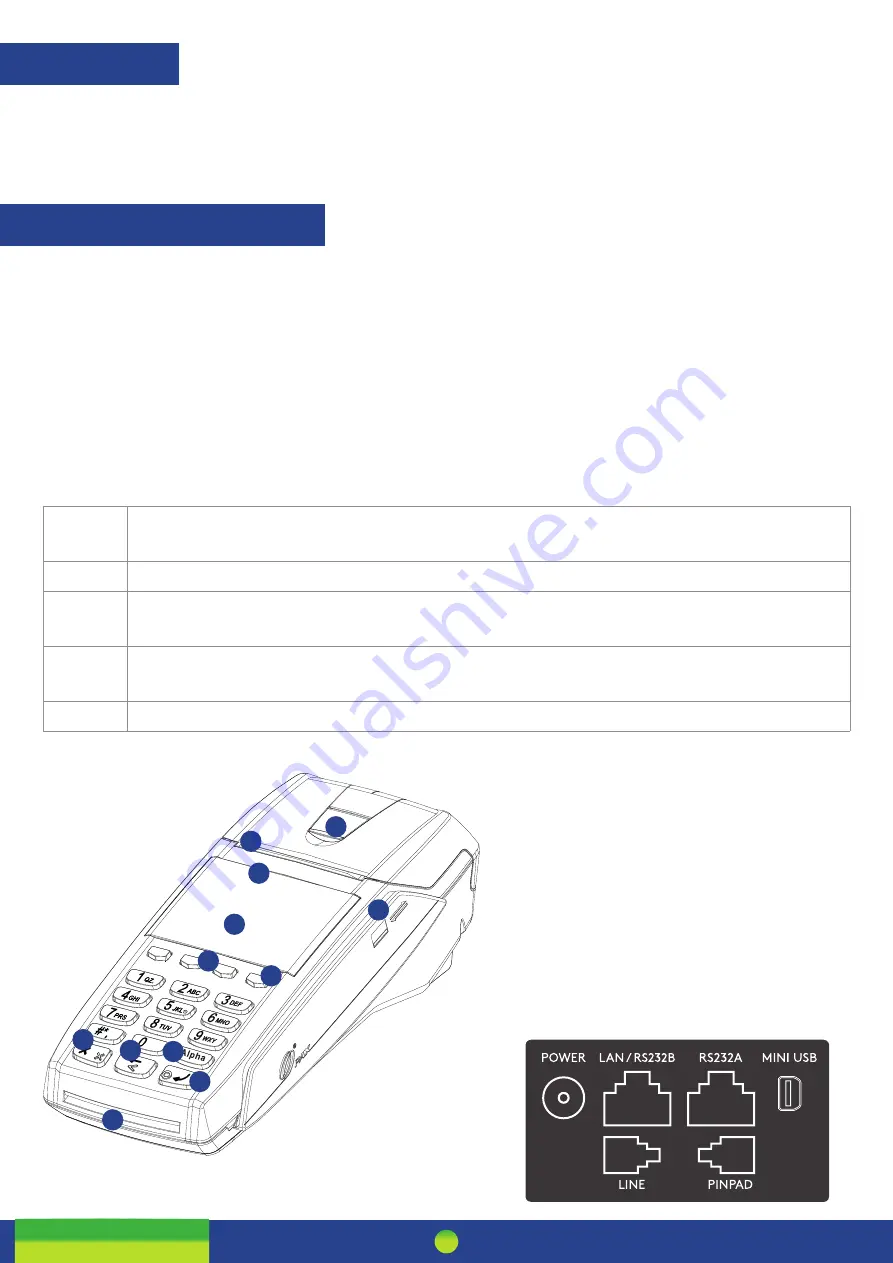
Which Plugs Go Where?

On the back of your S800 EFTPOS terminals there are ports available for plugging in the required cables. These plugs 
are labelled but can be difficult to read. For ease of use we have included diagrams and descriptions below.

LAN/RS232B

An Ethernet cable should be plugged in here to connect the terminal to a Broadband/Fibre Internet 
connection.

LINE

If you use a dial-up Internet connection the phone cable should be plugged in here.

POWER

The power cable supplied with your terminal plugs in here. Plug the other end into your wall socket or a 
power strip.

RS232A

If you are using a Keylink interface to your ECR/POS system connect the Keylink cable or accessory 
supplied here. 

PINPAD

Plug the S300 PINpad in here for two-piece EFTPOS setup.

CONTACT

TERMINAL HARDWARE

1

8

2

9

3

10

4

11

5

12

6

7

1.  Printer cover release
2.  Paper cutter
3.  Contactless LEDs
4.  Card swipe reader
5.  Colour display screen
6.  Page up/down arrows
7.  Menu key
8.  Cancel/Power On/Off key
9.  Clear/Back/No key
10.  ALPHA Menu key
11.  Enter/Accept/OK key
12.  Chip card slot

Summary of Contents for Pax One-Piece S800

Page 1: ...Paymark EFTPOS PTS 2017 Pax One Piece S800...

Page 2: ...Refund Pre authorisation Finalise authorisation Cancel Auth Check card status ADMINISTRATIVE FUNCTIONS ALPHA Menu Payment Application Menu Common Admin Functions Manual Logon Manual Settlement Print S...

Page 3: ...e of use we have included diagrams and descriptions below LAN RS232B An Ethernet cable should be plugged in here to connect the terminal to a Broadband Fibre Internet connection LINE If you use a dial...

Page 4: ...mm w x 47mm dia thermal paper rolls Replacing printer paper 1 Engage printer cover release flap to open printer bay 2 Remove existing roll core and place new roll in printer well the tongue of paper s...

Page 5: ...t If you use a dial up internet connection or dial backup plug the phone cable into the LINE port 3 Tuck the cables into the recessed cable tidy guides on the bottom of the base unit 4 If you re using...

Page 6: ...sented Contactless available No contactless available Electronic Offline Voucher EOV enables your business process EFTPOS transactions if your terminal has gone offline EOV is not designed to function...

Page 7: ...UTH Transaction type used to removed a stored AUTH that is no longer required by the merchant FINALISE Hospitality transaction type to complete Finalise a previously stored AUTH transaction on a CREDI...

Page 8: ...of using their PIN If this happens the Merchant Receipt will print with a space for the customer to sign in The terminal will require the operator to verify the customer signature to complete the tran...

Page 9: ...can be enabled for merchants who process telephone or mail order sales MOTO should only be used in situations where cardholder authorisation is given for the transaction and the physical credit card...

Page 10: ...ents EFTPOS terminal to customer 6 Customer taps inserts or swipes card a Insert or swipe customer follows screen prompts to select account and enter PIN b Tap customer follows screen prompts if requi...

Page 11: ...11 EFTPOS terminal returns to idle screen ready for next transaction Finalise Transaction 1 Operator selects FINALISE If there are no stored pre auth transactions the terminal will display no stored a...

Page 12: ...splay all matching stored pre auth 4 If there is more than one merchant shoul select the correct one to continue 5 Terminal will display original pre auth amount and prompt merchant to confirm CANCEL...

Page 13: ...lways relates to Merchant 1 only The default menu setting is 1 ALPHA 1 LOGON 2 ALPHA 2 REPRINT RECEIPT 3 ALPHA 3 SETTLE INQUIRY 4 ALPHA 4 SETTLE CUTOVER 5 ALPHA 5 PRINT CONFIG Payment Application Menu...

Page 14: ...an only be performed during your regular settlement window Terminal will automatically perform Paymark settlement once per day For further information about auto settlement window contact Paymark help...

Page 15: ...our sales team or THD to discuss activating deactivating the value added services on your EFTPOS terminal Network Comms Check This check can be performed to verify the terminal has a working network c...

Page 16: ...o back APP MANAGER 1 CONFIG 2 TMS 3 SYSTEM 4 MISCELLANEOUS 5 RESTART APP MANAGER 1 APPS 2 EXIT TO PROLIN MERCHANT COMMUNICATION SETTINGS DATE TIME DATE TIME Changing Comms Settings Changes to comms be...

Page 17: ...setting is black text on white background to change the display screen background colour between white and black Press CANCEL FUNC or MENU SYSTEM DISPLAY COLOURS POWER OPTIONS Screensaver Default sett...

Page 18: ......

Reviews: