background image

26


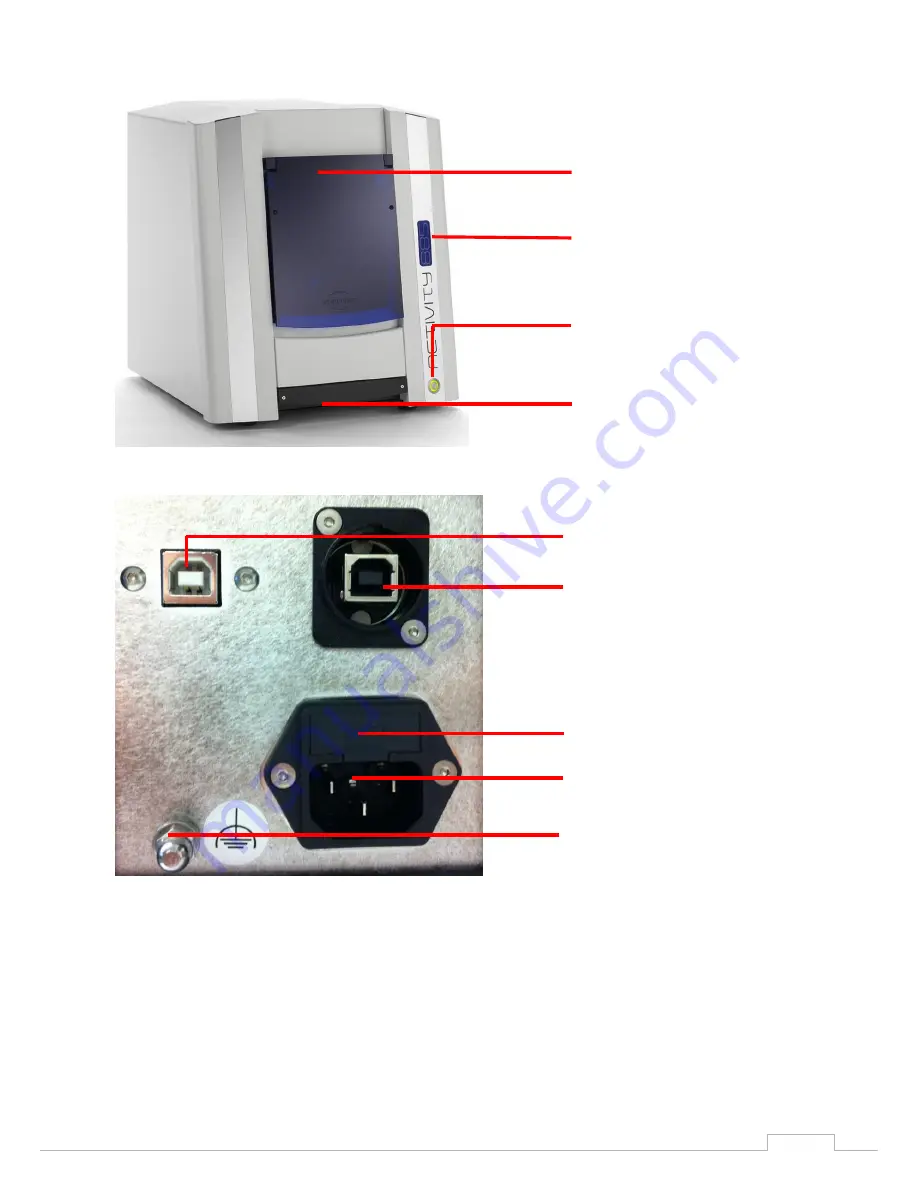
Basic information about the device 


Lid/Ghousing opening 


Device designation 


Power switch 


System drawer 


Figure 19: Device front 


USB connection for the camera 


USB connection for the motor 
and scanner control 


Fuse 


Power cord connection 


Functional earth 


Figure 20: Device rear 

Summary of Contents for Activity 885

Page 1: ...Operating Manual A product of smart optics Sensortechnik GmbH For software version 2 6 06 status 11 2015...

Page 2: ...RY 11 8 3 CARRYING POINTS 12 8 4 REMOVING THE SCANNER FROM THE PACKING 13 9 INSTALLATION 15 9 1 INSTALLATION THE SCANNER 15 9 2 INSTALLING THE COMPUTER 16 9 3 INSTALLING THE SOFTWARE 16 9 4 IMPORTING...

Page 3: ...THE SYMBOLS 48 13 2 THE 3D VIEWER SYMBOLS OBJECT VIEW 49 13 3 ACTIVITY MENU OPTIONS 50 13 4 OPTIONS SETTINGS MATCHING 51 13 5 OPTIONS SETTINGS GENERAL 52 13 6 OPTIONS SETTINGS INSTALLATION 55 14 MAINT...

Page 4: ...VICE REAR 26 FIGURE 21 SIDE VIEW 27 FIGURE 22 SYSTEM DRAWER 27 FIGURE 23 DATA PLATE 28 FIGURE 24 ROTATING SWIVELLING UNIT 29 FIGURE 25 INDIVIDUAL PARTS OF THE OBJECT HOLDER 30 FIGURE 26 OBJECTHOLDER S...

Page 5: ...ABS 46 FIGURE 51 END SCANNING PROCESS 46 FIGURE 52 SCANNING PROCESS DONE 47 FIGURE 53 CAD ICON 47 FIGURE 54 COMPLETE STL DATA SETS IN THECAT SOFTWARE 47 FIGURE 55 ACTIVITYMENU OPTIONS 50 FIGURE 56 SET...

Page 6: ...intended for use in performing optical three dimensional measurements of human jaw models It is possible to measure articulated models in order to simulate masticatory movements using corresponding so...

Page 7: ...ution Basic resolution of the 3D sensing head 62 5 m 80 x 60 x 85 x y z Accuracy according to DIN ISO 12836 6 m Implant bar accuracy following DIN ISO 12836 messured distance 50 8 mm 8 m Output data f...

Page 8: ...ionputincirculation This declaration becomes invalid in case of an unauthorized change of the device Device description Optical 3D scanner Device type Activity 885 EU guidelines applicable machine gui...

Page 9: ...d storage must be observed when lifting and transporting the scanner 5 Please do not place any objects on the scanner as there is a risk that these can fall down owing to the surface structure as well...

Page 10: ...again and restarting the software do not use the scanner any longer The device must be marked as defective and prevented from being put into operation again until the fault is rectified 7 3 Do not rea...

Page 11: ...s open the upper folding lid of the box The box contains a foam piece that protects the scanner which is packed below during transport First pull the foam piece upwards out of the box You can then lif...

Page 12: ...plate 3 3x spacer plates 4 1x system adapter plate 5 1x hex key 6 1x allen bit set 7 1x removable object holder 8 1x power cable 9 2x USB cable 10 Software installation CD including calibration data a...

Page 13: ...re provided to move the device Please note these specifications Stand so that one person each is positioned to the left and right of the scanner Take hold of the scanner with one hand at the bottom fr...

Page 14: ...2 and 3 3 Working together and at the same time lift the scanner out of the packaging and place it at the installation site 4 When doing do make sure that you have free access to the workplace and do...

Page 15: ...0 position before installation Figure 4 Mains switch on the front of the device 1 Connect the device to the USB cables using the USB ports on the rear of the device Fuse USB camera USB device control...

Page 16: ...alibration data contains a code that can be enabled only by the corresponding scanner Therefore compare the serial number indicated on the data plate of the scanner with the serial number indicated on...

Page 17: ...on Figure 7 Set up Installation Define the installation location for the software by using the Browse button to define the path The installation program suggests a standardized path that you can use H...

Page 18: ...General safteyinformation 17 Figure 8 Select Installation location Define the software name in the Select Start Menu Folder window Then click on Next Figure 9 Start Menu...

Page 19: ...ether you require a Desktop symbol and confirm with Next Figure 10 Creating a desktop symbol Before starting the installation check your selected settings and chose Install The installation starts imm...

Page 20: ...completed Figure 12 Completing the installation The scanner specific calibration data must be imported during the initial installation Start the Activity software via the Desktop icon or from the Star...

Page 21: ...ath SO 202 When doing so select only the parent folder and confirm with OK Click Next The calibration data is imported into the Activity software Figure 14 Selected Folder The scanner installation has...

Page 22: ...alibration model Figure 16 individual calibration block These values must be saved in the software after reinstalling the software or replacing the calibration model Start this procedure as follows A...

Page 23: ...calibration only by selecting the start command under the item Options Service 3D calibration Complete The system now performs a 3D calibration this can take several minutes The following message will...

Page 24: ...ence the object is simultaneously monitored with the camera Since the camera cannot capture the entire object if the object is complex in shape as in the case of a jaw model the object is mapped with...

Page 25: ...or and starts these The positions provided in the scan program are started up by the positioning unit and a 3D measurement is performed When scanning adjacent tooth stumps it is usually necessary to m...

Page 26: ...e Lid Ghousing opening Device designation Power switch System drawer Figure 19 Device front USB connection for the camera USB connection for the motor and scanner control Fuse Power cord connection Fu...

Page 27: ...27 Basic information about the device System extract Figure 21 Side View Figure 22 System Drawer...

Page 28: ...mber Figure 23 Data Plate Use only the USB cables included in the scope of delivery if possible These have undergone multiple testing at our company in conjunction with your scanner Communication prob...

Page 29: ...ven swivel axis means that the object that is to be metered can be held in any turning position relative to camera of the 3D sensor that is above the object slide The swivel unit makes it possible to...

Page 30: ...he locking plate so that the plates can be assembled correctly The locking plate is fitted with a magnet and acts as the connection piece with the object holder There is also a lock on the plate for t...

Page 31: ...e an optimum alignment of the model to be scanned in the measuring range a maximum of three additional spacer plates can be mounted on this The locking plate is attached to the top most spacer plate a...

Page 32: ...Height alignment The scanner has a definite height measuring range If the object to be measured is located outside this range no measuring values will be measured there This means that the finished s...

Page 33: ...ince you will usually work with one model system in a laboratory you can work with a standard setting already defined in most cases However we recommend making sure that the height deviation is not to...

Page 34: ...n this occurs automatically when starting the program Clamp the model in the removable object holder and align the height using the spacer plates see Figure 28 and 29 Depending on the scanner and CAD...

Page 35: ...new case Dental DB Information such as customer patient technician etc is to be entered into these fields This example will demonstrate how to operate the device Figure 30 DentalDB case example 12 3...

Page 36: ...he respective scan type colour in the tooth schema Confirm the entries by pressing the Save button Switch the scanner on at the mains The activity software opens automatically after the Scan button is...

Page 37: ...a on the left hand side By pressing the left mouse button you can slide these squares so that they centre on the respective tooth stump squeeze occlusion The scan software can now recognise the positi...

Page 38: ...nner now moves the model down automatically based on the predefined scan strategy and compiles a number of individual measurements from various perspectives During the prescan or the 3D scan the symbo...

Page 39: ...mouse functions Rotate model Left Right mouse button Move model Both mouse buttons Zoom Scroll wheel The software will now prompt you to remove the squeeze occlusion and begin with the model stump sc...

Page 40: ...the pre scan image The neighbouring teeth can also be measured for individual images If this mode is activated by checking the box the neighbouring teeth will be interdentally measured individually If...

Page 41: ...to the fact that the motor driving the object holder could also be turned by hand when switched on with a correspondingly high action of force The motor is not damaged by this but the defined motor po...

Page 42: ...ure 43 Figure 42 Rescan button If Rescan Mode is enabled this green cross will be shown in the centre of the 3D viewer see above Now the edge of the data hole must be positioned below the cross using...

Page 43: ...3 Figure 43 Rescan mode If you click on the blue start button any number of rescans can now be performed until all desired areas are recorded Figure 44 Rescan Areatoundergoa rescan Cross hairsnext tot...

Page 44: ...as matching You can set the quality of the STL under Item 13 4 After matching the records the completed data set is reloaded into the 3D viewer If more areas are missing the rescan mode can be repeat...

Page 45: ...Scanning procedure 45 Figure 46 data cut Figure 47 tailored data file Save the scan data after cutting the data set to size by clicking the Save icon Figure 48 save project...

Page 46: ...matched i e whether there is an STL Blue individual records Yellow STL data set Grey 2D scan see Fig 51 Figure 50 Tabs Now you can close the scan software and begin the construction To do this click...

Page 47: ...construction can begin See fig 53 Figure 52 scanning process done Now start the construction with the following icon Figure 53 CAD Icon The STL data sets are displayed in the CAD software and constru...

Page 48: ...Perform 3D scan Perform 2D scan Move automatically to the service position Open an existing project or STL file Start the matching process Add a new measurement Add bite Add wax up Next in Workflow 13...

Page 49: ...cutting action or measurement Open the dialog Fill holes Save the last work step possible if activated blue Open Settings dialog Information on the product End the Activity program Show camera angle...

Page 50: ...ower side Show data set in isometric alignment Rotate the object around the X axis only Rotate the object around the Y axis only Rotate the object around the Z axis only Normal rotation mode Figure 55...

Page 51: ...o also the data size are determined by the scan quality The higher the surface details the lower the distance between the pixels The maximum distance between the pixels is reproduced by selecting Very...

Page 52: ...as an aid if any measuring errors occur Save images Brightness You can set the light intensity of the camera live image here These settings do not have any effect on the 3D measurements 2D viewer Col...

Page 53: ...hange mouse function The light intensity of the sensor during the measurement is influenced by this Bright for white plaster Medium for beige coloured and Dark for very dark plaster Plaster type If yo...

Page 54: ...can lead to time delays Show measurements at the highest resolution You can use this function to define whether matching is to be made to the existing STL or to the existing individual images The que...

Page 55: ...Settings Installation The storage location of the scan data can be changed here All data is created and saved in this folder Work Folder The language of the user interface is set here The following ar...

Page 56: ...plastic surfaces Please do not treat the case with strong cleaning agents Please remember that the scanner is a sensitive optical device Maintenance and repair may therefore be performed only by trai...

Page 57: ...Imprint Manufacturer smart optics Sensortechnik GmbH Lise Meitner Allee 10 44801 Bochum Germany Please contact your dealer if you have any questions We reserve the right to make changes due to techni...

Reviews: