Smarthome SR-525 User Manual Download Page 35

The SR-525 User’s Guide

Manual


32  

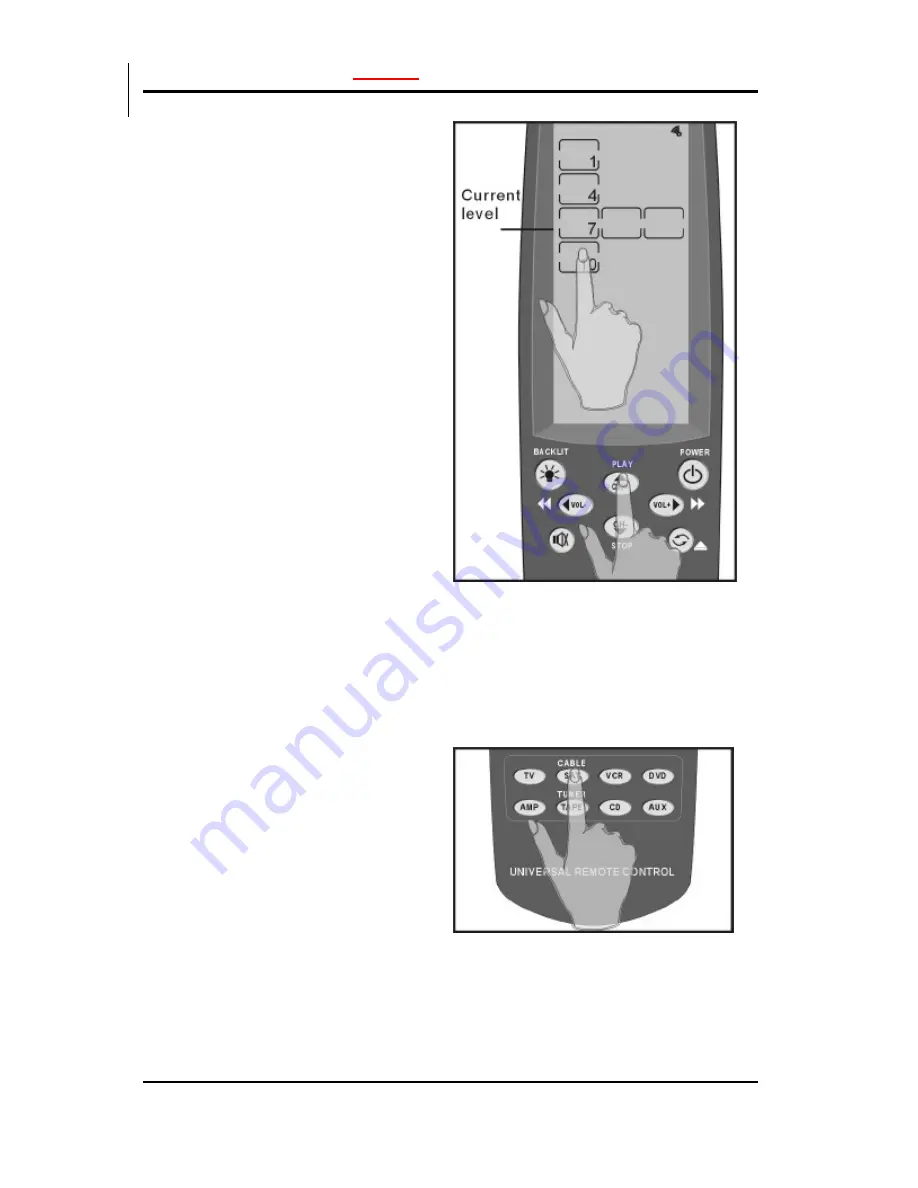
The SR-525 detects the 
ambient lighti ng and will 
turn the backlight on 
according to the setting in 
this screen.   

1 = most sensitive 

10 = least sensitive  

Press the 

up

 arrow key to 

increase

 the sensitivity of 

the backlight to the 
amb ient lighting.   

When set to 1, the 
backlight will automatically 
switch on after a small 
decrease in the ambient 
light brigh tness.   

Press the 

down

 arrow key 

to 

decrease

 the sensitivity 

of the backlight to the 
am bient lighting. 

When set to 10, the 
backlight will automatically 
switch on after a large 
decrease in the ambient 
light brigh tness.   


When you have finished 
making your adjustment, 
press any of the DEVICE 
buttons to exit. 


SR-525 

SMARTHOME™ 1-800-SMART-HOME 949-221-9200 http://www.smarthome.com  Order #8180N

Summary of Contents for SR-525

Page 1: ...SLIMLINE REMOTE SR 525 Universal Remote Control With Touchscreen Learning Function User s Guide SMARTHOME 1 800 SMART HOME 949 221 9200 http www smarthome com Order 8180N...

Page 2: ...stored in a retrieval system or transmitted in any form or by any means electronic mechanical photocopying recording or otherwise without the prior written permission of the publisher Trademarks Trade...

Page 3: ...PTER 3 10 Before using the Learning Function 10 Using the Learning Function 11 Using the Delete Function 16 Deleting a command button 17 Changing the LCD Layout 20 Changing the AUX Device Layout 23 Ma...

Page 4: ...uently Asked Questions 39 APPENDIX D 41 Pre configured X10 Codes 41 APPENDIX E 43 Application Note Applying Sound Field DSP commands from SONY Amplifiers 43 SMARTHOME 1 800 SMART HOME 949 221 9200 htt...

Page 5: ...vices you wish to control This unique concept reduces the number of buttons for each device which makes it easy to find the function you want The SR 525 features eight pre defined customizable button...

Page 6: ...pter 2 Touch screen panel with automatic backlighting for visibility in dim lighting Macro function any command button can hold a macro of up to 25 commands Controls eight customizable device layers i...

Page 7: ...LCD panel an d controls IR Port Point the IR port at the IR receiver of the device you wish to operate Battery Cover Remove this cover to replace the four AAA batteries LCD Keypad The LCD panel hard b...

Page 8: ...gh the steps for inserting the batteries and using the many features Power Supply The SR 525 operates on four AAA batterie s Batteries must be inserted before you can operate the SR 525 To insert the...

Page 9: ...battery low icon When the battery low power warning icon appears replace the batteries with new ones as soon as possible Don t worry When the batteries fail or are being replaced the SR 525 does not...

Page 10: ...rning icon appears in the information screen Be sure to replace the batteries if they have been used for longer than two years there might be a danger of leakage Device configuration data is automatic...

Page 11: ...screen buttons enable you to control your de vices as you would with your original remote control Quickly set up macros and configure your LCD panel the way you want Turning the LCD on To turn the LCD...

Page 12: ...mmerse it in liquid Don t expose the SR 525 to extreme temperatures Keep it away from heat sources Avoid dropping theSR 525 Don t drop anything on the touch screen Clean the LCD touch screen with a so...

Page 13: ...tton If you don t hear a beep when you press the screen you may have deactivated the beep Press any DEVICE button twice to activate the beep function If you still don t hear a beep press the button a...

Page 14: ...vice screens In this case you learn the regular TV functions from the TV remote and the volume functions from the amplifier remote In rare cases this might fail although no corruption of data or other...

Page 15: ...earning eye No need to power on the device Note It is helpful to customize the screen layout before learning the keys see Changing the device layout This way you don t have to delete and relearn butto...

Page 16: ...e learning function Follow these instructions Press the LEARN button for three seconds You hear a beep and then you see theunlock screen to the right Note This screen prevents you from unintentionally...

Page 17: ...your device s remote control at the SR 525 learning eye press the device s power button Note The hard buttons don t have corresponding symbols that flash to indicate that they are ready for learning...

Page 18: ...press the corresponding button of your device s remote control When you hear a beep and see the OK icon release the button The next button to be mapped will start blin king Continue to press the butt...

Page 19: ...ure it with a different remote control When you have finished mapping all the desired buttons from your device remote control to the SR 525 press the LEARN button You hear three beeps and the SR 525 e...

Page 20: ...commands for selected buttons for a device Delete IR commands for all buttons for a device Delete the IR commands for all devices The delete function only deletes the mapped data it does not remove b...

Page 21: ...evice Follow these instructions Press the DELETE button for three seconds You hear a beep and then you see theunlock screen to the right Note This screen prevents you from accidentally modifying your...

Page 22: ...u hear a beep and see the OK icon The bu tton s data has been deleted Note Pressing the button only deletes the mapped data it does not remove the button To learn how to remove buttons refer to chapte...

Page 23: ...want to delete You hear two beeps and see the OK icon All data for the device has been deleted Delete all devices To delete the data for all the devices press the DELETE button for three seconds The d...

Page 24: ...enus Follow these instructions Press the button of the device that you want to configure for three seconds The display will start flashing You hear a beep and then you see the unlock screen to the rig...

Page 25: ...to scroll through the options You can delete the button or choose one of the available icon layouts Note If you don t find the right icon to represent your device function you may use an empty button...

Page 26: ...mode Macro Function The macro feature enables you to store up to 25 commands on any command button When you have created a macro you will be able to run a chain of commands by pushing only one button...

Page 27: ...MACRO button for three seconds You hear a beep and then you see theunlock screen to the right Note This screen prevents you from accidentally modifying your SR 525 Press each number button in any ord...

Page 28: ...for this macro If you want to record another macro press a different macro run key and record the macro To exit press the LEARN button T ime Delays between macro co mmands A chain of macro commands is...

Page 29: ...r three seconds to enter macro setup mode Press each number button until it disa ppears Press the AUX button to open the AUX screen Then press 1 Yo u hear three beeps The 1 button in the AUX screen wi...

Page 30: ...o control your TV set B Press 1 to assign the macro start button Press the TV button Press the power button This will power the TV on Press TV Video This command will switch the TV mode to Video mode...

Page 31: ...l through the three options A two seconds B five seconds and C ten seconds Push the MACRO button until the ten second delay C appears Note You can set this time delay between any two commands Press VC...

Page 32: ...ress the button that you assigned when you recorded the macro In the preceding example the following events will happen when you press 1 in the AUX device screen 1 TV turns on 2 TV switches to video m...

Page 33: ...e for three seconds to enter the LCD backlight configuration mode Note Do not confuse this button combination with the combination for recalling the original LCD layout TV and DVD Otherwise your confi...

Page 34: ...D backlight stays on after you touch the LCD panel Press 1 for a 10 second delay Press 2 for a 20 second delay Press 3 for a 30 second delay After you have made your adjustment press the POWER button...

Page 35: ...to 1 the backlight will automatically switch on after a small decrease in the ambient light brigh tness Press the down arrow key to decrease the sensitivity of the backlight to the am bient lighting...

Page 36: ...Turning off the beep signal Recalling the Original LCD Layout You can reset the LCD panel buttons to their original factory configuration Any configuration changes you have made will be lost The learn...

Page 37: ...and then you see the unlock screen to the right Note This screen prevents you from accidentally modifying your SR 525 The SR 525 beeps several times and returns to normal view The original LCD panel...

Page 38: ...ge Approx 30 ft under typical conditions 30 45 degrees effective angle Memory 128KB Flash memory non volatile Power saving LCD turns off 20 minutes after last operation reactivates aut omatically Back...

Page 39: ...cannot operate a device even after configuring the device using the learning function Make sure that you have correctly mapped your device s remote control to the SR 525 Clear the device data from th...

Page 40: ...on that you pressed has not been configured Configure the button using the learning procedure The RECORD button does not work A feature of the SR 525 prevents the record function of your Tape or VCR f...

Page 41: ...for the respective button and try learning it again by pushing the volume bu tton on the original remote control only briefly Problems learning sound field com mands from SONY Amplifiers See Appendix...

Page 42: ...ions from your amplifier remote In some rare cases if you assign too many different remotes to the same device layer this might fail although no corruption of data or other damage will occur How can I...

Page 43: ...the SR 525 have a built in timer No During battery change does the SR 525 lose its data No the non volatile memory keeps the data during battery change or failure SMARTHOME 1 800 SMART HOME 949 221 92...

Page 44: ...t configuration will be lost Press the Learn button for 3 seconds Unlock learn function by pressing the 4 displayed buttons Hold the device button you want to map the X10 functions to for 5s Press the...

Page 45: ...The SR 525 User s GuideManual 42 Channel Up Channel On Channel Down Channel Off SMARTHOME 1 800 SMART HOME 949 221 9200 http www smarthome com Order 8180N...

Page 46: ...emote control 1 Push SET UP on the Sony remote 2 Enter IR SET 3 Scroll down to MACRO 1 and push ENTER 4 Enter MACRO1 1 5 Under Category enter RECEIVER 6 Enter SONY as maker 7 Scroll down to 2CH and pr...

Page 47: ...for 2ch mode and one button for AFD Mode These are direct inputs The other two buttons ANLG direct and SF mode are not di rect input buttons but will get you to the rest of the 25 or so sound fields F...

Reviews: