background image


3. Wireless LAN 

- SmartAT-870 option facts 


The SmartAT-870 is versatile mobile computer that you can add to your wireless LAN. It has an 
internal 802.11 b/g radio to transfer data using wireless communications. This section of the manual 
assumes that you have already set up your wireless communications network including access 
points. 
Your SmartAT-870 supports TCP/IP network protocols. In a TCP/IP network, the SmartAT-870 
communicates with a host computer directly using TCP/IP. The access point acts a bridge to allow 
communications in wireless networks


3.1 Power on Wireless LAN   

The default of Wireless LAN was set with “WLan off” when your SmartAT-870 was manufactured at 
the factory. 
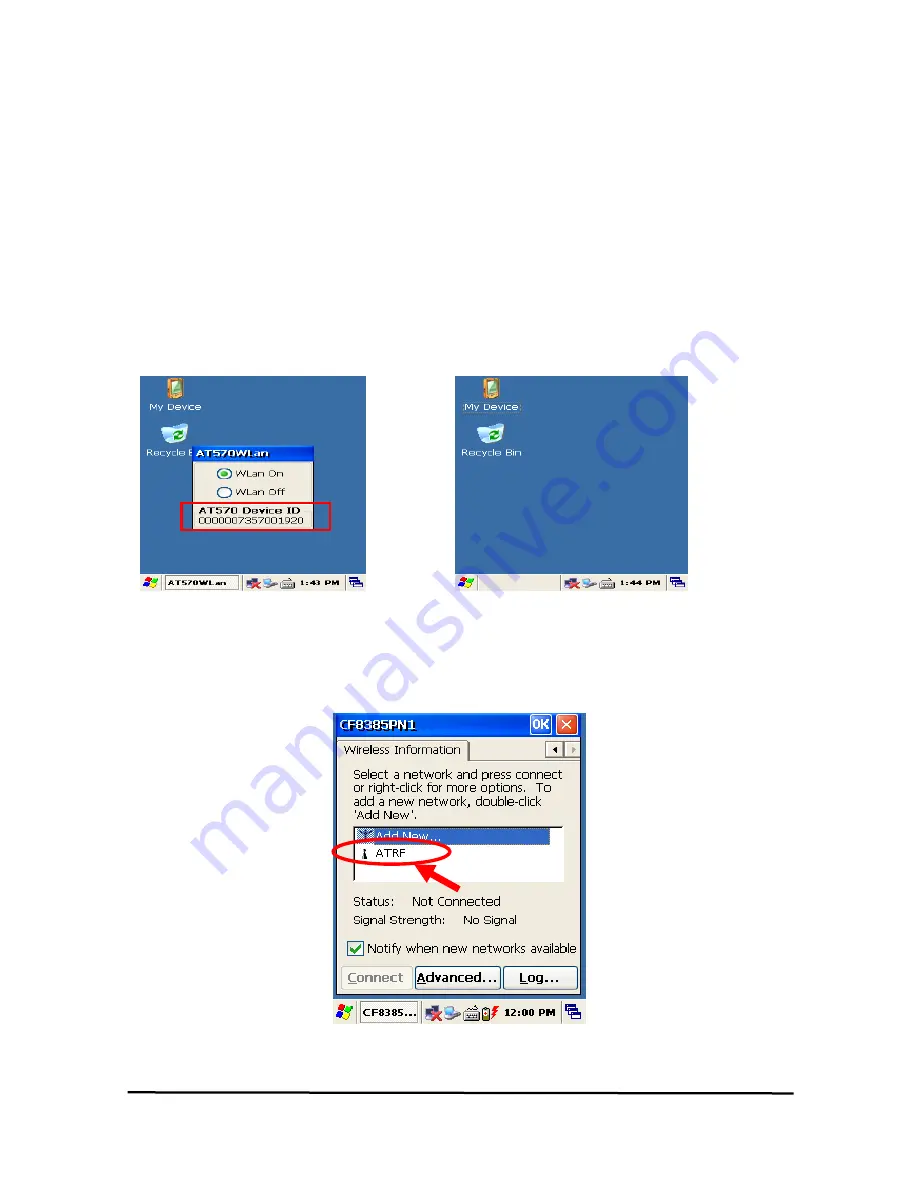
To make wireless LAN on: 

Select


Start > Programs > ATWlan


Figure 1. Wireless icon                        Figure 2. Select AP 
 

After selecting “WLan On” the LAN icon appears on the control bar. 
Connecting your SmartAT-870 to a network device: 

Double tap LAN icon > tap Wireless Information.


Figure 3. Select AP


SmartAT-870 User Reference


43

Summary of Contents for SmartAT-870

Page 1: ...SmartAT 870 User Manual Rev1 1 SmartAT 870 Windows CE NET Ruggedized PDA ...

Page 2: ... 11F Kolon Digital Tower Aston Bldg 505 14 Gasan dong Geumcheon gu Seoul 153 803 Korea Tel 82 2 790 5508 Fax 82 2 790 5509 Email sales sammicomputer co kr Web www sammicomputer co kr Us Office SmartTerminal Computers Inc 5300 Orange Ave Suite 212 Cypress CA 90630 Tel 1 714 761 5300 Fax 1 562 252 8272 Email sales smarterminal com Web www smarterminal com SMARTAT 870 User Reference 2 ...

Page 3: ...ttery 12 2 5 1 Using the adapter 12 2 5 2 Using the Cradle 12 2 6 Backup Battery 13 2 7 Disposal of the spent battery 13 3 Setting up the SmartAT 870 14 3 1 Power On 14 3 2 Power Off 14 3 3 Adjusting the Brightness 14 3 4 Calibrating the screen 15 3 5 Adjusting the Volume 15 3 6 Setting up the Date and Time 15 3 7 Power Configuration 16 3 8 Schemes Tab 16 3 9 Memory Allocation 16 4 Resetting Smart...

Page 4: ...code Symbology Setting 38 2 2 Setting the AT2DEmulator 39 2 3 Scanning Barcode 41 3 1 Power on Wireless LAN 43 3 2 IP Information 44 3 3 Setting manually 44 3 4 Power Off Wireless Off 45 4 1 To enable Bluetooth 46 4 2 Bluetooth Manager 46 4 3 Connecting Bluetooth Printer SPP 46 4 4 Reference for Application Developer 50 4 5 Disconnecting Bluetooth Printer SPP from SmartAT 870 51 5 GPS Module Smart...

Page 5: ...ty information Your safety is extremely important Read and follow all warnings and cautions in this document before you handle and operate SAMMI equipment If you do not follow the safety warnings and cautions you might be seriously injured and the equipment and data are also might be damaged WARNING A warning requires you must pay attention to the operating procedure practice condition and stateme...

Page 6: ...puter is a small ergonomically designed PDA which built on the Microsoft window CE NET 5 0 operating system The PDA uses an Intel Bulverde CPU and a 3 5 VGA color Touch screen display The PDA supports wireless LAN 802 11b g embedded module for communication 1 1 Product Composition Open the packing box and confirm that the items as below 1 1 SMARTAT 870 PDA Body 3 3 Lithium Polymer Battery Pack 2 P...

Page 7: ...trated parts Figure 2 Front View 1 LCD Touch screen Display 10 Speaker 11 Power Key 6 Power LED Alarm Indicator 13 Key Pad 12 KBD Key 9 Reset Key 2 Scan key Right 5 Volume key Left With Fn Key 18 MIC 4 LAN ON OFF Alarm 19 Battery LED Figure 3 Side view SmartAT 870 User Reference 7 ...

Page 8: ... Scan Window 20 Antenna 22 Flash Figure 4 Top view 14 Ear Jack 8 USB Serial Synchronization Port 7 DC Power Jack Figure 5 Bottom view 16 Hand strap Holder 15 Battery Compartment 17 Styles Figure 6 Rear view SMARTAT 870 User Reference 8 ...

Page 9: ...ndow The scanning beam is emitted from this aperture Aim the scanning beam at the bar code you wish to scan 4 WLAN ON OFF display light To show WLAN s on off status You can adjust the volume of the device by using the FUN button with the up and down arrow button 5 Volume Key 6 Power LED Alarm Indicator The power LED will be change into red when the device under charge status When the battery is co...

Page 10: ...sappears Use the alpha numeric function and navigation keys on the keypad to enter numbers letters symbols etc 13 Keypad Connecting to the media player you can listen to the audio files or to communicate with other devices by using an application such as GSM 14 Ear Port 15 Battery Compartment You can install the removable main battery which can provide the power to the device The PDA comes with th...

Page 11: ...e other method Tap start Suspend 2 1 3 What is idle mode The device has been powered but has not been used for a period of time called idle mode When the idle mode time arrived which you have set before the device will get into the suspend mode automatically When you restart your SmartAT 870 those programs which have been running for sometime before the idle mode will be recover rapidly If you wan...

Page 12: ...nsert the bottom of battery into the sunken place located in battery compartment and press the battery latch to the left until the battery is installed completely 2 4 Battery discharging Several factors determine the life of your battery such as extreme temperatures input devices and your usage but generally you can use SmartAT 870 for 6 12hours If the SmartAT 870 is not on external power and batt...

Page 13: ...hat reason Refer to Flash Disk for more information If both the battery pack and the backup battery are allowed to discharge completely you must recharge both batteries for thirteen 13 hours The backup battery is charged off the battery pack so it is important to keep the battery pack with at least a minimal charge so the unit can maintain date time data and other settings 2 7 Disposal of the spen...

Page 14: ...ion suspends the device but actually does not turn it off All running applications remain as you left them until you press the Power key again to resume operation of the device Figure 1 Main Screen 3 3 Adjusting the Brightness The SmartAT 870 manufactured at the factory keeps 80 brightness but because of several reasons such as dark environment or user s condition of eyesight and above all the ill...

Page 15: ...Recalibrating 3 5 Adjusting the Volume Volume Sounds In the factory your SmartAT 870 has been set for the maximum volume you can adjust the volume to your suitable sound To adjust Volume Sounds Tap Start Settings Volume Sounds Volume tap tap to adjust Volume Sounds tab tap to set the imitated sounds Figure 4 Adjusting volume 3 6 Setting up the Date and Time Date time You can set the current time l...

Page 16: ...tatus 3 8 Schemes Tab It allows you to determine the entry time of user s idle mode system idle mode and suspend mode while using either main battery or AC power This will helps you to save more power if you have to move repeatedly on your work To exit press OK from the command bar or press the Enter key on the keypad Figure 7 Schemes Tap 3 9 Memory Allocation To adjust the Memory Allocation as fo...

Page 17: ...lication shortcuts on the screen The custom settings are existent in the registry The RF network s connecting status will be recover rapidly 4 2 Hard Reset cold reset When you should perform the cold reset If the warm reset fails to restore system operation it may have necessary to perform a hard reset This is a boot method that formats the object store to clean data and registry information from ...

Page 18: ...p important application and execute user s own application automatically after the hard reset To save your application program the procedure as below 5 1 Hard reset 1 At first copy an execute file you want to re execute 2 Double tap My Device Flash Disk Open Start folder Open Hard Reset folder 3 Paste the copied file in the Hard Reset Folder Fitgure1 Click Flask Disk Figure2 Click Start folder Fig...

Page 19: ...ou want to execute after warm reset 2 Double tap My Device Flash Disk Open Start folder Open Reset folder 3 Paste the copied file in the Reset folder Figure 5 Open Reset Folder Figure 6 An application in theReset folder If you don t want to execute the application copied in the Flash Disk after the Warm reset is performed press the Fn key during the Warm reset SmartAT 870 User Reference 19 ...

Page 20: ...s get replaced Copy files you want to replace after the hard reset Double tap My Device Flash Disk Open CopyFile Figure 7 Click Copy File Figure 8 Copy files you want to replace To make your files return back to the background screen Windows Background after Hard Reset paste your Files into the Desktop folder To make your files return back to programs Windows Programs folder after Hard Reset paste...

Page 21: ...and even if it is discharged completely The main function of registry 1 Makes connection between WLAN and AP 2 Execute RegistryBackUp program and save registry 3 Restores the connection between WLAN and AP after hard or soft reset To save registry Tap My device Windows Double tap Registry Backup Figure 1 Registry BackUp Figure 2 Save or delete registry Figure 3 Registry Save SmartAT 870 User Refer...

Page 22: ...se Uppercase Special Figure4 Changing Current Character 7 2 Inputting the data Numeric Mode After making your choice to the Numeric Mode through the key key and just press from 1 to 10 numeric keys Alpha Mode In alphabetical order there are 2 3 letters per key To input the first letter press the key you want input one time and to input the second and third letter press the key how many times as th...

Page 23: ...ute App1 program KBD App1 Execute User Program program Ref Control Panel Button Setting App To execute the program designated by user directly Tap Start Control panel Application Buttons and designate App1as you want to execute anytime KBD button you can make the touch screen display the input panel program directly to press the KBD button on the front of the SmartAT 870 SmartAT 870 User Reference...

Page 24: ...ject on the SmartAT 870 s touch screen display Use only the supplied stylus or plastic tipped pens intended for use with a touch screen sensitive display Use the stylus to Navigate the touch screen display Select characters in the soft input panel SIP Select applications from the desktop or system tray Select buttons tabs fields and text within applications and dialog boxes SMARTAT 870 User Refere...

Page 25: ...ve program and current time switch to programs input panel and battery status Command bar Input panel WLAN status Battery status Current program Tap to start a program Figure 1 Task Bar and Command Bar Use the command bar to perform tasks in programs The command bar includes menu names functions 1 2 Pop up Menus Use pop up menus to quickly perform an action on an item For example you can use a pop...

Page 26: ... can see the following start screen Try to double tap My device Icon windows Program tap an icon you want to execute You can also display it by tapping the Start flag at the bottom left of your display Figure 2 Executing a Program to use Start Flag SMARTAT 870 User Reference 26 ...

Page 27: ...te using transcriber Double click Figure 3 1 Selecting SIP menu Figure 3 2 Popping up SIP To make pop up menu appears double tap the keypad icon on the taskbar To make soft input panel SIP popped up tap the keypad icon on the taskbar or press KBD key on the keypad To see Soft Keyboard Option Tap Start Settings Control Panel Input panel select keyboard from the current Input method drop down list t...

Page 28: ...rite anywhere on the screen using the stylus just as you would on paper Double tap input panel icon than tap Transcriber After selecting than write anywhere on the screen Figure 5 Using Transcriber in an application program SMARTAT 870 User Reference 28 ...

Page 29: ... PC make sure that you have v4 2 or higher To install Microsoft ActiveSync complete the following steps on the PC 1 Go to the Microsoft Windows CE NET website and download the most current version of ActiveSync http www microsoft com mobile pocketpc downloads Install the most current version of Microsoft ActiveSync v4 2 or greater on the host PC 2 Once ActiveSync is installed it will attempt to co...

Page 30: ...d pwd igure 1 WordPad 5 Microsoft WordPad U Select Start Programs Microsoft WordPad The PDA comes with WordPad for Windows CE N and document file types are compatible with WordPad Text txt Word Document doc Rich Text File r When you transfer file types other than pwd to the Windows CE NET device it translates the files into a compressed Windows CE NET file type F ...

Page 31: ...on your desktop to copy digital audio and video files to your SmartAT 870 You can play Window media and MP3 files on your SmartAT 870 To display Media Player Tap Star Programs Media Player Figure 1 Media Player SmartAT 870 User Reference 31 ...

Page 32: ...Explorer by selecting Start Programs Internet Explorer 2 To set a default home page navigate to the desired default web page 3 Select View Internet Options from the command bar 4 Enter the desired URL in the Start Page field 5 Press the OK button Figure 1 Internet Explorer SMARTAT 870 User Reference 32 ...

Page 33: ...ilable where ever a button appears in the upper right hand corner of the window To open context sensitive Help select tap the in the upper right corner of most screens Select tap the desired item from the list of hot links Figure 1 Sensitive Help SmartAT 870 User Reference 33 ...

Page 34: ...n be changed 1 1D barcode Scanner SmartAT 870 option facts This chapter introduces the SmartAT 870 built in with the 1D 2D barcode Scanner program to assist you in making the most out of your SmartAT 870 1 1 1DScanner Demo program You can execute AT1DSMScanner coded from SAMMI to make sure that your SmartAT 870 scans barcodes exactly Figure 1 Scan Window for 1D or 2D image 1 To execute Scanner Dia...

Page 35: ...4 Select barcodes that you are using Figure 5 Detailed function Figure 6 Load factory default Optional Function Decides to format or not the result value to be added with its type SmartAT 870 User Reference 35 ...

Page 36: ...he following figure Fiture8 Barcode value in the WordPad Program 1 Using the AT1DEmulator Because the AT1DEmulator can apply to all application programs that have a cursor such like Web program Wordpad and others you can input the scanned data directly without coding any application program 2 To executing Emulator Tap Start Program Scanner AT1DTCEmulator Figure 9 AT1DTCEmulator exe Tap this AT1DTC...

Page 37: ...rmination code B CRLF Default Setting Carriage Return Line Feed Enter code C Space Input Space code D Tab Input Tab key code 3 KeySetup You can make Hardware keys set to aim the lager beam A F1 F8 Key press those keys on the keypad to read barcode after setting B Gun1 Gun2 Set for the gun typed SmartAT 870 C KBD 1 KBD 2 key Same with the F1 F8 Key D Left Key Right Key key Same with the F1 F8 Key 4...

Page 38: ...en the lager beam is aimed to a barcode 2 Make sure that your SmartAT 870 scans barcode exactly on the demo program The scanned data will be displayed on the screen if your SmartAT 870 reads a tag exactly If you stop scanning before your SmartAT 870 reads a tag completely An abnormal sound comes out Figure 2 2D Scanner Function After Scanning barcode the value you scanned will be displayed on the ...

Page 39: ... Like an input device the AT1Demulator makes data displayed in an application program see the following figure Figure 5 Barcode value in the WordPad Program 1 Using the AT2DEmulator Because the AT2DEmulator can apply to all application programs that have a cursor such like Web program Wordpad and others you can input the scanned data directly without coding any application program SmartAT 870 User...

Page 40: ...2 To executing Emulator Tap Start Program Scanner AT2DTCEmulator Figure 6 AT2DEmulator exe Figure 7 Tap this AT2DEmulator Icon 3 Setting the Emulator Figure 8 Setting Menu SMARTAT 870 User Reference 40 ...

Page 41: ...ode 5 Vibrator set the Vibrator On Off after Scanning Barcode 6 Setting NO use 7 Close Make Emulator Program closed 2 3 Scanning Barcode To use the scanning function complete the following steps 1 If you have not already done so remove the protective plastic film before using devices equipped with a laser scanner Warning Some SmartAT 870 come with laser scanners that scan using laser light Never l...

Page 42: ...the vibrates until the trigger is released or after five 5 seconds The beep tone and Vibrates indicate a good read If the bar code scan failed adjust the reading angle or distance Make sure that the scanning beam scans across all bars of the bar code 6 The bar code data is entered in the current application Once a bar code is read successfully the scanner turns off automatically SMARTAT 870 User R...

Page 43: ...P IP network the SmartAT 870 communicates with a host computer directly using TCP IP The access point acts a bridge to allow communications in wireless networks 3 1 Power on Wireless LAN The default of Wireless LAN was set with WLan off when your SmartAT 870 was manufactured at the factory To make wireless LAN on Select Start Programs ATWlan Figure 1 Wireless icon Figure 2 Select AP After selectin...

Page 44: ...ormation To see IP Information Double tap the LAN icon and tap IP Information tap Figure 4 IP Information 3 3 Setting manually You can also connect your SmartAT 870 to a network with manual method in the Wireless Properties To set wireless LAN in Wireless Properties Double tap WLAN icon tap WLAN Tap Input data Tap OK Figure 5 Wireless Properties SMARTAT 870 User Reference 44 ...

Page 45: ...3 4 Power Off Wireless Off To make wireless LAN Off Press FN key and Esc key at the same time and select WLAN Off Figure 6 Wireless Off SmartAT 870 User Reference 45 ...

Page 46: ...oth virtual COM ports registered Reactivate the connections manually as the system does not do them If Bluetooth was disabling before a clean boot was performed the SmartAT 870 boots up with disabled To turn on Bluetooth Double tap My Device Windows Tap Bluetooth icon 4 2 Bluetooth Manager Bluetooth Manager is a program that makes your SmartAT 870 scan SPP device and connect to a device that you w...

Page 47: ...the information of scanned devise will be displayed on the screen Note If the BT_Manager has found out the printer you want to use before the OK massage appears and you want to stop scanning other printer you can stop scanning other printer to click the Scan Stop button Figure 4 Step 3 After scanning device SmartAT 870 User Reference 47 ...

Page 48: ...ur cotton down lower part text boxes under two clicks from in equipment list and comes Figure 5 Step 4 Selecting the Device 1 From while equipping which is searched under using boil must select the equipment certainly 2 Connect where when has become the equipment selection consecutively does a connection with SSP equipments Figure 6 Step 5 Press the Connect button SMARTAT 870 User Reference 48 ...

Page 49: ...on Mode Save 1 picture 5 and identically searches SSP systems and selects 2 Inputs Pin Code where the printer manufacture company provides 3 Connect button and click connects 4 Mode consecutively maintains Save buttons the connect state which is hardware Endures automatic connection rehabilitation 5 Exit button Apply consecutively BT_Manager programs bell Figure 8 Step 7 Press the Mode Save after ...

Page 50: ...through the BT_Manager the BT_Manager program is only for hardware connection support so you will never use it as far as the Bluetooth Printer is not changed 2 If you make program with the EVC Tool you need to set the Port as COM3 and Baud rate as 9600bps Ex EVC Source Open Windows API CreateFile Function g_BT_Handle CreateFile _T COM3 GENERIC_READ GENERIC_WRITE 0 NULL OPEN_EXISTING FILE_ATTRIBUTE...

Page 51: ... to support power to the Bluetooth chip modulated in SmartAT 870 to save more power 3 If you want to connect your SmartAT 870 to another printer Start Program Tap BT_Manager To disconnect bluetooth printer from AT 870 1 Execute BT_Manager 2 Click the Open button 3 Select 9600bps and select 1 in the Mode Select box 4 Click the DisConnect button Figure 9 Click BT_Manager Figure 10 Step 1 Click COM3 ...

Page 52: ...e power press the Power Off button Figure 12 Step 3 Power off Click Note You should close the program after tapping the Power Off button therefore you can use the program again anytime SMARTAT 870 User Reference 52 ...

Page 53: ...r that please double click the GPS_Power_Init the EXE file that in the Flash Disk And than tap the GPS EXE icon the following GPS screen appears Figure 4 Executed GPS screen Figure 5 Comm Setting If you tap the Agree tap in the figure 5 the Comm Setting screen appears For executing the GPS you need to configure the port and baud at first Select the connect on the command bar and select Serial Port...

Page 54: ...am is operated normally you can see the red lamp see the 1 in the figure 26 glittering The data received appears in the part of the 2 but according to the reception status it takes more or less time to access data 1 2 Figure 9 GPS Reception Status Confirmation of receiving GPS data 1 Find an open place to check your GPS SMARTAT 870 User Reference 54 ...

Page 55: ...cording to the actual environment the time to receive data is different about 3 10min 3 After receiving GPS data once it is more fast to receive GPS data than the first attempt SmartAT 870 User Reference 55 ...

Page 56: ...uting Camera Camera Screen Delete File Button Adjusting Brightness Preview Window Figure 2 Camera Screen Preview Start Button Zooming button Resolution Setting Button The number of stored files Capturing button Re rotation Button Preview Stop Button Setting Viewing Effect SMARTAT 870 User Reference 56 ...

Page 57: ...o kind The internal organs style RF13 56 is a type where modules are established with the internal organs RF13 56 Module Figure 1 RF13 56 Module The internal organs style 7 2 MultiReader Read Write Possibility Diagnostics Execute 시작 Program ATRFMultiReader Execute the program Figure 3 RFID Program execution SmartAT 870 User Reference 57 ...

Page 58: ...in the leader the lighter registration MF_UID Mifare Tag ID Read Block Read Block Data Read Block Write Block Data Write Keyload Increment Price in block data Decrement Reduce productions a price in block data Figure 4 Mifare 2 ISO 15693 Tag ISO 15693 Tag Window UID 15693 Tag ID Read R Block 15693 Block Data Read W Block 15693 Block Data Write Clear Erases a display screen coat data Figure 5 ISO 1...

Page 59: ...ifare Tag Window UID Ultra Light Mifare Tag ID Reading R Block Ultra Light Mifare Block Data Read W Block Ultra Light Mifare Block Data Write Clear Erases a display screen coat data Figure 6 Ultra Light Mifare SmartAT 870 User Reference 59 ...

Page 60: ...na 1 Gun Connector 2 Gun Locker Figure 2 Gun Type RFID Reader Figure 3 Gun Type RFID Reader Gun handle mount You put the gun handle into gun connector fix by gun locker Gun handle desorption You pull gun locker subtract gun handle 1 Program execution UHF in order to execute 900MHz R S programs referring to the explanation the lower part wishes Figure 1 Demonstration program icon SMARTAT 870 User R...

Page 61: ...t contents of module Figure 2 Main Menu 3 Multi Tag Reading 1 Selects Gen2 protocols 2 Start the button with the push button Stop is exchanged and attempts a reading 3 Stop presses the button and to discontinue a reading Start is exchanged 4 As the tag modification which reads Tag Count numbers increase 5 Checks in Continue and reads the tag continuously and as the number of times counting the cor...

Page 62: ...lock Data Reading 1 Reads and character selects BankType where does 2 Start locations and selects Length 3 Presses Block Read buttons or presses Fn1 height When reads 4 Block contents the block contents is indicated in the screen which 5 If AccessPassword and KillPassword territories are becoming Lock and access password without the reading is impossible Block Data Write 1 Selects Write percentage...

Page 63: ...Password 4 Block Write Push Button 5 Success is indicated if succeeded 6 BankType Start after at 0 selecting Length at 2 Block Read confirms Kill Password where is input consecutively with RESERVED Changes Access in order Password from Access Password territories must be becoming UnLock AccessPassword and KillPassword becomes Lock when case Read Write Access Password are necessary 7 Lock UnLock Me...

Page 64: ...ice which modules is 0 0 when the user stands still until continuously accomplishes an order Will be able to change 1 first level comfort price 4 Buzzer Switch From RFID modules the tag recognition hayss time lights Buzzer where rings and puts out 5 Session Value Index value 1st time about low of early stage once will read tag in 0 5 intervals and a data again and the data which admits will read w...

Reviews: