background image


ESTABLISHING AN RS-232 CONNECTION 


Before you start: 

Controlling a Smart-AVI device via RS-232 requires an RS-232 card installed on your computer or a USB 
to RS-232 adapter. Below are instructions on how to create an RS-232 connection between a PC and the 
Smart-AVI device. 
 
Use terminal client software such as the PuTTY to connect to the Smart-AVI device. Make sure to use 
communication settings 9600 bps, N, 8, 1, No flow control. 
 
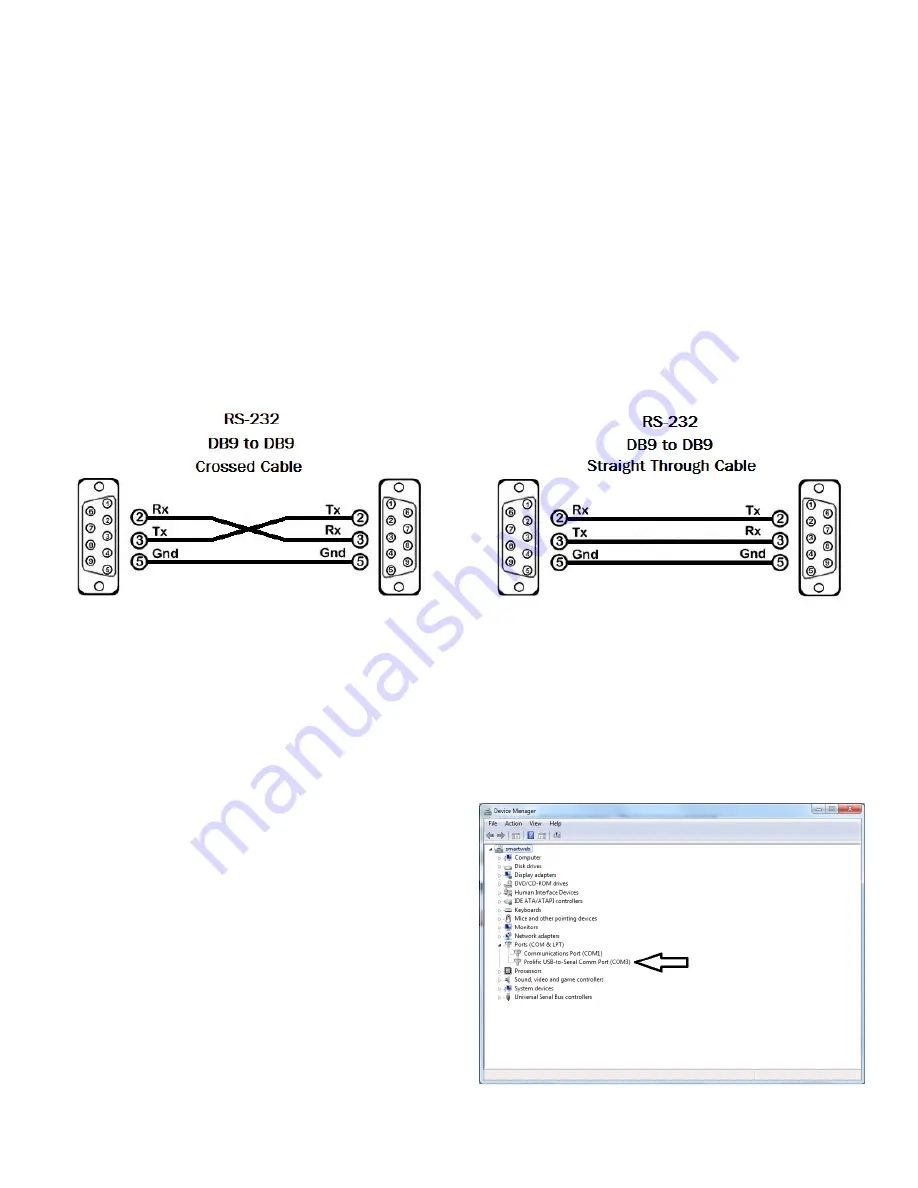
Check the device and your PC to determine if you need a male to male or a male to female cable and how 
long it needs to be. The Smart-AVI device requires a straight through cable. You  can use a Null Modem 
Adapter to convert a crossed cable to a straight through cable. Examples of crossed and straight thorough 
cable pin-outs are shown below. The standard maximum length for an RS-232 cable is 50 feet. Call our 
Smart-AVI Support Engineer if you require more information.  

Figure 7-1 

Examples of 9 pin RS-232 Straight Through and Crossed Cables 


Establish a connection to the Smart-AVI device:


1.  Connect an RS-232 cable to the RS-232 connector on the PC. 
2.  Connect the other end of the cable to the RS-232 port of the Smart-AVI device. 
3.  Use Windows Control Panel / Device Manager to identify the Com port number. See instructions and 

Figure 7-2 below. 

4.  Power on the device. 
 
If you are using a USB to COM port adapter on a Win-
dows PC and need to identify the COM port used, do 
the following: 
 
1.  Click on the start button.  
2.  Click on  Control Panel.  
3.  Click on Device Manager.  
4.  Click on the arrow  next to Ports (COM & LPT). 
 
You should see the name of  your  adapter and the 
COM port number in use. 


Figure 7-2 

Summary of Contents for DPN-4 Duo

Page 1: ...1 Made in U S A www SmartAVI com 1 800 AVI 2131 DPN 4 Duo User Manual Access Control up to 4 Computers from a single Workstation 4 Port Dual Head Displayport KVM switch with USB 2 0 and Audio Sharing...

Page 2: ...BLISHING AN RS 232 CONNECTION 7 LIMITED WARRANTY STATEMENT 8 Figure 2 1 Figure 2 2 PART NO QTY DESCRIPTION DPN 4DUO S 1 4 Port Dual DisplayPort KVM Switch with USB 2 0 and Audio Sharing PS5VDC3A 1 Pow...

Page 3: ...ssential as it simulates the existence of the keyboard and mouse to all the computers while switching without interruptions FEATURES Zero pixel loss with TMDS signal correction Supports all USB 2 0 De...

Page 4: ...0 1 0 V Common Mode Rejection at 60 dB USB Signal Type USB 2 0 1 1 and 1 0 w internal hub Input Interface 4 USB Type B female Output Interface 2 USB 1 1 Type A female for keyboard and mouse 2 USB 2 0...

Page 5: ...S 232 for control functions 5 Connect the USB keyboard and mouse to the two USB ports marked for them on the right 6 Connect the DisplayPort monitors to the OUT connectors on the DPN 4 Duo 7 Optionall...

Page 6: ...otkey commands are listed below RS 232 Control RS 232 control allows for remote control of the DPN 4 Duo See the section on establishing an RS 232 connection in this manual Set the connection to 9600...

Page 7: ...crossed and straight thorough cable pin outs are shown below The standard maximum length for an RS 232 cable is 50 feet Call our Smart AVI Support Engineer if you require more information Figure 7 1...

Page 8: ...t AVI Any replacement product could be new or like new provided that it has functionality at least equal to that of the product being replaced Smart AVI limited warranty is valid in any country where...

Page 9: ...arranties of merchant ability and fitness for particular purpose SmartAVI will not be liable for errors contained herein or for inci dental or consequential damages in connection with the furnishing p...

Reviews: