background image

smartwitness.com 

| 1016 Lunt Ave. Schaumburg, Illinois U.S.A. | Tel: 312.981.8774 | 

sales.usa@

smartwitness.com

9

THIS IS VIDEO TELEMATICS

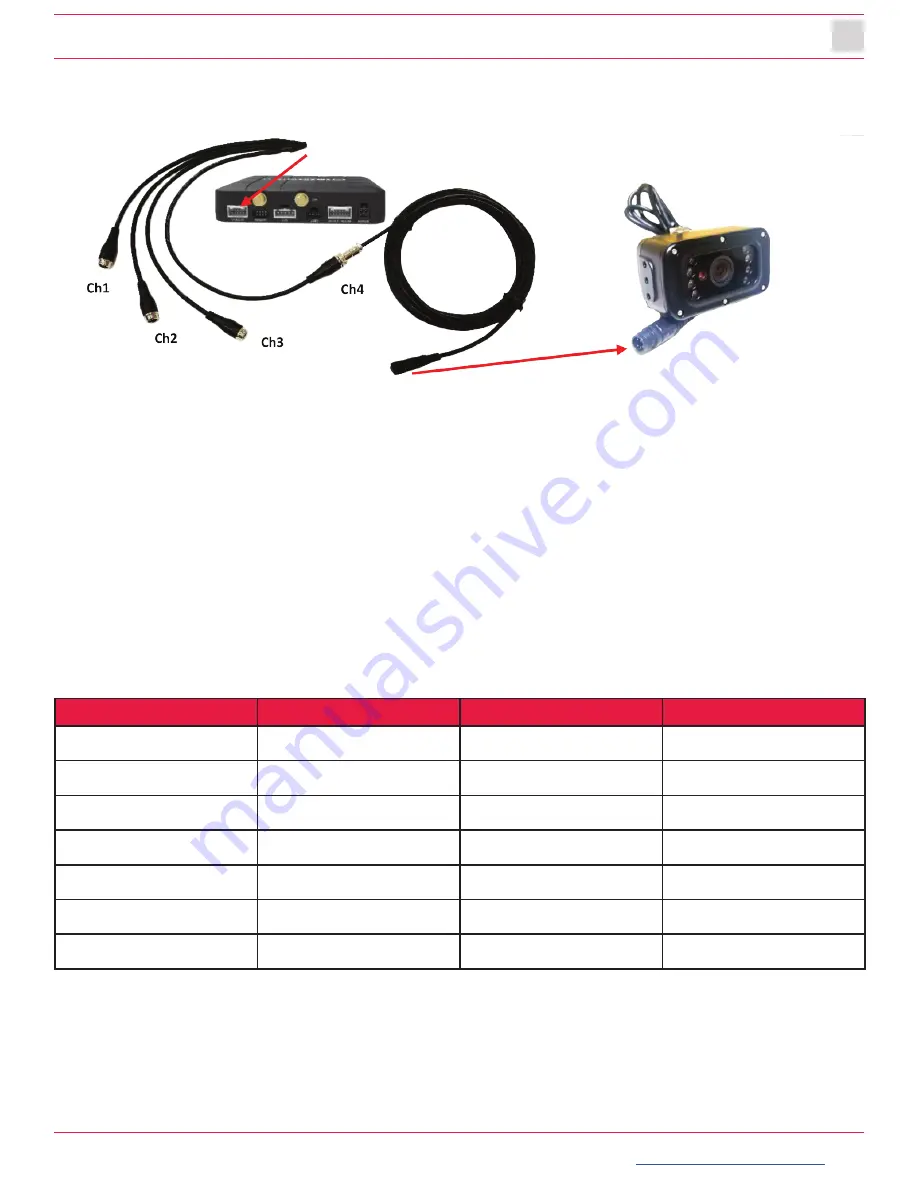
7.  Connect all cables to CP4 Recorder. Secure the windshield mounted camera cables into the 

headliner and down the A-Pillar.


Camera Channel Inputs

The CP4 has some restrictions on which cameras can be connected to which channel 

inputs.

Restrictions

1. 

You cannot connect an “A” camera to channel 4.

2.  Channel 2 and channel 3 must have the same camera type (either both “C” cameras or both “A” 

cameras.

Acceptable Configurations

The table below shows 

acceptable

 camera input configurations:

Channel 1

Channel 2

Channel 3

Channel 4

A

A

A

C

A

A

A

-

A

A

-

C

A

C

C

C

C

A

A

C

A

A

-

-

C

C

C

C

Required

Summary of Contents for CP4-NA-LTE

Page 1: ...R CP4 NA LTE 4 Channel HD Recorder Installation Guide smartwitness com Version 1 2 ...

Page 2: ...Restrictions 9 Acceptable Configurations 9 Unacceptable Configurations 10 GPS Reception 11 Power Cable and Wiring 12 Power Connection 12 Video Output Cable I O Harness 12 Locking Enclosure 13 Front View open 13 Rear View closed 13 Wifi Modem Connection 13 LCD Monitor Connection 14 Completion Power up 15 Troubleshooting 16 LED Status 17 CP4 NA LTE Table of Contents ...

Page 3: ...m can be dangerous to both you and your vehicle This installation is intended only to be a guide since vehicle designs and power input sources can vary significantly from vehicle to vehicle If you need to schedule a professional installation service in the USA for your SmartWitness device s please visit smartwitness com scheduleinstall and submit the online form All cellular enabled CP4 devices mu...

Page 4: ...and Gyro adjustable sensitivity 128GB SD storage capacity record up to 150 hours of footage on 4 camera setup Dual Record mode Continuous Event Optional Audio Recording Tamper Resistant locking case available Key required to access SD card Data Three 12V alarm input triggers for advanced event recording Built in temperature logic for improved performance in high temp environments Auto SD card form...

Page 5: ...pre inserted if applicable Power Cable BAT IGN BAT Remote Controller Panic Button with 3M adhesive Video Output Cable and I O triggers Camera Input Cable 4x Aviator input for Ch 1 4 GPS Antenna Module Audio Microphone Torx Screw x2 and Torx T screwdriver Velcro tape x4 and Wire Splice clip x5 External 3G LTE Antenna Locking Enclosure Mounting Bracket Optional Accessory External Wi Fi Modem Optiona...

Page 6: ...Tel 312 981 8774 sales usa smartwitness com 6 R Hardware Overview Watch the CP4 NA LTE 360 Hardware Overview Video here Dimensions Front View Built in Microphone 3 55 4 75 Torx Screw Serial Port Debug Port USB Input 2 Microphone Input Slide Lock SD Card Slot ...

Page 7: ... recorder and locking case if applicable The default axis adjustments by device position is set as shown on the right 4 Install all the interior and exterior cameras with 3M dual sided adhesive or hard mounting screws confirm with customer as to the desired installation method and locations All four cameras will be connected to the CP4 recorder via the Camera Input Cable Camera Input Harness CH 1 ...

Page 8: ...eld Infrared LEDs SVA045 AM Road facing on Windshield No IR LEDs SVA035 A Outside of vehicle either side mount or rear backup view IP 69 Weatherproof Camera module can rotate 360 and tilt up and down as needed SVA036 C Outside of vehicle Rear backup view IP 69 Weatherproof Sun rain shield included SVA033 C Versatile camera may be mounted as driver facing inside side view outside or rear view outsi...

Page 9: ... Camera Channel Inputs The CP4 has some restrictions on which cameras can be connected to which channel inputs Restrictions 1 You cannot connect an A camera to channel 4 2 Channel 2 and channel 3 must have the same camera type either both C cameras or both A cameras Acceptable Configurations The table below shows acceptable camera input configurations Channel 1 Channel 2 Channel 3 Channel 4 A A A ...

Page 10: ...nel 3 Channel 4 A A A A A A C A C A A A C C A A C A C A A C C C C C A 3 Route the GPS cable and LTE Antenna cable if applicable up the side panel and on the dashboard in view of the windshield so it can have a view of the sky to acquire GPS signal Activate the product in an area without large buildings to improve GPS reception The temperature ranges for optimum operation of the GPS receiver in you...

Page 11: ...yers and or alarms using GPS 4 If you are using a receiver connected by cable electric interference can be avoided by simply changing the location of the receiver antenna 5 On heavily overcast or cloudy days if the vehicle is in a covered location such as under a bridge or raised roadway in a tunnel an underground roadway or parking area inside a building or surrounded by high rise buildings 6 If ...

Page 12: ...on the way down to the vehicle s power source Power Connection Video Output Cable and I O Harness optional Power Specifications Input DC 12 24V 3A Required Power BAT Ground BAT Ignition IGN Red Black White White Purple Green Orange Blue Gray Brown Black Alarm In1 Voltage On Off 3 70V Alarm In2 Voltage On Off 3 70V Alarm In3 Voltage On Off 3 70V Alarm In4 NC NO Open Close Speed TACHO RPM TACHO Alar...

Page 13: ... 13 THIS IS VIDEO TELEMATICS Locking Enclosure Optional Front View open Rear View closed Wifi Modem Connection Optional 1 Connect external modem to only the USB1 input on the back of the CP4 unit 2 The CP4 remote should have a solid blue and green LED to indicate network connection after bootup USB 1 ...

Page 14: ...AV OT Alarm Input port on the rear of the CP4 Remote Panic Button The default display is Quad view 2x2 with all cameras shown to change the video display channel press the M2 button see below on the CP4 Remote Panic Button to select which camera to view Each press will change the camera on display with the last option being all camera views Trigger inputs are associated to live channel display In ...

Page 15: ...to create a support ticket 3 Login to install smartwitness com and complete the installation wizard to validate the installation and generate the installation report G Sensor Calibration G sensor calibration is needed after installing the CP4 1 Turn on the unit and wait until it starts recording 2 Press and hold M1 button located on the remote controller for more than 2 seconds 3 You will hear a b...

Page 16: ...be initialized with the CP4 Configuration Tool for the device to function properly and the right settings must be applied IF SD card is not initialized blank the CP4 will automatically initialize the SD card Apply the latest NAND settings during the rebooting process 3 CP4 red LED is solid Please verify proper voltage and amperage is being supplied to the Red BAT White IGN cables on the power harn...

Page 17: ...al Record Continuous Recording On Event Recording Flashing blink rate fast No Record Not Recorded Off Network 3G Network Device Ready On Communication On Function SD Initialize format Off On and Off Off and On Beep 1 time continuously G Sensor Calibration Beep after 2 sec Beep Beep FW Upgrade On and On Off and Off On and On Off and Off Button Press Beep 1000 Hz 200 ms Beep Warning System Warning S...

Page 18: ...smartwitness com 1016 Lunt Ave Schaumburg Illinois U S A Tel 312 981 8774 sales usa smartwitness com 18 R Notes ...

Page 19: ...le risk is analyzed R Video Evidence Capture High Resolution cameras capture images of the road inside and outside the vehicles sides and rear views GPS Location Recorded Built in GPS Glonass provides precise event location route vehicle speed and direction Network Connected Cellular connectivity provides real time images live location and on demand HD video upload Events Driver Analyzed Detailed ...

Reviews: