background image

 16 

4. Bundled Software (SlidyBike GPS) Introduction: 

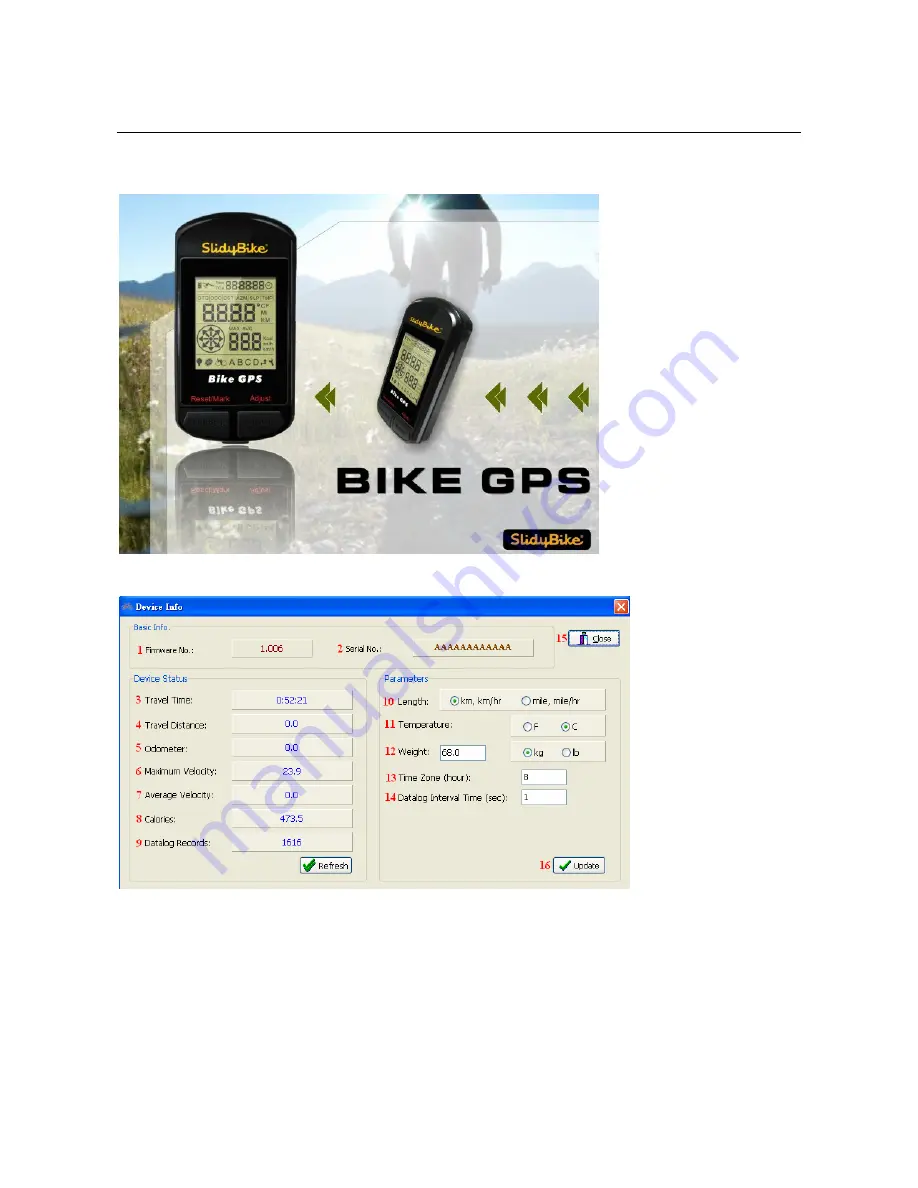
1.  Start the software: Start -> Programs -> SlidyBike GPS -> SlidyBike GPS Utility 

2.  Software startup screen: 


3.  Device information and settings 


(1) Firmware version 

(2) Device serial number 

(3) Travel time 

(4) Travel distance 

(5) Odometer:   

(6) Maximum velocity 

(7) Average velocity 

(8) Calories 

Summary of Contents for SlidyBike

Page 1: ...SlidyBike GPS User Manual...

Page 2: ...n to the Hardware 7 1 5 System Requirements 7 1 6 Basic Specifications 8 1 7 Installing the device cradle 9 2 USB Driver Installation 13 3 Bundled Software Installation 15 4 Bundled Software SlidyBike...

Page 3: ...hrough any method be it electronic or mechanical photographic records included except with the prior consent in writing of Sliding Bike Development Ltd Sliding Bike Development Ltd reserves the right...

Page 4: ...items of knowledge Please read through this user manual before operating the device The SlidyBike GPS is only intended to be an auxiliary device and can t be held legally liable for any accidents res...

Page 5: ...es By knowing the position and distance of al least 4 satellites it s possible to accurately calculate the receiver s current latitude longitude and elevation WAAS enhances the accuracy of your GPS WA...

Page 6: ...s manual will introduce you to the use and features of the SlidyBike GPS so you can optimize performance and take care of the device as well To ensure that you achieve the best performance and service...

Page 7: ...e AC charger Plug the AC charger into a power socket 2 The device can be on or off while charging A battery icon will appear while charging to show the current progress The number of blocks will incre...

Page 8: ...Push backlight on off Hold on 3sec marks locations and resets parameter settings Push 1 5 System Requirements Please check that your computer meets the following system requirements before installing...

Page 9: ...nd Positioning Accuracy Single unit positioning with no SA interference 10M Antenna Internal Power Supply Battery Type Rechargeable Lithium Battery 850mAh Endurance 11 hours under normal use with back...

Page 10: ...t 1 Device cradle 1 2 Rubber pad 1 3 Cable tie 2 Installing the device cradle on the horizontal bar 1 As shown in the figure insert the device cradle into the rubber pad 2 As shown in the figure inser...

Page 11: ...10 3 Fasten the cable ties around the horizontal bar of the bicycle 4 Cut off the extra cable ties 5 Upon completion insert BIKE GPS along the direction indicated by the arrow in the figure...

Page 12: ...le on the vertical bar 1 As shown in the figure insert the device cradle into the rubber pad 2 As shown in the figure insert the two cable ties into the device cradle 3 Fasten the cable ties around th...

Page 13: ...12 4 Cut off the extra cable ties 5 Upon completion insert BIKE GPS along the direction indicated by the arrow in the figure...

Page 14: ...13 2 USB Driver Installation Do not connect the SlidyBike GPS to the PC 1 Start Windows OS 2 Inset the Installation CD into CD ROM drive 3 The installation program will start automatically...

Page 15: ...dyBike GPS to the PC 1 Connect one end of the USB cable to the USB port on the PC 2 Connect the other end of the USB cable to the port on the base of the SlidyBike GPS 3 Hold down the power button on...

Page 16: ...ROM drive 3 The installation program will start automatically 4 Click SlidyBike GPS the installation program will start automatically 5 If it can t install please download the Windows Installer 4 5 f...

Page 17: ...the software Start Programs SlidyBike GPS SlidyBike GPS Utility 2 Software startup screen 3 Device information and settings 1 Firmware version 2 Device serial number 3 Travel time 4 Travel distance 5...

Page 18: ...9 Datalog records 10 Length unit 11 Temperature unit 12 Personal Weight 13 Time zone 14 Datalog interval time 15 Close the device information window 16 Update the settings...

Page 19: ...om the device to the map click the icon to download the POI saved in the device to the map Besides you can save the POI to your desktop computer by clicking the icon for others to upload to another BI...

Page 20: ...Click the save icon to save the POI on the map to the proper folder on your computer...

Page 21: ...e map by moving the POI icon A D around the map and later upload the POI to the device Click the POIs A D with your mouse and move them to your desired places Click the upload icon to upload the POIs...

Page 22: ...u may open the POI files saved in your computer and upload them to the device Click the open icon to open a POI file saved in your computer Click the upload icon to upload the POIs on the map to the d...

Page 23: ...screen Download the TurnPoint from the device to the map click the icon to download the TurnPoint saved in the device to the map As well you can save the TurnPoint to your desktop computer by clicking...

Page 24: ...e map Click the save icon to save the TurnPoint on the map to a proper folder on your computer You may edit the TurnPoints 1 50 on the map by adding or deleting TurnPoints on the map and later upload...

Page 25: ...To remove TurnPoints click the delete icon and click the Turnpoints you want to delete Click the upload icon to upload the TurnPoints on the map to the device...

Page 26: ...the TurnPoint files saved in your computer and upload them to the device Click the open icon to open a TurnPoint file saved in your computer Click the upload icon to upload the TurnPoints on the map t...

Page 27: ...Delete all the TurnPoints Click the clear all icons to remove all the TurnPoints on the map When all the TurnPoints have been deleted the screen shows the world map...

Page 28: ...route Click the download icon to download the route saved on the device To clear the route data saved on the device click the clear icon Click save icon to save the route downloaded from the device to...

Page 29: ...setup screens click the icon to enter the device information setup screen On the map screen click the map satellite mixed buttons to switch the map display mode When the network resources are not eno...

Page 30: ...00 00 00 4 TOA Time of Arrival When switched to Waypoint and Route display mode it shows the estimated time of arrival If current speed is under 5km hr there is no GPS fix or if distance to target is...

Page 31: ...etween 22 5 67 5 17 MAX Maximum speed Shows the maximum riding speed on record as mi h or km h 18 AVG Average speed Shows the average riding speed on record as mi h or km h 19 3 Digit Display 20 Calor...

Page 32: ...26 Route indicator Shows the location of the next destination 27 Setup Mode indicator Changes to Setup Mode when user enters setup mode...

Page 33: ...d this device Blinking icon means no fix or scanning A constantly lit icon means fix acquired or being acquired When there is no GPS fix time is displayed as distance as and speed as 6 2 Bike Mode Thi...

Page 34: ...idden so far shown as DST in MI or KM Current speed shown as mi h or km h Arrow pointing north 3 After pressing the Select button a second time the displayed items become Current riding time shown as...

Page 35: ...den so far shown as DST in MI or KM Average speed shown as mi h or km h Arrow pointing north 5 After pressing the Select button a fourth time the displayed items become Current Time in 24 hour format...

Page 36: ...ct button to cycle through waypoints A D When the Power button is pressed to exit or access this mode it will remember which waypoint A D was last displayed Estimated time of arrival shown as TOA Esti...

Page 37: ...B C or D a buzzer will sound 5 times lasting 1 second each time at 0 5 second intervals The arrow will also blink each time the buzzer sounds The user can press any button to stop the buzzer or wait...

Page 38: ...ng or entering Route mode the device will remember the last destination ID displayed When GPS fix has not been acquired time is shown as and distance as If speed is less than 5km hr time is shown as E...

Page 39: ...he recorder on and off as well The recording intervals can be configured through the bundled software For more information please refer to the software instructions 2 Turn LCD backlight on or off Hold...

Page 40: ...the display Blinking items include Time time display DST distance display MAX AVG speed display Kcal In Setup Mode pressing the Reset Mark button i e Start Stop button resets everything to 0 The 4 di...

Page 41: ...i h will be blinking as well If KM is blinking then km h will be blinking Pressing the Reset Mark button i e Start Stop button switches between metric or imperial units and they will continue to blink...

Page 42: ...aypoint and marks the current coordinates The calculated DTG should be 0 00 Once reset it will continue blinking Pressing the Select button for the second time Blinking items include MI or KM mi h or...

Page 43: ...Once reset it will continue blinking Pressing the Select button a second time Blinking items include MI or KM mi h or km h If MI is blinking then mi h will be blinking as well If KM is blinking then k...

Page 44: ...e not detected 1 Not enough time to scan for satellite signal 2 Device under cover 1 Check satellite icon to see if it is continuing to blink If it stops blinking it has acquired fix on satellites 2 K...

Reviews: