


17
4354
13
2022
-
SEP IP 60
Motor Installation
1. Insert the drive pin to the motor drive shaft. Insert the coupling to align with the drive pin in the motor shaft.
2. Install the motor onto the motor bracket ensuring the couplings are engaged together correctly (top and bottom).
(NB: The motor can be placed
in all directions on the motor bracket. However, ensure the cable terminals are accessible for electrical installation later.)
3. If you are installing the motor at an angle of more than 30 degrees off vertical, the motor will require separate/ additional support.
(NB: Do not
position supports on the motors top cap.)
4. Fasten the bolts holding the motor to the motor bracket with the above torque.
5. Check the drive shafts are engaged by rotating the propeller.
(NB: Rotating the propellers can be hard due to the gear reduction and the motor,
however the propeller must be able to rotate via hand power.)
MC_0043
!
Please refer to the graphic for special considerations relating to your model
!
IMPORTANT
The thruster motor assembly must be protected using suitable covering to avoid dust/debris ingress from fabrication/maintenance/shipbuilding
operations. On completion of operations, the cover must be removed before operating the thruster.
MG_0069
1
2
3
4
FASTEN
(18 Nm)
(13.28 lb/ft)
Drive Pin
Gasket
Turn gear leg shaft so
the motor coupling
fits into the slots.
Coupling
Motor support
> 30°
MC_0035
Electrical Installation
WARNING
After all electrical connections have been completed, turn off main switch and check the following with an ohmmeter:
1. There is no electrical connection between electro-motor flange and the positive terminal on the motor.
2. There is no electrical connection between electro-motor flange and the negative terminal on the motor.
If unsure contact skilled personnel.
1. Plan the location of electrical components before starting with the electrical installation. Main electrical components will typically consist of
battery, Automatic Main Switch (AMS) or manual main switch, Proportional Power Controller (PPC) and motor, see Wiring Diagram chapter for an
overview.
2. Estimate the total length of the power cables to determine the recommended cross section. The total power cable length is defi ned as
the distances from the positive battery pole, via fuse, main switch and PPC to the motor and all the way back to the negative battery pole.
Compromising the cable sections named B+, M- and B- on the drawing in the Wiring Diagram chapter.
3. Find the recommended power cable cross section for you installation by using the estimated total power cable length and the table shown in
Electrical Reference Guide
chapter
4. Find the recommended fuse size by using the table shown in
Electrical Reference Guide
chapter. Use slow blow rated fuses to hold stated nominal
current for minimum 5 minutes.
5. Use appropriate dimensioned battery with Cold Cranking Amps (CCA) according to recommendations in
Electrical Reference Guide
chapter.
Battery voltage must be compliant with the voltage rating of the thruster motor and control circuitry. Capacity and rated discharge current of
battery should be according to rated nominal current drawn and typical duty cycle for thruster operation. Nominal current drawn is listed in the
Cross Section Guide for Power Cables chapter. The actual voltage at the motor while running the thruster determines the motor RPM and thrust.
Use larger cable cross section and high-capacity battery for improved performance.
6. Install the cable from the as described in chapter Installation of Actuator Cable.
7. Install the PPC according to instructions in PPC Installation chapter.
8. Install and connect the battery, fuse, main switch and wiring according to instructions in Wiring Diagram chapter. For safety reasons it is always
recommended to install a fuse and a main switch on the power cables and as close as possible to the positive battery pole connection. The main
switch must be installed such that it is easily accessible to disconnect the thruster when not on-board or in the case of an emergency.
Follow the instructions in the Motor Lug Connection chapter when fastening the power cables to the motor.
Sleipner offers both manual main switches and Automatic Main Switches (AMS). Sleipner AMS is controlled by the control panel in addition to the
option of manual operation. Turning on the control panel does also turn on the automatic main switch. When the control panel is turned off the
automatic main switch is also turned off. This ensures that the control electronics and motor is only energized when the control panel is turned on.
Sleipner offers AMS supporting either S-Link or ON/OFF control panels. Ensure to select a main switch with voltage rating according to the chosen
motor- and battery-voltage. Note that the AMS requires separate power supply which should be protected by a dedicated fuse.
MG_0535
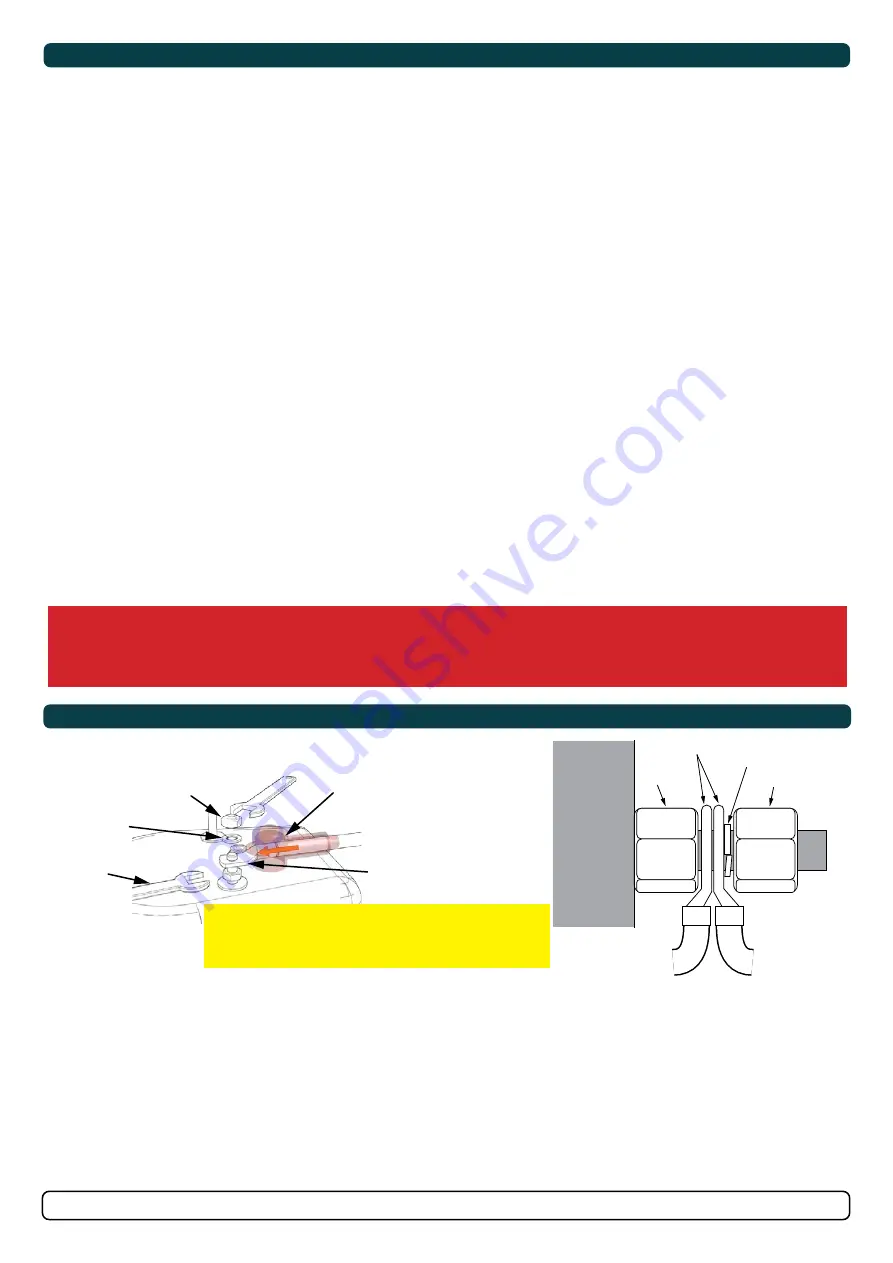
Product Lug Connection Configuration
Nut
Tighten to
18Nm/ 13.8lb/ft
washers
Isolation Cap
Lugs
Hold in place for
securing the end nut.
Multi-lug
configuration
Ensure lug faces
are back to back.
Spring
washer
Nut
Nut
Lugs
IMPORTANT
Do NOT use washers between lugs, this causes overheating
and fire. Spring washers must be placed in the outer
position before tightening nut.